UPDATE 30th March 2022: I’ve updated the tutorial to include the use of Hotspot Node Buttons.
Overview
This “Little Bits” tutorial shows you a little trick on how to create a skin template that can be re-used on different tours without having to change or modify the skin.
It’s based on the premise that you have multiple tour projects and in each project you want to have one panorama node be the Home node. In one project this may be Node ID 1 in another project it could be Node ID 5 etc.
The skin would contain a ‘Home’ button that when clicked would take you to the desired Home node without having to update the skin.
At this time the skin editor does not have an option to create an Action that does this so we will use a little workaround, using Direct Node Access, to achieve the result we want.
Note: this tutorial is designed for Pano2VR V6.0.5 You can download the software here. As “Little Bits” tutorials don’t go into detail about Pano2VR operations a working knowledge of Pano2VR is an advantage.
Final Output
Tutorial Files
In the tutorial folder, ThisIsHomeNodes, there is an Asset Folder with 3 equirectangular panos. There is also a Project folder with a Pano2VR project 'thisishomenodes.p2vr', a skin 'thisishomenodes.ggsk' and an output folder called 'This-Is-Home-Nodes' with the basic production output. (Figure #1)
Figure #1: Tutorial Folder
Project Overview
In this tutorial we will modify the thisishomenodes.p2vr project file and the thisishomenodes.ggsk skin by;
Adding a Custom Node ID to one of the 3 nodes in the Tour Browser
Setting our output to include ‘Direct Node Access’
Adding an Action to the Home button to directly access that node
Adding Actions to the previous/next buttons to resolve an issue with Direct Node Access
Adding Actions to the ht_node Hotspot Templates to resolve an issue with Direct Node Access
Note: this tutorial assumes a basic knowledge of Pano2VR V6
Note: click on any image in the tutorial to enlarge it
Getting Started
1. Download the zipped tutorial folder here
2. Open the project file ThisIsHomeNodes.p2vr (Figure #2)
Figure #2: ThisIsHome project
Custom Node ID and Direct Node Access
1. Select Numbered Panos2 to make it active. Click on the User Data button in the menu to open the User Data panel and enter ‘home’ in the Custom Node ID field (Figure #3)
Figure #3: ThisIsHome Project
3. Right Click on the Numbered Panos2 and select ‘Set as Start Panorama’ from the popup menu (Figure #4)
Figure #4: Set Start panorama
4. In the Output panel click on the HTML option to open the dropdown menu. Click on the Edit Template button to open the HTML Template window and check Direct node access to enable it. (Figure #5)
Figure #5: Enable Direct node access
Note: With Direct node access enabled we can target Numbered Pano2 using it’s Custom Node ID set in set 1.
5. Save the Project and click on the Generate Output button to view the changes.
Note: the project opens on panorama node #2, the Home button has an alpha setting applied and does not have any actions. The previous and next buttons move through the 3 panorama nodes.
Add Pano Home Action
1. Click on the Edit Skin button to open the Skin Editor. Click on the dropdown arrow on the container to view its contents and click on the Pano Home element to show it’s properties.
The Pano Home element has a logic block on the Visible setting that hides it when the current node’s Custom ID is = to home and there are no Actions set. (Figure #6)
Figure #6: Skin Editor and Pano Home Properties
2. Add an Action to the Pano Home element that opens the Numbered Panos2 node by double clicking in the empty actions field to open the Action Settings window. Add the following settings and select OK; (Figure #7)
Source: = Mouse Click
Action: = Go to URL
URL: = index.html#home
Target: = _self
Figure #7: Pano Home Action
Note: as there is no option under ‘Open Next Panorama’ that would allow us to target the ‘home’ node we will use Direct Node access to target it. The _self option opens the new window in the existing one.
2. Save the skin and output the project again. Your project should be the same as the one below.
Note: If you click on either the next or previous button the Pano Home button becomes active and if you click on the Pano Home button the home panorama node opens, all good.
However , if you click again on either the next or previous button and click on the Pano Home button again nothing happens!
This is because the browser URL is already index.html#home and the button cannot reload the browser window. Fortunately there is an easy workaround!
Updating the Previous/Next buttons
Note: in order to make the Pano Home button work we will modify the actions on the Previous/Next buttons to use the Go to URL action instead of Open Next Panorama
1. Click on the Pano Next element to show it’s properties. Double click on the Mouse Click action to open the Action Settings window. Change the settings to the following and click OK; (Figure #8)
Source: = Mouse Click
Action: = Go to URL
URL: = index.html#$(next)
Target: = _self
Figure #8: Update Pano Next Action
2. Repeat for Pano Previous using the URL: = index.html#$(prev)
3. Save the skin and output the project again. Your project should be the same as the one below.
Note: Now when we move through the tour using the Previous/Next buttons clicking on the Home button takes us back to node 2.
However, If you click on either of the Node Hotspots the Home button will work but if you click on the Node Hotspot again clicking on the Pano Home button nothing happens.
This is because the browser URL is already index.html#home. In the next step we will resolve this issue
Updating the ht_node hotspot templates
Note: in order to make the Pano Home button work with the Point Hotspots we will modify the actions on the ht_node Hotspot Template by adding in a Go to URL action.
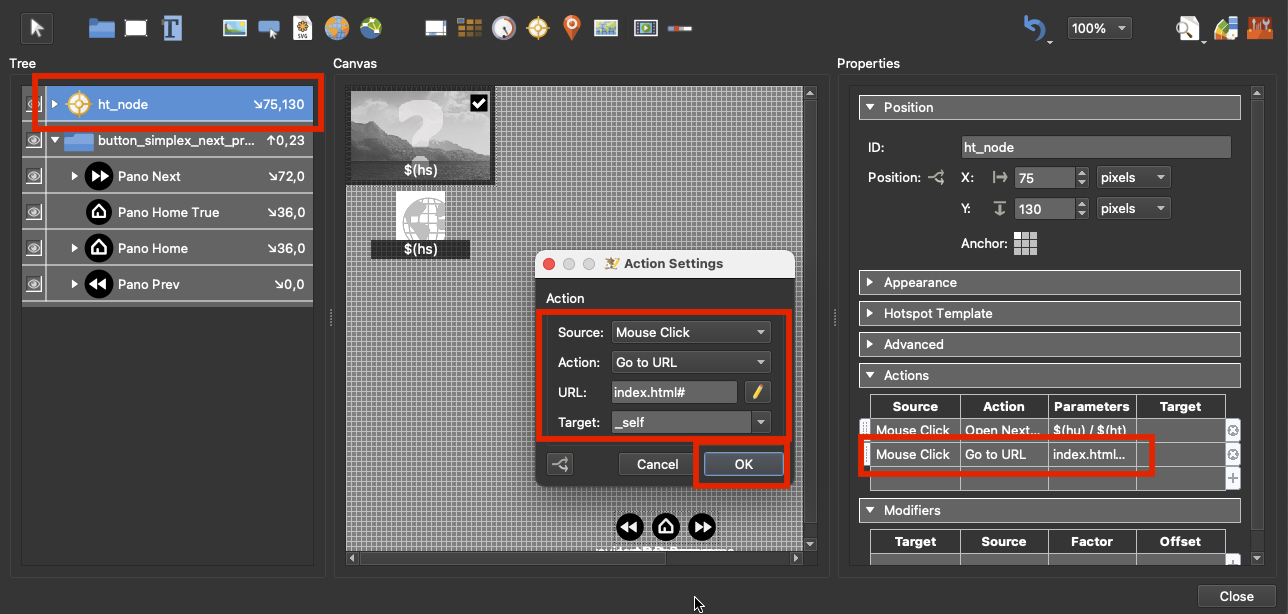
1. Click on the ht_node element to show the element properties. Open the Actions panel and double click in the blank Action field to open the Action Settings window. Add the following settings and click OK; (Figure #9)
Source: = Mouse Click
Action: = Go to URL
URL: = index.html#
Target: = _self
2. Select the new action and drag it above the existing action. (Figure #10)

3. Save the skin and output the project again. Your project should be the same as the one at the beginning of this tutorial.
Summary
You can save the skin element as a component and use it without modifications on other projects where you want the same home node actions.
I hope you have enjoyed the tutorial and it has helped you to achieve the best possible project outcome. If it has please take a second to consider a donation so that I can continue to add more tutorials.
