Overview
This “Little Bits” tutorial show you how to assign tags to individual nodes and use them to show information pertinent to that node.
Note: this tutorial is designed for Pano2VR V6.0.6. You can download the software here. As “Little Bits” tutorials don’t go into detail about Pano2VR operations a working knowledge of Pano2VR is an advantage.
Final Output
Tutorial Files
In the tutorial folder, Using Tag, there is an Asset Folder with Equirectangular files. There is also a Project folder with a Pano2VR project 'using-tags.p2vr', a skin 'using-tags.ggsk' and an Output Folder called 'Using Tags' with project files created from the .p2vr and .ggsk elements. (Figure #1)
Figure #1: Asset Folder
Project Overview
In this tutorial we will modify the using-tags.p2vr project file and the using-tags.ggsk skin by;
Adding Tags to each node
Configuring a drop down element
Creating a logic blocks that use tags to show/hide content
Note: this tutorial assumes a basic knowledge of Pano2VR V6
Note: click on any image in the tutorial to enlarge it
Getting Started
1. Download the zipped tutorial folder here
2. Open the project file ‘using-tags.p2vr’ in Pano2VR6.0.6 (Figure #2)
Figure #2: Base Project
Note: We are going to define each node as Lounge, Dining and Bedroom. In the skin will be a drop down information box that has a title matching one of the three locations and some placeholder text. As the user moves between nodes the title and text will change to reflect the location.
3. With the first node selected and the User Data panel open type the word ‘Lounge’ into the Tags text field then select ‘return’ on your keyboard to add the tag to the node. (Figures # 3 & 4)
Figure #3: enter ‘Lounge’ in the Tags: text field
Figure #4: Select return to add the tag to the node
4. Repeat for the second and third nodes using the Tags; Dining and Bedroom respectively.
5. Save the project file.
Editing the Skin - Adding the Titles
1. Click on the Edit Skin button to open the using-tags skin (Figure #5)
Figure #5: using-tags tutorial skin
Note: the first step is to add the location titles
2. Open the room-description-container and select the room-name-textbox to make it active (Figure #6)
3. With the room-name-textbox active open the Properties > Text panel and click on the Text: logic block arrow to open the Logic Block Settings window. (Figure #7)
4. Add 3 logic blocks with Trigger = Tags | Comparison = contain | Value = Lounge, Dining and Bedroom and Text: = Lounge, Dining and Bedroom. Leave the Default Value: Text: empty. Click 'Okay’ to save the Logic Block Settings. (Figure #8)
Figure #8: room-name-textbox Logic Block
5. Save the skin, and output the project. Now the room-name-textbox shows the location names as per the output below.
Edit the Skin - Adding the descriptions
1. Open the room-dropdown-container and select the room-description-textbox to make it active.
With the room-description-textbox active open the Properties > Text panel and click on the Text: logic block arrow to open the Logic Block Settings window.
Add 3 logic blocks with Trigger = Tags | Comparison = contain | Value = Lounge, Dining and Bedroom and Text: = Lounge: Text goes here. <p>Lorem ipsum dolor sit amet, consectetur adipiscing elit, sed do eiusmod tempor incididunt ut labore et dolore magna aliqua. Arcu dui vivamus arcu felis bibendum ut tristique et egestas. Non nisi est sit amet facilisis. Est lorem ipsum dolor sit..
Leave the Default Value: Text: empty. Click 'Okay’ to save the Logic Block Settings. (Figure #9)
Figure #9: room-description-textbox Logic Block
2. Save the skin, and output the project. Now the room-description-textbox shows the location descriptions as per the output below.
Edit the Skin - Configure the dropdown
Note: We will set the room-description-text off screen and enable the up and down buttons to reveal it.
1. Open the room-dropdown-container and select the room-description-textbox to make it active. In the Properties > Position panel set the Position: Y: to -270 (Figure #10)
Figure #10: Set the room-description-textbox off screen
2. Click on the Position: logic block button and set a logic block with Trigger = *vis_loc_text | Comparison = true | X: 0 | Y: 0 | Transition: Enabled = checked Time: = 1 second (Figure #11)
Figure #11: Set the logic block to position the room-description-textbox
3. Save the skin, and output the project. Now the up and down arrows show and hide the location descriptions as per the output below.
Note: if the description box is left in the ‘down’ position, when you change to the next node it retains its position but the text changes to reflect the location. In the next step we will make it automatically close on node change as per the final example at the start of the tutorial.
Edit Skin - Hide on Node Change
Note: before you start this section make sure nothing in the tree is selected.
1. Add an empty container to the skin (it position isn’t important). In the Properties > Position set the ID: to nodechange-setvariable (Figure #12)
Figure #12: adding an empty container to the skin and naming it.
2. With the nodechange-setvariable container selected add two actions to the Properties > Actions panel.
The first Action is Source: = Node Changed | Action: = Set Variable Value | Variable Name: = vis_loc_text | Operation: = Set(=) | Value: = False
Then you need to add an Action Filter to the Action Trigger = *vis_loc_text | Comparison = = | Value = true (Figure #13)
Figure #13 nodechange-setvariable Actions
The second Action is Source: = Node Changed | Action: = Visibility | Type: = Show Element | Target: = room-description-textbox (Figure #14)
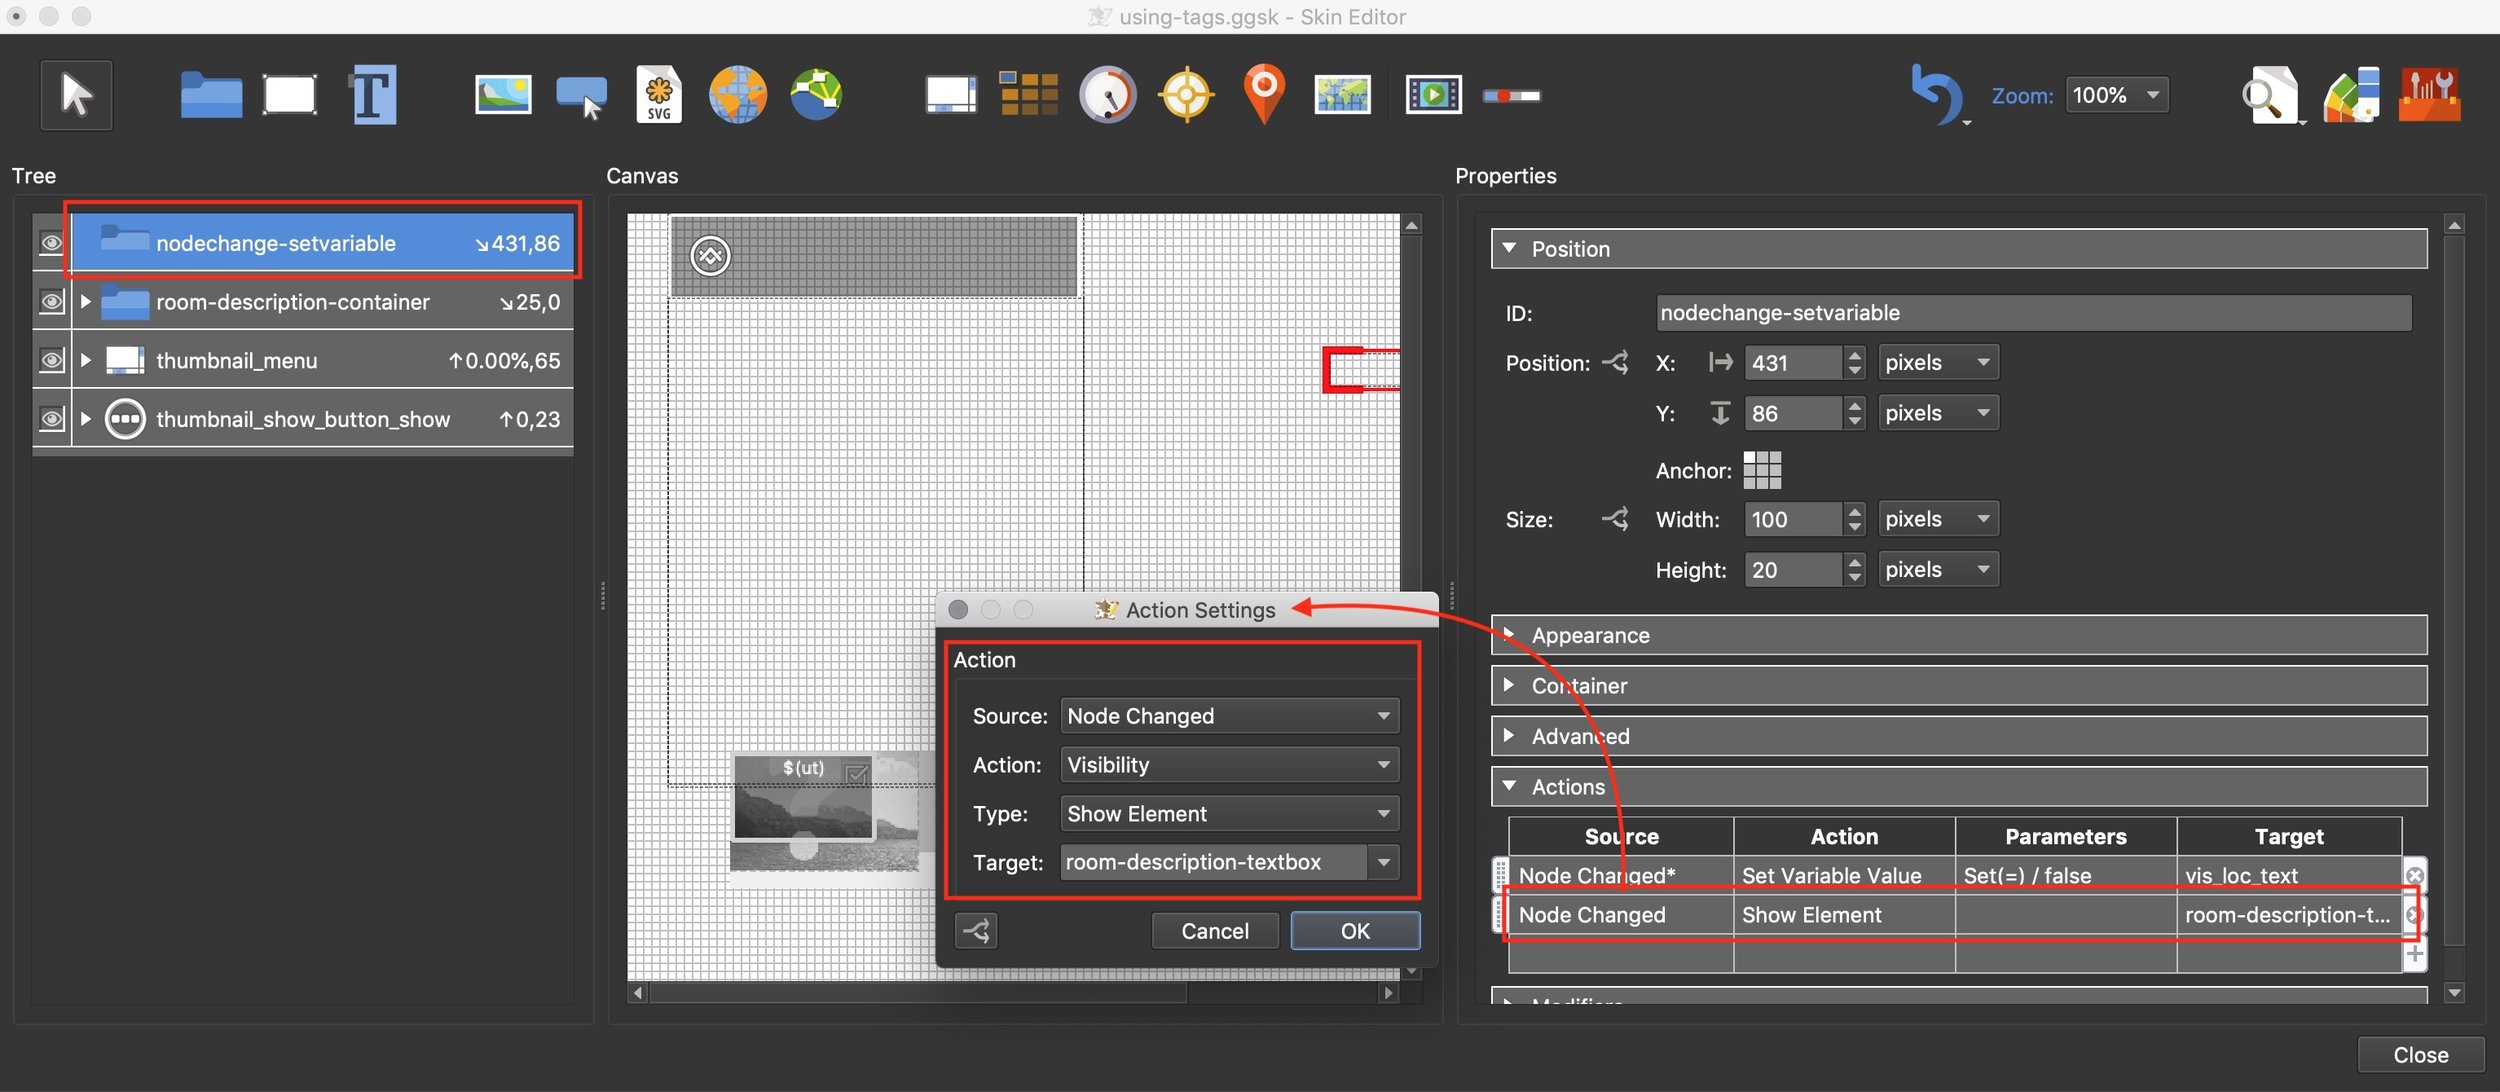
Figure #14 nodechange-setvariable Actions
3. Save and close the skin, save the project and output the project
Summary
I hope you have enjoyed the tutorial and it has helped you to achieve the best possible project outcome. If it has please take a second to consider a donation so that I can continue to add more tutorials.
