Update
This update details how to add the external HTML files to the assets folder in the output project using the Output > Advanced panel. Adding them this way a Garden Gnome Package Output will correctly show the HTML files in the iFrame.
Hotspots and iFrames
Using Point Hotspots to deliver contextual content is a great way to make your Virtual Reality tours more interactive and provide an enhanced experience for the viewer. A convenient way to create and deliver the content is by employing .html files and iFrames within the hotspots.
Note: rather than create and manage multiple hotspot templates this tutorial shows how to use a single point hotspot template and external .html files with multiple hotspots.
Example
The example screen images below, (figures 1, 2 &3), show the two 'info' buttons. As you mouseover the buttons individual titles are displayed and when the button is clicked on, two content popups provide different information about the panorama.
Figure #1: The 2 Information Buttons

Figure #2: Information #1 Velimir popup
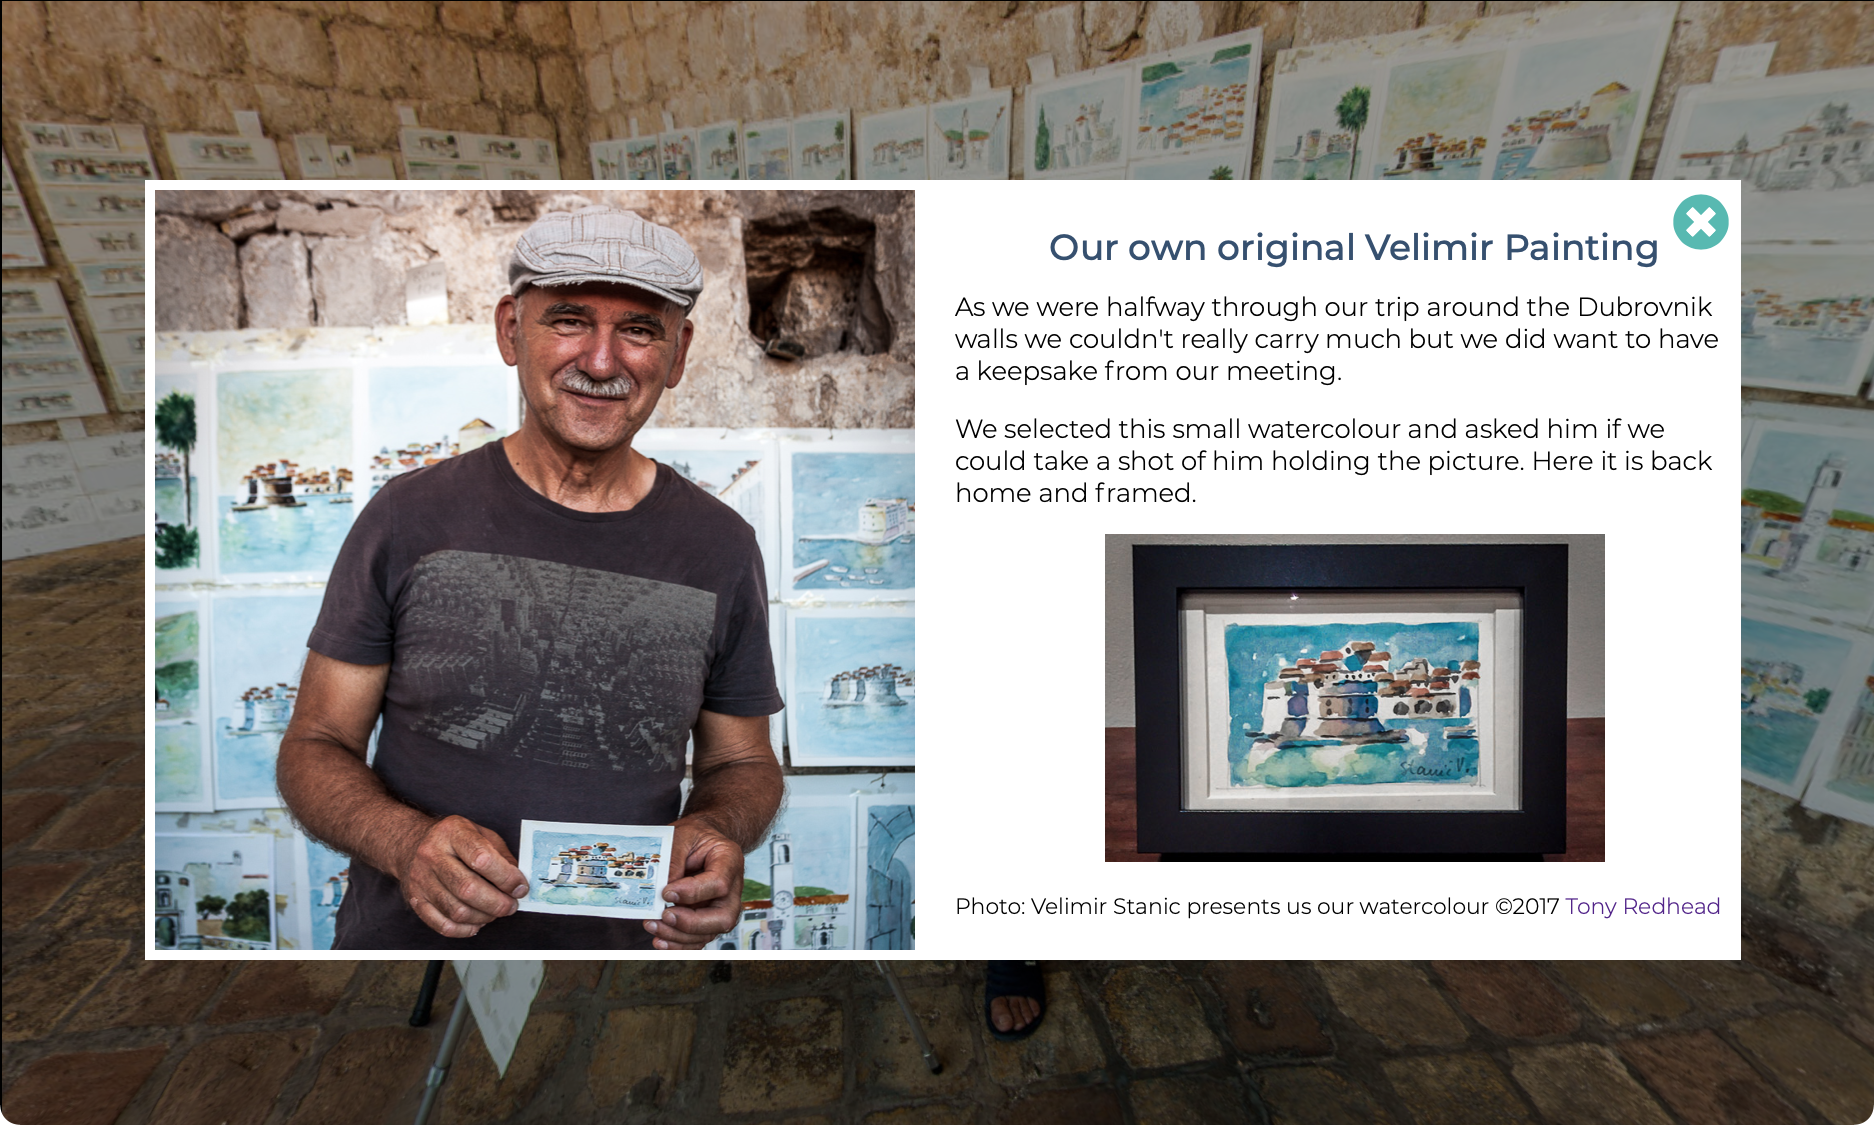
Figure #3: Information #2 Watercolour popup
Here is the final output:
Credits
The functionality that makes this tutorial possible was developed by a member of the Pano2VR Forum, mbb, in this post https://forum.ggnome.com/viewtopic.php?f=6&t=12858#p53677
Step 1. Getting Started
This tutorial doesn't cover all of the ins and outs of Hotspots rather it shows how a single hotspot template can be used to provide multiple links within a node showing different popup content for each link.
A basic understanding of Pano2VR is required to complete this tutorial.
Note: this tutorial is designed for Pano2VR Version 6
In this tutorial we will;
Import an equirectangular image into Pano2VR
Add two Hotspots
Create a skin containing a Hotspot Template
Add iFrame code to the Hotspot elements
Create Variables and Actions to manage the content within the Template
Add .html files to the project
Output the Project
Download the ‘include’ .html files here.
Step 2. Import the Equirectangular image and set up the hotspots
1. Open Pano2VR, import your equirectangular image, and set the default view (Figure #4)

Figure #4: Default view for the Equirectangular
2. Open the Viewer Modes and select the Point Hotspot mode (Figure #5)

Figure #5: Select Point Hotspot tool
3. Double click on the view area to position the first Point Hotspot (Figure #6)

Figure #6: Placing the first hotspot
4. With the Point Hotspot still active, in the Properties - Point Hotspot window set the Type to 'Info', This will allow us to access a built in component in the skin. (Figure #7)
5. Add a title, in this case 'The Artist, Velimir Stanic'. This will be used as a tooltip when there is a 'mouseover' on the button. (Figure #7)
6. Set the Link Target URL: to the name of your include '.html' file. In this example velimir.html is the name of my include file so I'll enter 'velimir' in the text field. (Figure #7)
Note; Pano2VR has an extensive list of placeholders.
To see all the placeholders visit the Pano2VR site
A placeholder is like a shortcut for using data or text from other sections of the software. For example, a text box in the skin may contain the placeholder $(hu). When the project is published the placeholder will display the text entered in the Link Target URL as shown below.

Figure #7: Point Hotspot properties for the 1st Hotspot
7. Right Click on the panorama and select 'Copy Active Point Hotspot' from the popup menu (Figure #8)

Figure #8: Copy Active Point Hotspot
8. Right Click on the panorama and select 'Paste Point Hotspot' (Figure #9)

Figure #9: Paste Point Hotspot
8. Position the Hotspot on the panorama (Figure #10)

Figure #10: Position the hotspot on the panorama
9. With the second Point Hotspot still active, in the Properties - Point Hotspot window change the title, in this case its 'The Watercolours' and set the Link Target URL: to the name of your include .html file. In this example watercolour.html is the name of my include file so I'll enter 'watercolour' in the text field (Figure #11)

Figure #11: Point Hotspot settings for 2nd Hotspot
Step 3. Setting the Output Type
1. Select HTML 5 as the Output Type
2. Create an Output Folder. In this example I'm creating a folder called Hotspot-Template in the same folder as my project Assets. (Figure #12)

Figure #12: Create the Output Folder
7. Select 'Create' to define the output folder path (Figure #13)

Figure #13: Output Settings
8. Save the Project. In this example I'm saving it into a new Project folder in the same folder as my project Assets and calling it Velimir-Stanic-Hotspots.p2vr
Step 4. Creating the Skin
1. Open the project if it's not already open
2. Open a blank skin in the Skin Editor by selecting the 'Edit Skin' button without selecting a skin from the dropdown menu
3. In this example I've set a Canvas size of 1,000 x 600 pixels (Figure #14)

Figure #14: Canvas settings
4. Select the 'Information Popup Silhouette' component from the Built-In component list (Figure #15)
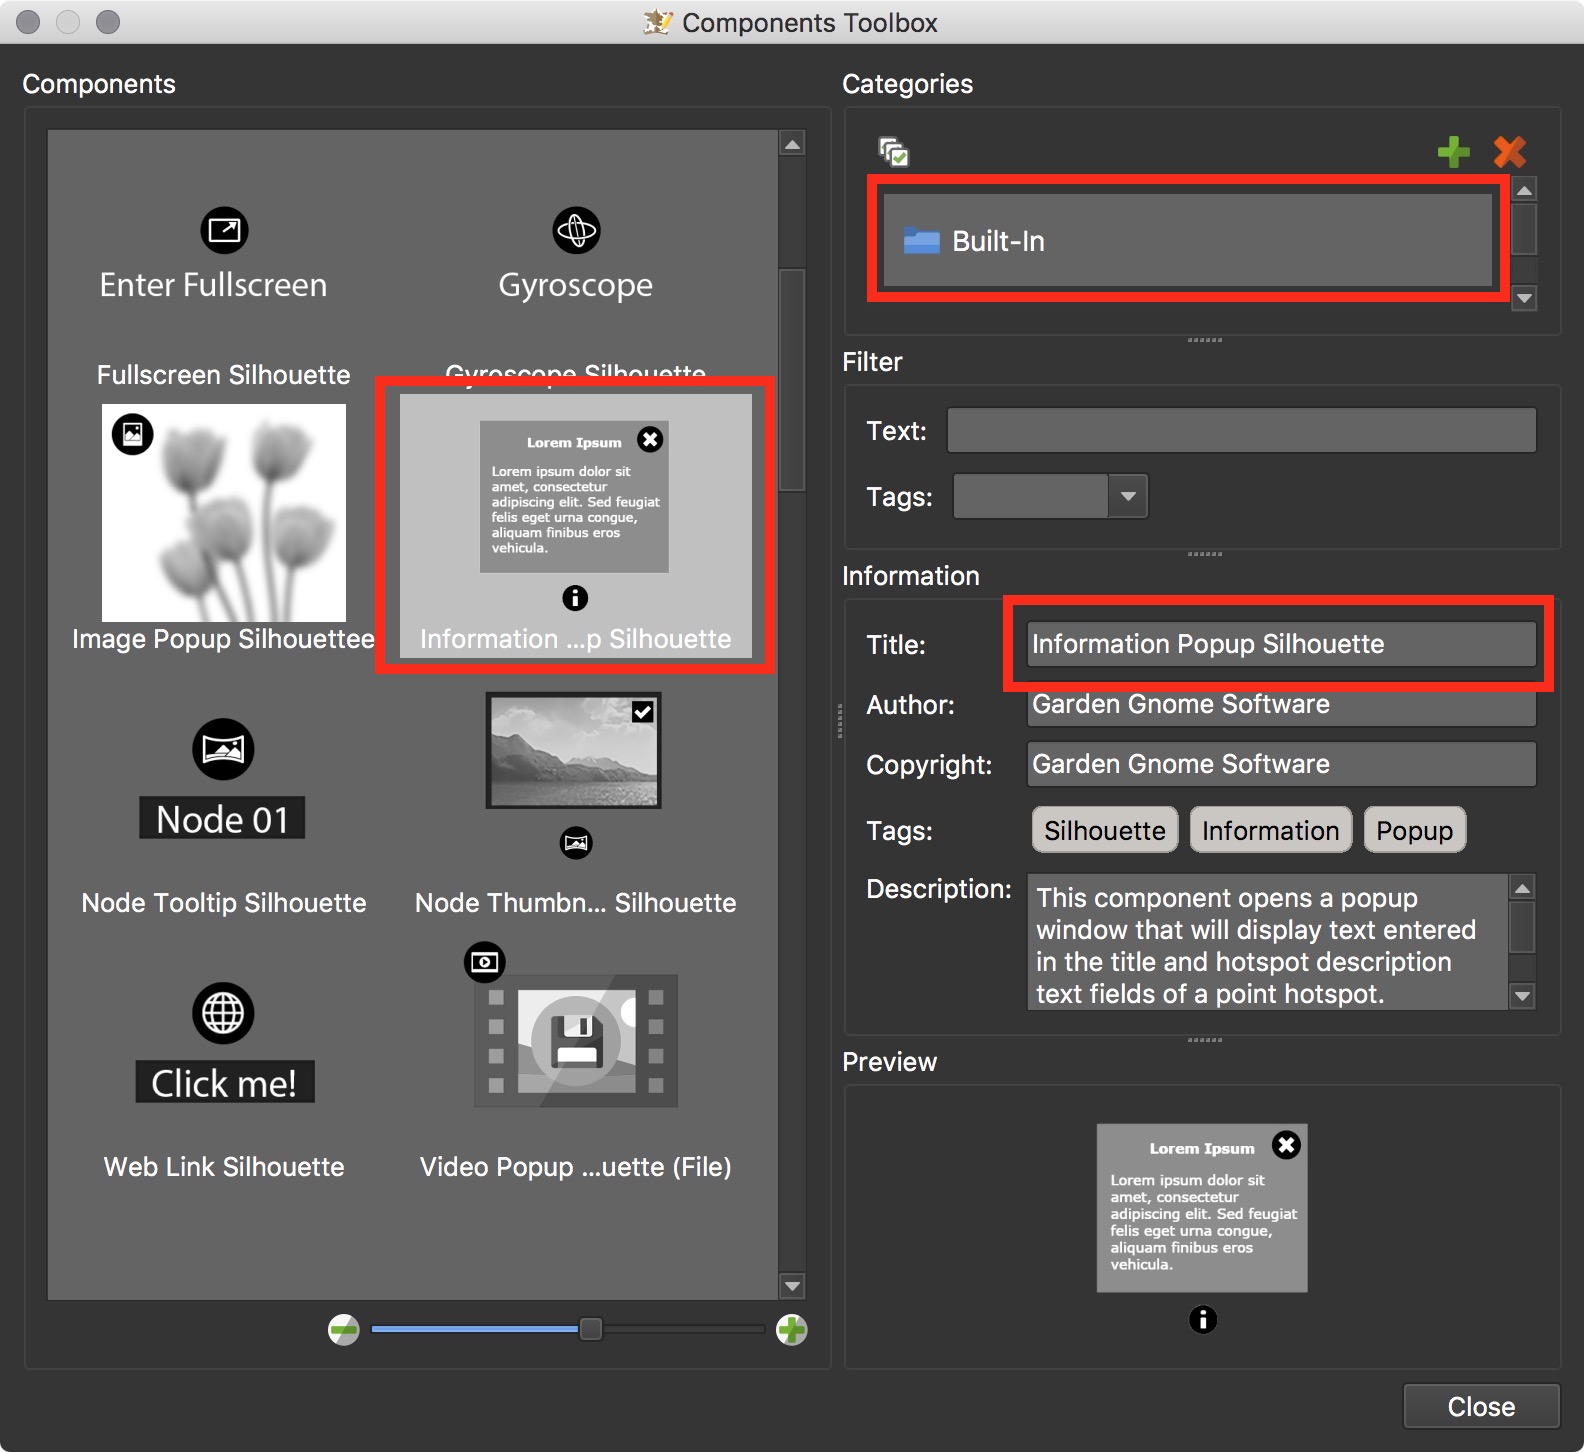
Figure #15: Select component
5. Double click on the component to add it to the skin (Figure #16)

Figure #16: Component added to the skin
6. At this point we can save the skin. I'm going to call it Hotspot-Template and save it into a folder called Skin in the same folder as the Assets and Project.
7. Close the Skin
Note: We need to close the skin so that the skin location is added to the project. You only need to do this once.
Step #5. Adding the Interaction
1. Re-open the skin
2. Add a new Variable, in this example I'm going to give it the name MyPageURL and the Type is 'Text' (Figure #17)
Note: this variable will be used to pass the text in 'Link Target URL' field to the iFrame code

Figure #17: MyPageURL variable
3. Click on the 'down' button next to the 'information' container in the Skin Tree to reveal the assets within the container
4. Highlight the text asset 'info_text_body'
5. Open the Text dropdown in the Properties panel
6. Enter the following text;
<iframe src="assets/includes/$(*MyPageURL).html" width="100%" height="100%" frameborder= "0" scrolling="no"></iframe>
The text will appear in the info_text_body field in the skin
Update 26/12/2018: Thanks to Carola de Poel from Panorama-Fotografie for her comment, and solution, re using .php files generated via a database. If you have a file, for example, ‘index.php?id=7’. and your Link Target URL is something like https://mywebsiteurl/index.php?id=7. Then change the iframe text to: <iframe src="$(*MyPageURL)" width="100%" height="100%" frameborder= "0" scrolling="no"></iframe> and drop the includes and the .html outside of the brackets.

Figure #18: iFrame text
7. Select the hotspot element 'ht_info' to make it active
8. Open the Properties/Actions dropdown panel
9. Double click on the Mouse Click | Set Value | $(hd) | info_text_body action. Change the settings in the Action Settings window to;
Source: Mouse Click
Action: Set Variable Value
Variable Name: MyPageURL
Operation: Set(=)
Value: $(hu) (Figure #19)
Note: when the hotspot is clicked this action will set the variable, MyPageURL, to the text entered in the 'Link Target URL' field. In our case either velimir or watercolor.

Figure #19:
10. Save the skin
Step 6. Testing the Interaction
1. Click on the 'Generate Output' button in the Output section of the Output panel to open the panorama in your default browser
2. Rolling over the hotspot buttons displays the individual tooltips text from the Point Hotspot Title Field
3. Clicking on a hotspot button will display the popup but only shows the entry from the Title field. (Figure #19)
Figure #19: Blank popup windows
Note: Because we don't have the includes folder and velimir.html and watercolour.html files in the Project Output folder the iFrame can't load any content and will display an error: File not found: assets/includes/velimir (or watercolour).html
It’s hard to see against the black background but it you select it you can hightlight it (figure#20)
5. In the project window expand the Output: Advanced panel (figure #21)
Figure #21: Advanced panel
6. Scroll to the bottom of the panel to the Assets section and click on the ‘+’ button (figure #22)
Figure #22: Add a folder to the assets
7. Navigate to the includes folder you extracted from the zip file, highlight the includes folder and select OK (figure #23)
Figure #23: Select to Add includes folder to assets
8. The includes folder is added to the Assets (figure #24)

Figure #24; Assets
Note: the next time the project is published these files will be copied to the assets folder in the output folder
9. Republish the project
10. Now content from the .html file is displayed in the popup (Figure #20)

Figure #20: Working popup windows
Note: once you have clicked on one hotspot and seen the content if you close the content popup the next time you click on a hotspot nothing is shown. This is because we need to reset the Variable 'MyPageURL' before we open another popup.
8. Open the Skin Editor if it's not already open
9. Highlight the info_popup_close button in the information container and, in the Actions dropdown, double click on the action Mouse Click | Set Value | info_text_body (Figure #21)

Figure #21: Mouse Click action for the Close button
10. In the Action Settings window, change the values to Mouse Click | Set Variable Value | MyPageUrl | Set(=) | 'don't add any value' and click OK (Figure #22)

Figure #22: Action Module
10. Once the action has been modified, right click on the action and select 'Copy'

11. Highlight the screentint_info asset in the tree.
12. In the Actions dropdown delete the action Mouse Click | Set Value | info_text_body
13. Right click over the empty action field and select 'Paste' to add the new action (Figure #23)

Figure #23: Paste in the action from info_popup_close
13. Save the Skin
14. Click on the 'Generate Output' button in the Output section of the Output window to open the panorama in your default browser.
The output should look and work like the panorama below.
Conclusion
So now we can have multiple hotspots in a panorama but only have to manage a single component in the skin editor. This allows us to make changes such as colour, size and have it reflected over every instance in our panorama or tour.
In my original example I have created two .html files using CSS and local Fonts. For more information please checkout some of my other tutorials including Styling with CSS.
Donations
I hope you have enjoyed the tutorial and it has helped you to achieve the best possible project outcome. If it has please take a second to consider a donation so that I can continue to add more tutorials.
