In Part 1 we reduced the number of screentint elements from 3 to 1 and we reduced the number of popup_close elements from 3 to 1
Now, in Part 2, we will do the same with the Hotspot Templates
In Part 2 of this tutorial we will modify the trimming-the-tree.p2vr file by;
Adding a unique value name for each Point Hotspot
Replacing the existing Hotspot Template images with custom images
and modify the trimming-the-tree.ggsk skin by;
Adding a Variable to store the unique value name
Consolidating the Actions of all Hotspot Templates into one Template
Adding Action Filters to manage the Actions based on the value of the current unique identifier name
Reducing the number of Hotspot Templates to 1
Applying colors to the screentint, information_bg and popup_close elements
Trimming 3: Hotspot Templates
1. If it’s not already open, open the trimming-the-tree.p2vr file saved at the end of Part 1 or used the saved trimming-the-tree-part1.p2vr in the Part1-Finished folder in the Tutorial Project folder.
Note: as we will be removing all but one of the Hotspot Templates and consolidating their Actions into one Hotspot Template we need each Point Hotspot to have a unique value that we can reference in the Action Filter.
When the Point Hotspot is clicked that value will be assign to a Variable and that Variable used in an Action Filter to manage the Actions .
2. In the Viewer, select the ht_info Point Hotspot and in the Properties > Point Hotspot > Target field enter the value ‘information’ (Figure #1)
Figure #1: ht_info Target = information
Note: To simplify the management of Point Hotspot images we will add some Custom Images to the Point Hotspots
3. With the ht_info Point Hotspot still selected click on the Custom Image Folder button, select the Info-Panel.svg from the Assets folder and select Open (Figure #2)
Figure #2: Adding the Info-Panel.svg as a Custom Image
4. Set the Custom Image: Width & Height to 40 (Figure #3)
Figure #3: Setting Custom Image size
5. Select the ht_video_youtube Point Hotspot, and in the Properties > Point Hotspot > Target field enter the value ‘video’, then click on the Custom Image Folder button and select the Play_Video.svg from the Assets folder and set the Custom Image: Width & Height to 40
4. Pan around and select the ht_url Point Hotspot, and in the Properties > Point Hotspot > Target field enter the value ‘web’, then click on the Custom Image Folder button and select the Web_URL.svg from the Assets folder and set the Custom Image: Width & Height to 40
5. Save the Project and open the Skin Editor
Note: to use the unique value assigned to each Point Hotspot we need to add a new Variable that store the value.
6. In Properties > Variables create a new Variable with the following parameters; Name: hotspot_type | Type: Text (Figure #4)
Figure #4: New Variable hotspot_type
Note: the next step is to consolidate all of the Hotspot Template Actions into one Hotspot Template. In this exercise the ht_info Hotspot Template will hold all the Actions.
Even though we have 3 Point Hotspots in the Panorama we can manage them through one Hotspot Template. By reducing the number of Hotspot Templates it places all of our Actions in one place making it easier to debug and manage our work.
7. Select the ht_url Hotspot Template and open the Properties > Actions dropdown menu
8. Shift select all of the Actions, right click on the active fields and select Copy (Figure #5)
Figure #5: Copy all of the ht_url Hotspot Template Actions
9. Select ht_info Hotspot Template and open the Properties > Actions dropdown menu
10. Right click in the empty field at the bottom and select Paste to add the three Actions (Figure #6)
Figure #6: ht_info Hotspot Template Actions updated with ht_url Hotspot Template Actions
11. Repeat steps 7 - 10 for the ht_video_youtube Hotspot Template and add the two Actions. (Figure #7)
Figure #7: ht_info Hotspot Template Actions updated with ht_video_youtube Hotspot Template Actions
Note: in the same way that we had to add Action Filters to the screentint element Actions in Part 1, we have to do the same to the ht_info Hotspot Template Actions.
In this case the Action Filter will be Trigger: *hotspot_type | Comparison: = | Value: information or video or web depending upon the Point Hotspot Actions selected.
Before we do that we need to create a new Action that adds the unique value to the hotspot_type Variable when the user clicks on the Point Hotspot.
12. Double click in the empty field in the ht_info Hotspot Template Properties > Actions dropdown menu
13. In the Action Settings window set the following;
Source: Mouse Click
Action: Set Variable Value
Variable Name: hotspot_type
Operation: Set(=)
Value: $(ht)
Note: the values we want to use were entered in the Target field of each of the Properties: Point Hotspot. The Target field content can be obtained by using the Placeholder $(ht) (Figure #8)
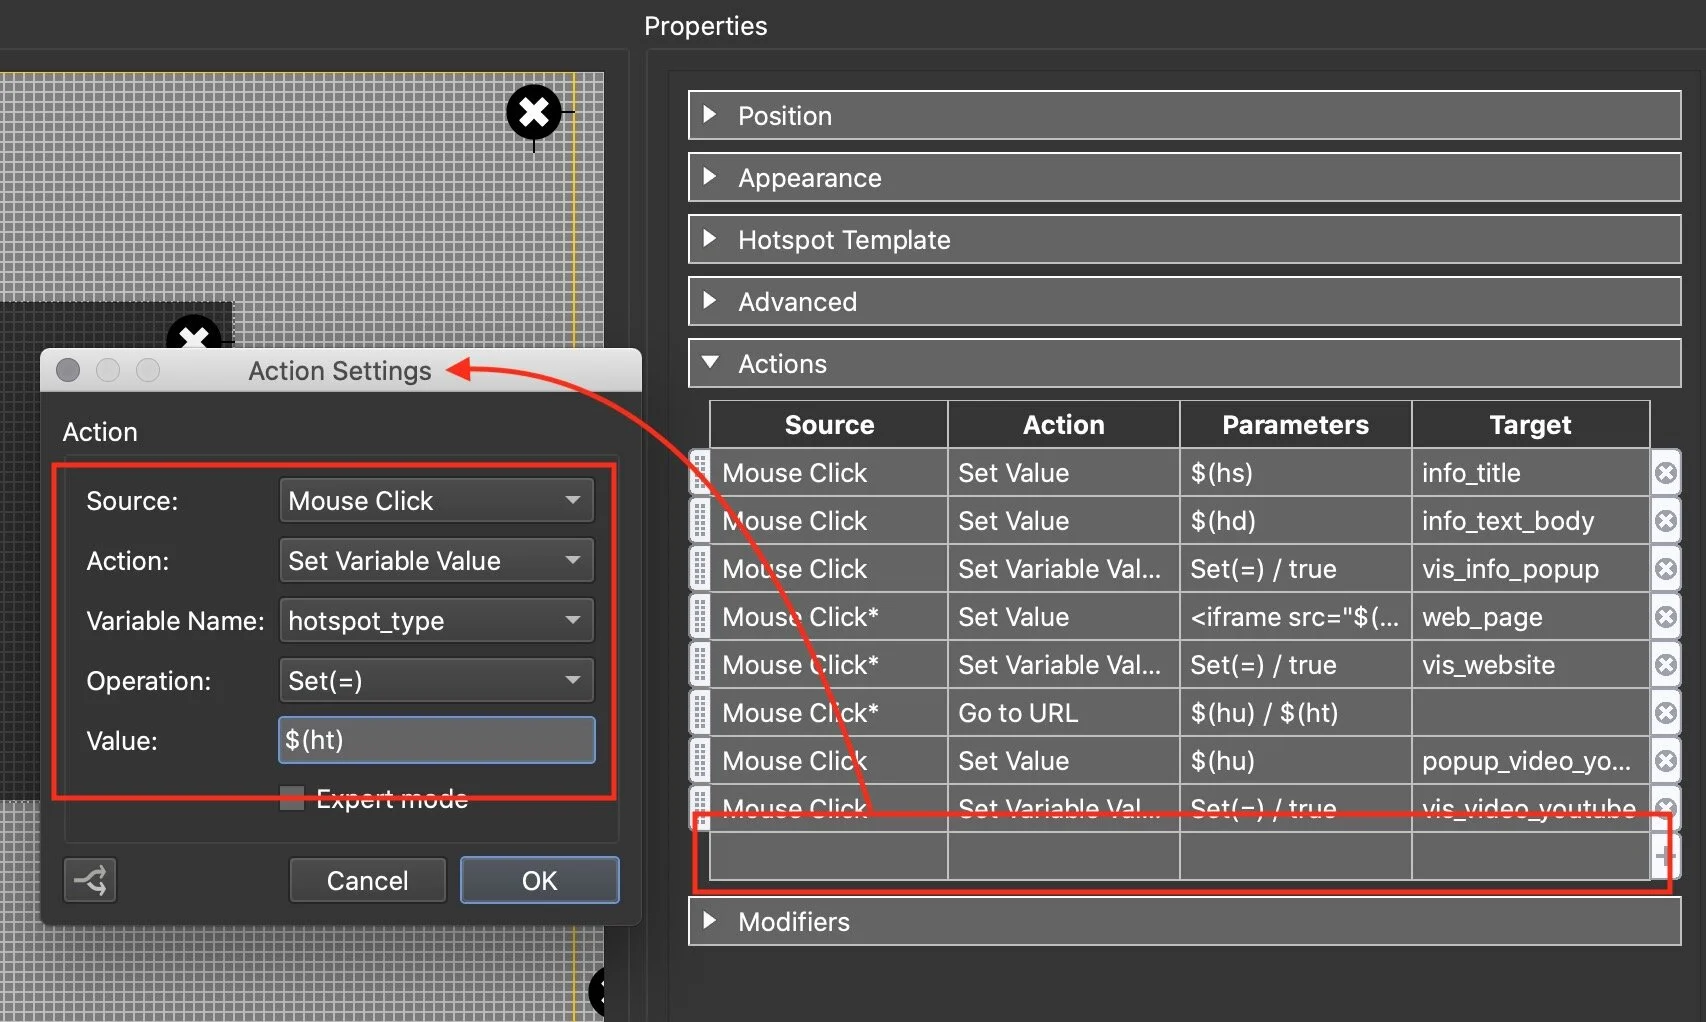
Figure #8: Create new Action
Note: we want to use the content of the hotspot_type Variable as a Trigger in the Action Filter applied to the Hotspot Template Actions. To do so we need to move the new Mouse Click Action to the top of the list so it is actioned first.
14. Move the Mouse Click | Set Variable Value | hotspot_type Action to the top of the list (Figure #9)
Figure #9: Mouse Click | Set Variable Value | hotspot_type Action move to the top
Note: the next step is to apply Action Filters to the rest of the Mouse Click Actions.
15. Double Click in the 2nd action field from the top (target=info_title)
16. Click on the Action Filter button in the Action Settings window
17. In the Action Filter window add the Trigger: *hotspot_type | Comparison: = | Value: information and click on OK
Note: As the next two Actions relate to the same Point Hotspot before you click OK you can click on Copy to copy the Trigger to the clipboard. (Figure #10)
Figure #10: Action Filter for the ‘info’ hotspot
18. Double click on the 3rd action field from the top (target=info_text_body), click on Action Filter button and select Paste and then click on OK (Figure #11)
Figure #11: Paste copy of Action Filter
19. Repeat step 18 for the next Action (4th field from the top) (target=vis_info_popup)
Note: the next 3 Actions (copied from the ht_url Hotspot Template) (target = webpage; vis_website; blank) already have an Action Filter assigned to them. The Action Filter contains two Triggers. We need to maintain these Triggers and add our new one to them. (Figure #12)
Figure #12: Existing Action Filter Triggers for the ht_url Hotspot Template
20. Double Click in the 5th Action field from the top (target = web_page)
21. Click on the Action Filter button in the Action Settings window
22. In the Action Filter window click in the empty field and add the Trigger: *hotspot_type | Comparison: = | Value: web | Operation: And (Figure #13)
Figure #13: New Trigger added
Note: as there are already Triggers in the other two ht_url Hotspot Template Actions using Copy would copy all the Trigger fields. In this instance we will only copy the new Trigger field.
23. Right Click in the field with the *hotspot_type Trigger and select Copy from the popup menu and then click on OK to update the Action Filter (Figure #14)
Figure #14: Copy single Trigger field
24. Double Click in the 6th Action field from the top (target = vis_website)
25. Click on the Action Filter button in the Action Settings window
26. In the Action Filter window right click in the empty field and select Paste
27. Double Click in the 7th Action field from the top (action = Go to URL)
25. Click on the Action Filter button in the Action Settings window
26. In the Action Filter window right click in the empty field and select Paste27. Double Click in the 7th Action field from the top (action = Go to URL)
25. Click on the Action Filter button in the Action Settings window
26. In the Action Filter window right click in the empty field and select Paste
Note: as the Action Filter for the Action Mouse Click | Go to URL } $(hu)/$(ht) | has an ‘Or’ option between the two triggers we need to add two *hotspot_type Triggers
27. Repeat #26 in the next empty field
28. Drag the first hotspot_type trigger between the *opt_url and Has Touch triggers
29. Set the Operation to And; Or; And (Figure #15)
Figure #15: Action Filter for arrangement for ‘Or’ option
30. Double Click in the 8th Action field from the top (target = popup_video_youtube)
31. Click on the Action Filter button in the Action Settings window
32. In the Action Filter window add the Trigger: *hotspot_type | Comparison: = | Value: video, copy the Trigger and click on OK (Figure #16)
Figure #16: Add and copy Trigger
33. Double Click in the 9th Action field from the top (target = vis_video_youtube)
34. Click on the Action Filter button in the Action Settings window
35. In the Action Filter window right click in the empty field and select Paste and click on OK
Note: except for the first Action every other Action should now have a asterisk next to the Source type (Figure #17)
Figure #17: Hotspot Template Actions with asterisks indicating Action Filters
36. Delete the ht_url and ht_video_youtube Hotspot Templates and their content.
37. In the ht_info Hotspot Template delete the ht_info_image element
38. Change the name of ht_info Hotspot Template to global_hotspot so our finished trimmed tree looks like the image below (Figure #18)
Figure #18: Finished Trimmed Tree
33. Save the skin and republish the project (see below)
Note: at this point if your ‘web’ link is opening the website in a new page check to see the status of your Edit Skin Configuration.
The ht_url component is V6 compatible and it’s default option is to open the website in a new window. Click on the Skin Configuration button and check to see that the Skin Parameter: ‘Open URL hotspot in frame:’ is checked. (Figure #19)
Figure #19: Skin Configuration button
Trimming 4: Set UI Colors
Note: lets just finish off and set the color of the UI elements to match the customimages. Rather than change multiple versions of the close button and text thumbnail we only have to change one now!
We will also change the color of the information_bg and screentint
The hexidecimal code for the color is #008cff
1. If the Skin Editor isn’t open, open it
2. Select the popup_close element and click on the Color Tool to open the Change Colors window
3. Click on the dropdown arrow next to the Original Color (Black)
4. Double Click on the Svg Elements Fill area to open the Select Color window
5. Paste the code #008cff into the HTML: field (Figure #20)
Figure #20: Select element, open Change Color window, select color to change, add new hexidecimal code
6. Click OK to apply the new color (Figure #21)
Figure #21: The new color is applied to the element and is automatically passed on to other clone version in the Node Markers
7. Select the tt_information element and click in Properties > Rectangle > Background > Color: color picker to open the Select Color window
8. Paste the code #008cff into the HTML: field and select OK to update the element (Figure #22)

Figure #22: Update color of the tt_information element
9. Select the information_bg element and click in Properties > Rectangle > Background > Color: color picker to open the Select Color window
10. Paste the code #008cff into the HTML: field and select OK to update the element (Figure #23)
Figure #23: Update color of the information_bg element
11. Select the screentint element and click in Properties > Rectangle > Background > Color: color picker to open the Select Color window
12. Paste the code #008cff into the HTML: field and select OK to update the element (Figure #24)
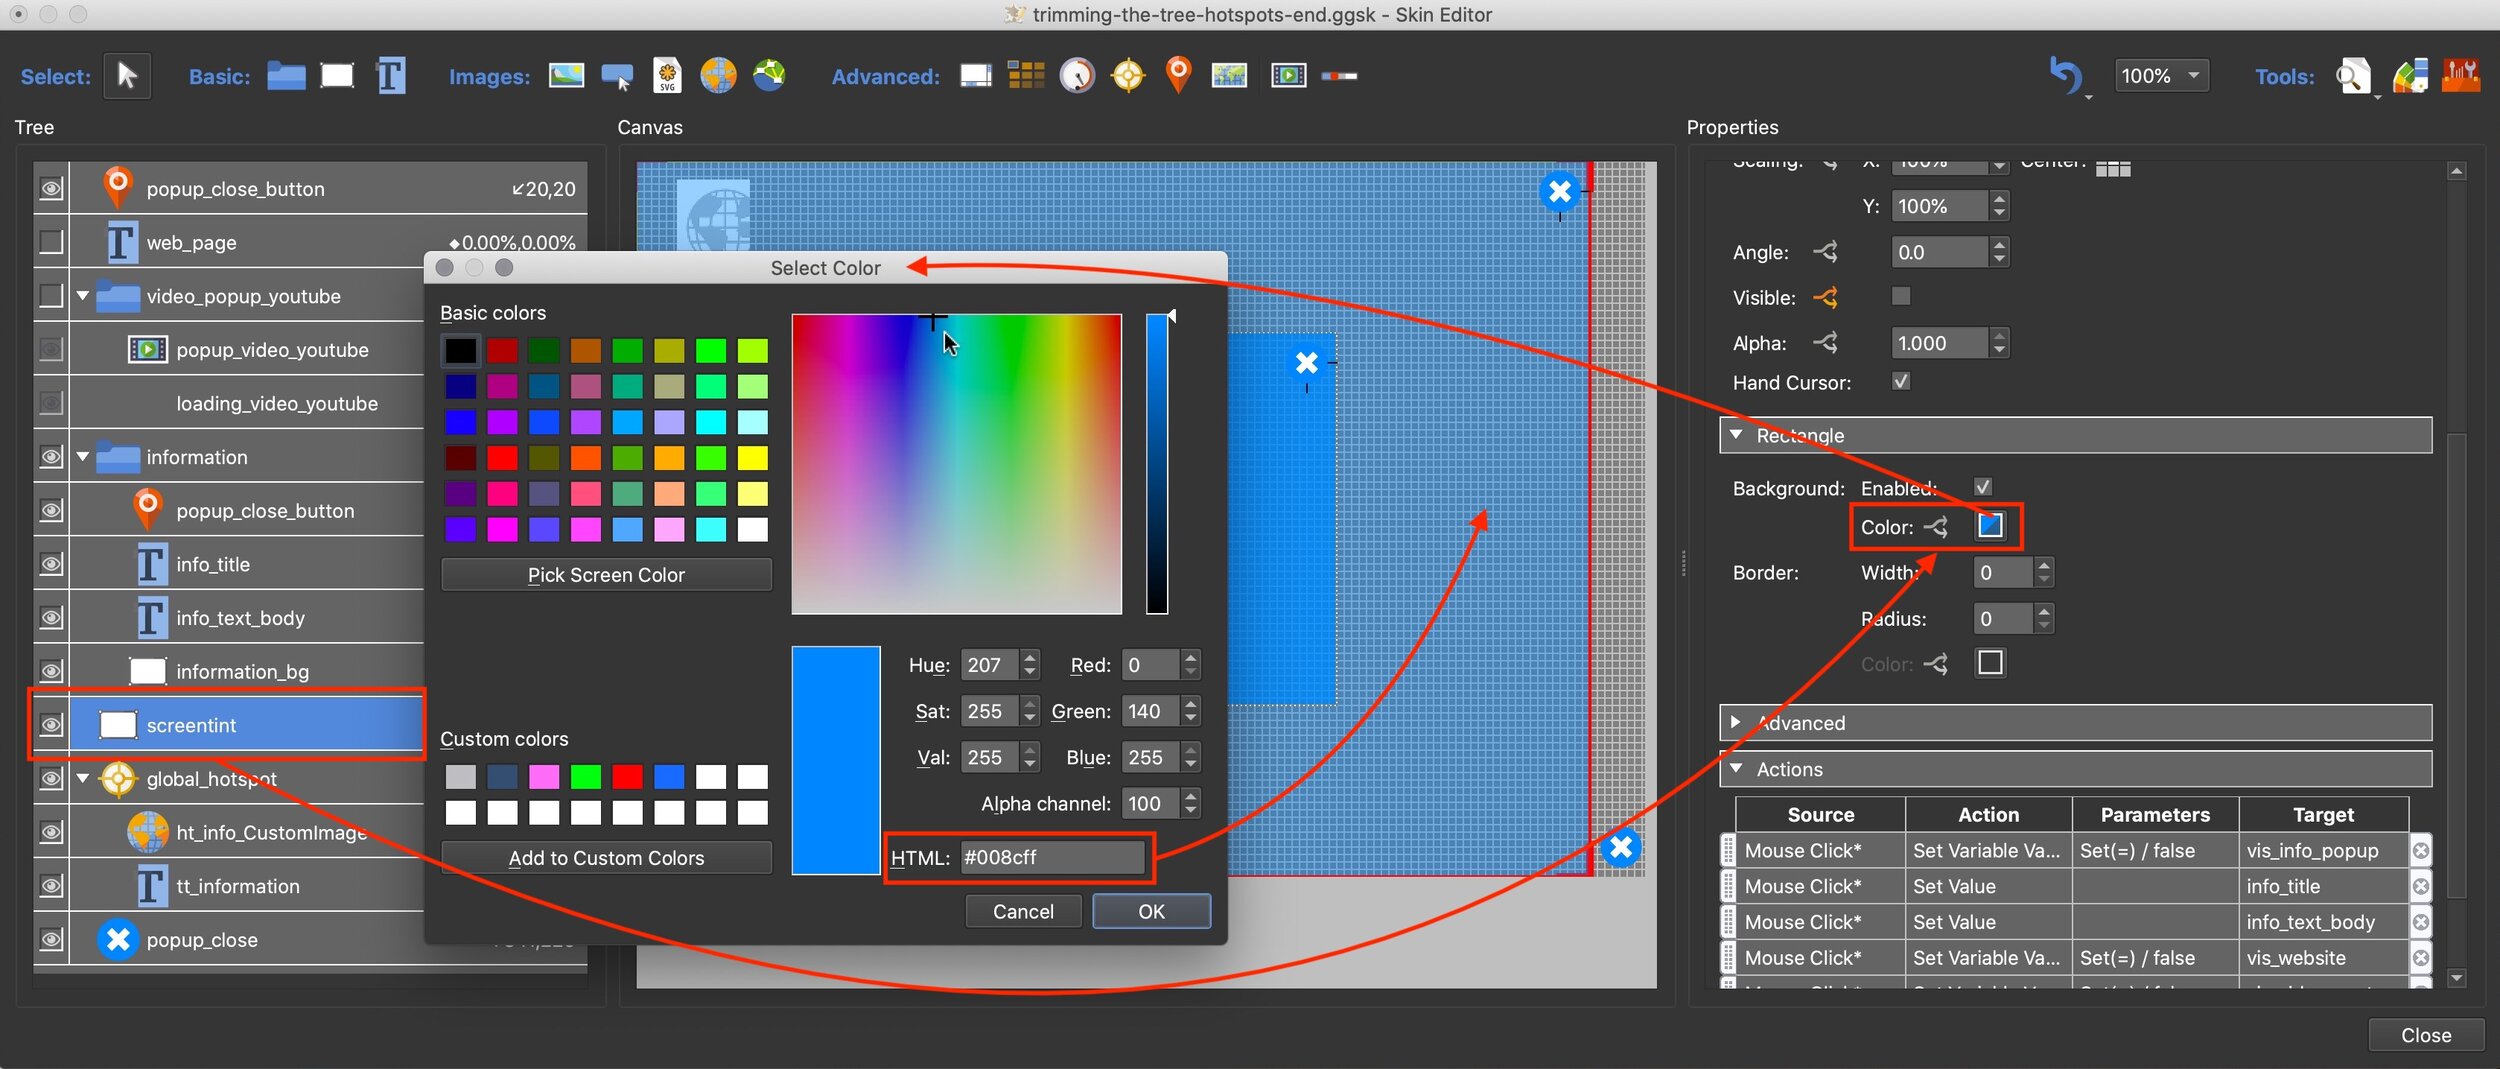
Figure #24: Update color of the screentint element
13. Save the Skin and republish the project (see below)
Summary
I hope you have enjoyed the tutorial and it has helped you to achieve the best possible project outcome. If it has please take a second to consider a donation so that I can continue to add more tutorials.
