After a number of requests follow the publication of my tutorial Offline Virtual Tours for iOS using Adobe PhoneGap Build I've added this tutorial for those of you wanting a simple way to show your Virtual Tours on your Android device.
In some ways it's similar to and uses sections from the iOS version but is much simpler due to the fact that you don't have to have a developers license or create a set of certificates.
Before we start:
The assets supplied as part of this tutorial, include basic Pano2VR V5.2.3 and Krpano projects. Both contain the same 'grid' panorama so you are free to use whichever one you want.
You can download the Android Asset zip and then follow along using the files included.
Preparing our Project
The beauty of the PhoneGap solution is that we can use all the standard files from either Pano2VR or Krpano output without having to make any modifications whatsoever. All we need to do is add a congif.xml file and some icons and splash screens for the Android platform into the folder containing our project.
Note: I'm not going to explain how the config.xml is structured but the one supplied in the assets will give you a good idea of what's required. If you would like to know more please visit the PhoneGap Document site Configuring or alternatively there are a number of videos such as this one 'config xml for PhoneGap Build Part 8' on YouTube.
The other thing to remember with the config.xml file is that it's designed to integrate and support functionality that you may include in a bespoke app development. As we are not modifying our exported projects to use the various PhoneGap/Device plugins or settings our config.xml file is quite basic.
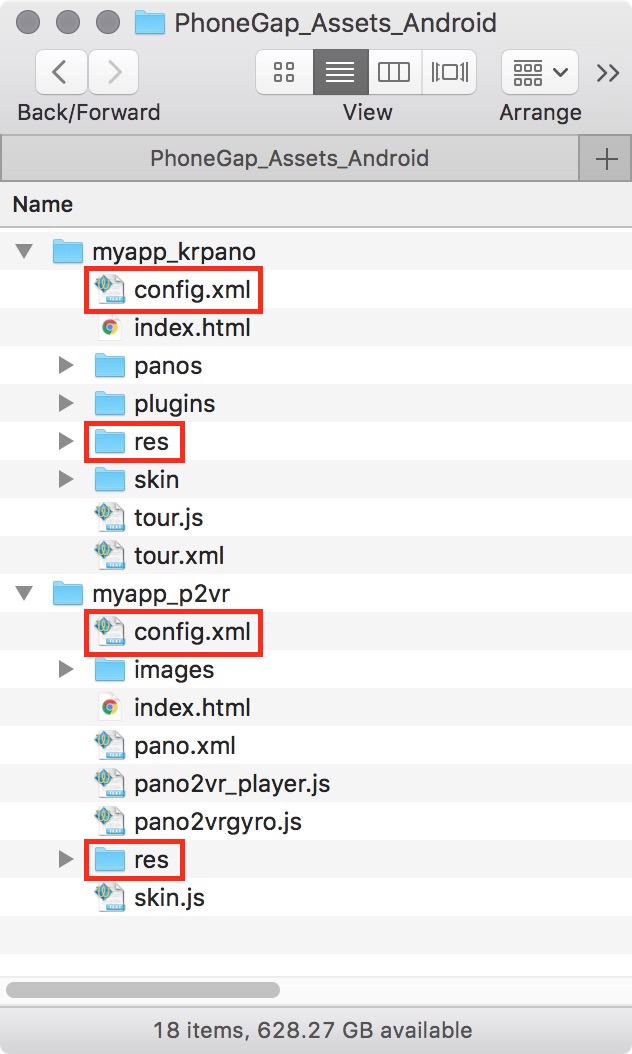
The following image shows the contents of the PhoneGap_Assets_Android folder. Aside from the highlighted config.xml file and the res folder both the myapp_krpano and myapp_p2vr contain normal output files. The Krpano project was output using krpano-1.19-pr14 'MAKE VR TOUR (NORMAL) Droplet.app and the Pano2VR project was output from Pano2VR V5.2.3 (figure #1)
figure #1: Contents of the PhoneGap_Assets_Android folder
Note: Both projects require an index.html. If you are using a Krpano VTour droplet make sure to change the tour.html to index.html. If you don't you will receive an error when you try and build the app.
Config.xml
1. Open the 'config.xml' file from the project folder you intend to use, in a text editor. I use TextWrangler but you can use whatever text editor you like. (figure #2)
- The contents of the <name> tag will be used by PhoneGap as the name of the app
- The contents of the <author> tag can be changed to your own email and domain setting
figure #2: config.xml file
2. Make any required changes to the <name> or <author> tags and resave the config.xml file overwriting the old one
Icons and Splash Screens
Note: in the config.xml you will see a tag <platform name = "Android">. This section contains links to the Android icons and splash screens. For this tutorial I've just made a number of simple generic graphics using the PhoneGap logo.
You can find these images in myapp_(pano2vr|krpano)/res/icons/android in each project folder.
If you wish to generate some graphics of you own I'd recommend the online PhoneGap Resource Generator it's the application I used to generate the graphics in the tutorial project (figure #3)
figure #3: Android icons
3. Once you have everything you need in your selected project folder you can right click and select Compress "myapp_**". (figure #4 & #5)
Note: in this example I'm going to use the myapp_krpano
figure #4: Select Compress
figure #5: Zip ready for upload
PhoneGap Build Sign in
With our zip file ready we can log into PhoneGap Build and create our app.
You will need an Adobe ID to login to PhoneGap Build, if you already have an Adobe ID you can skip forward to step #7. If you don't have an Adobe ID you can set one up within the Adobe PhoneGap Build application.
1. Browse to the URL https://build.phonegap.com (figure #1) and select "Get Started" (figure #6)
figure #6: PhoneGap Build - get started
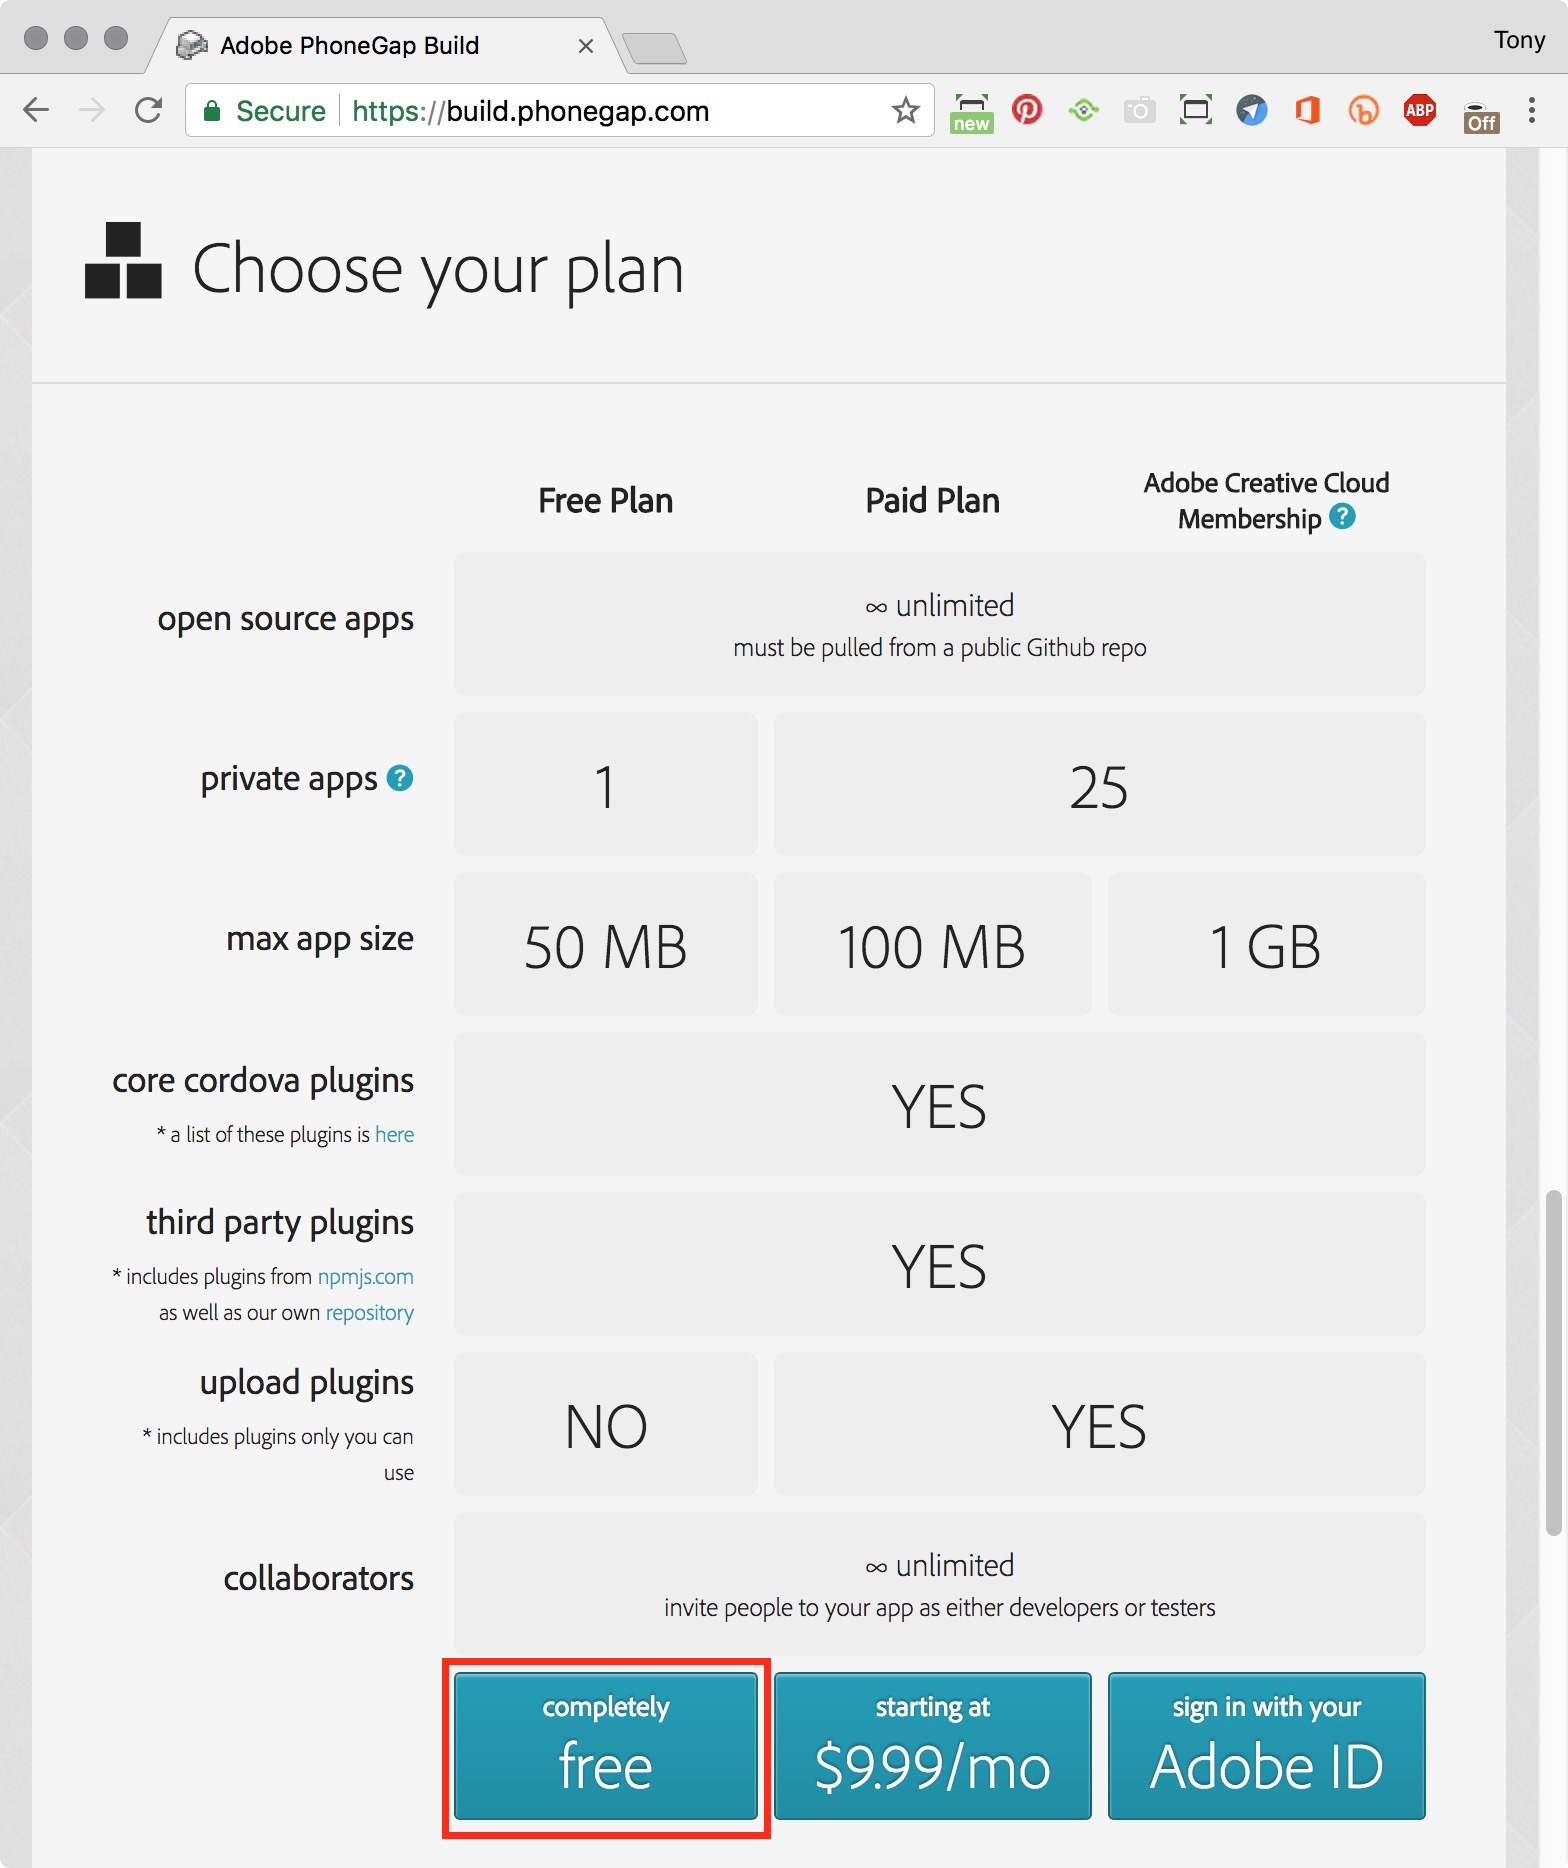
2. As you don't already have an Adobe ID I will presume you don't have a Creative Cloud account. So in this step of the tutorial we are going to select the Free plan which allows you to create 1 app with a maximum app size of 50mb
Note: If you already have an Adobe ID and an Adobe Creative Cloud Membership you already have access to PhoneGap at the highest level
3. Select the "Completely Free" option (figure #2)
figure #7: Completely Free option
4. On the 'Sign in to continue" page select the link "Get an Adobe ID"(figure #8)
figure #3: PhoneGap Build Sign In
5. Fill in the Name, Email Address, Password and Location fields, check the Terms and Conditions and then select "Sign up" (figure #9)
figure #4: Sign Up
6. The "Welcome to Adobe PhoneGap Build" page will be displayed (figure #10)
figure #10: Welcome to Adobe PhoneGap Build page
Note: For those creating their Adobe ID for the first time, at this point you can skip ahead to the Build our App section
7. For those of you who already have an Adobe ID select 'Sign In' from the top menu (figure #11)
figure #11: Sign In
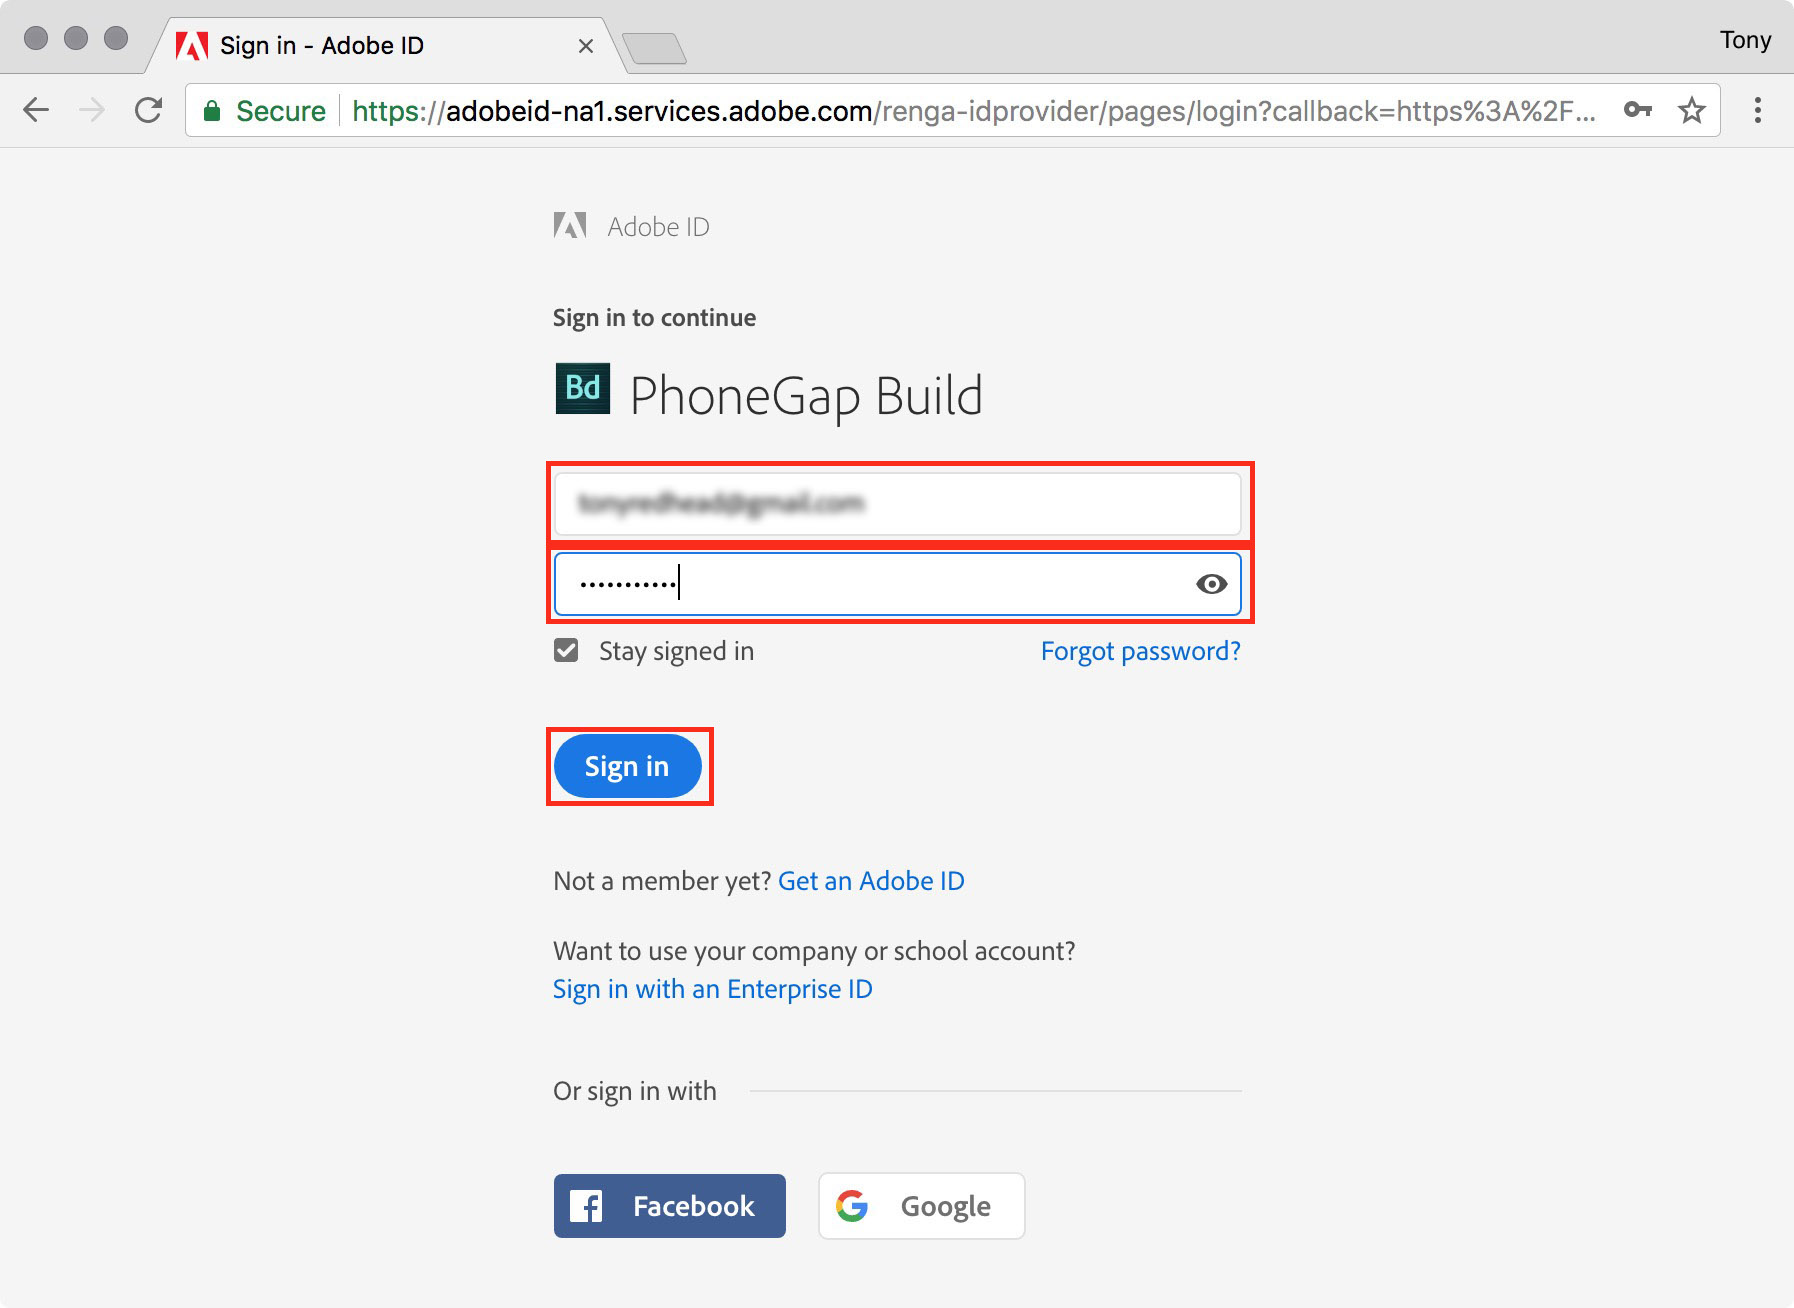
8. On the Sign in to continue page enter the email address and password that you use for your Adobe ID. Select 'Sign in' (figure #12)
figure #12: Sign in to continue
Note: you may encounter a Terms of Use page. If so just click on the checkbox and select 'Continue' (figure #13)
figure #13: Terms of Use
9. The Welcome to Adobe PhoneGap Build! page will be displayed (figure #14)
figure #14: Welcome to Adobe PhoneGap Build
Build our App
Finally the fun part where we build our app.
1. Select the button 'Upload a .zip file' (figure #15)
figure #15: Upload a .zip file
2. Browse to the Project folder and select the .zip file. In my case it will be myapp_krpano.zip, select 'Open' (figure #16)
figure #16: Select your .zip file
Note: The page refreshes and the 'Uploading file' animation is played (figure #17)
Note: if you want to check progress of your upload in Chrome the percentage upload is displayed in the lower left corner of the browser
figure #17: Uploading
Note: When the upload is finished the page refreshes to show the App information screen. The icon and name of the app is shown along with a button 'Ready to build'. (figure #18)
3. Click on the 'Ready to build' button
figure #18: Ready to Build
Note: a minute or two later the page refreshes and there are several changes to the page. The name of the app has changed from black to blue (clickable), the are two new buttons 'Update code' and 'Rebuild all' and a large QR code. (figure #19)
figure #19: Build Complete
4. Click on the blue 'MyApp' title to show more information about the app. The two elements we are interested in are the QR code and the download 'apk' button. (figure #20)
Note: As I'm working on an iMac I have two option in regard to installing this app on my Samsung S8.
1. I can use a QR scanner app on the S8 and scan the QR code
2. I can download the .apk file, copy it to my connected Samsung S8 using the Android File Transfer app.
I'm going to use #1 and scan it straight on my S8 (figure #21)
figure #21:
Left to right (top) - Scan, Open URL, saved to Firefox, download in Firefox, apk in My Files/Internal storage/ Download
Left to right (bottom) - Instal, Installing, App installed - Open, App opened in S8, MyApp Krpano icon on the desktop
If you've reached this point and you have successfully built your app, downloaded and installed it on your Android device, congratulations. If you have any feedback,comments or issues on the tutorial I'd be very happy to hear them.
Thank you,
Tony


