In order to post a 360˚ Panorama "Photosphere" to Google Maps you need to add specific MetaData in order for Google to recognise the photosphere and display it properly. In the past Google provided a tool that added the MetaData but http://photo-sphere.appspot.com/ just goes to a 404 page now.
A great replacement, on Mac and Windows, has been ExifTool and the companion app pyExifToolGui, until recently that is. The recent release on the Mac of El Capitan broke the interface between the two applications. After installing both applications as covered in my tutorial Preparing 360˚ Panoramas for Google Maps on Mac OSX the El Capitan upgrade results in the following dialog box being displayed when the application is launched.

Warning Dialog box
When you select OK a window opens, you need to find the ExifTool location, highlight it and then select Open.
Locating the ExifTool application
Now locating the ExifTool application is not as easy as it sounds, you can't just search for it because it's in one of those hidden locations that don't show up on searches. To find the file you need to follow these simple steps.
1. From the Finder window, select Menu/Go/Go to Folder

2. From the popup window type /usr/local/bin and select Go.
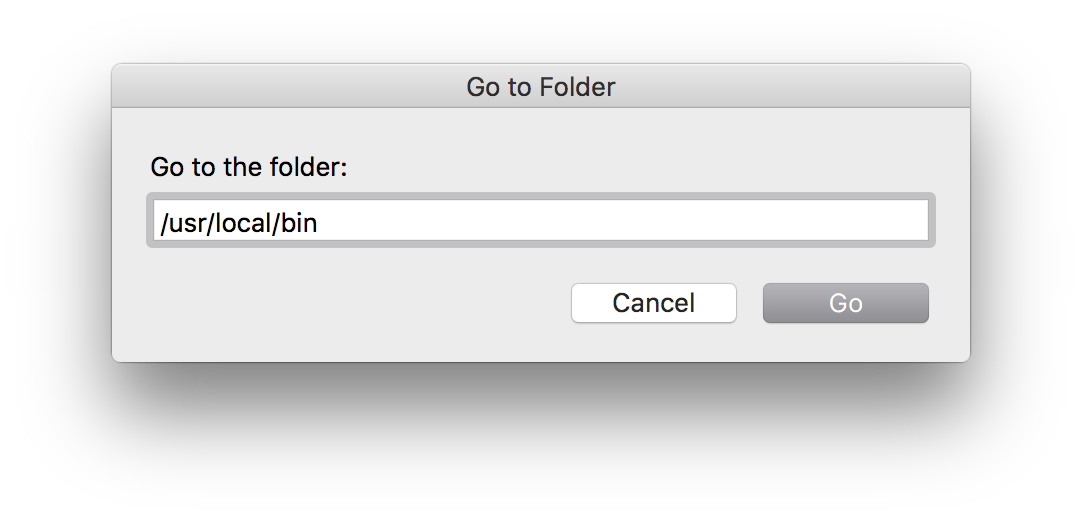
This will open a new Finder window containing the exiftool application

Note: In order to make it easier to locate this folder when you see the warning message from pyExifToolGui we will make a bookmark of the "bin" folder in the sidebar.
3. Rt Click on the "bin" icon at the top of the window and select "local"

4. From the "Local" window drag the "Bin" folder to the sidebar to create the bookmark and place it in a prominent spot. That's it for the first part.

Testing the Location
To test wether or not we can see the ExifTool Application open pyExifToolGui, when the warning appears select 'Okay' and a new Finder window will open, from the sidebar select "bin", select "exiftool" and 'Okay'. If you are running El Capitan at this point pyExifToolGui will quit. Restarting it will result in the same error message. This is what we have to fix!
Updating the ExifTool config.cfg file
We need to make a simple change to the ExifTool config.cfg file. Like the ExifTool Application this file is also hidden but unfortunately it cannot be located via the above method. This time we need to use one of two methods. The first and simplest is using an application called "TextWrangler". TextWrangler is free and can be downloaded from their website. If you don't have or don't want to download TextWrangler then you can use the Terminal window to reveal the hidden files!
Using TextWrangler
1. Open the TextWrangler and select Menu/File/Open
2. From the 'Open' window navigate to Users/'your user name' (in my case 'Tony')
3. The .pyexiftoolgui folder isn't visible. To show hidden files you need to check "Show hidden items" next to the options at the bottom of the window. Once you have checked it the folder will be displayed.
4. Open the .pyexiftoolgui folder, highlight the config.cfg file and select 'Open'
5. Change the line alternate_exiftool = False to True. Note: Check to make sure that the exiftooloption is pointing to /usr/local/bin/exiftool. On a new installation it may just point to exiftool
6. Save and close the file. Proceed to the section 'Finish Up'
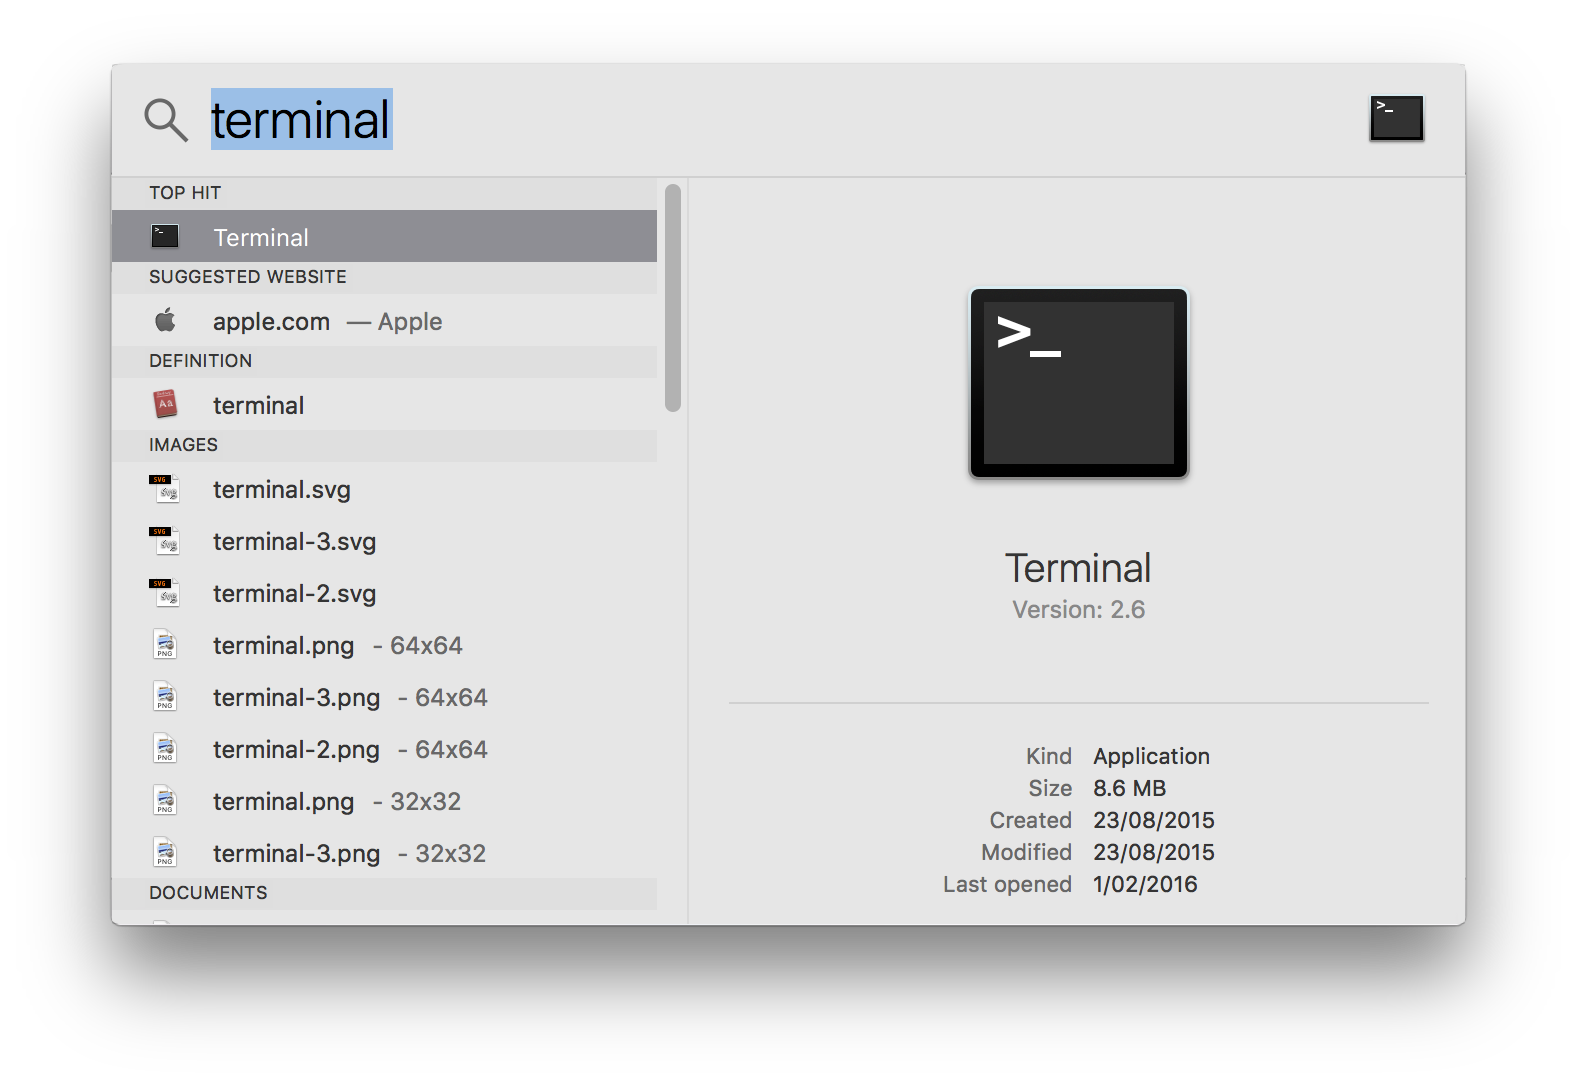
Using the Terminal Window
1. Open the Terminal by typing in the name in the Search bar and selecting it.
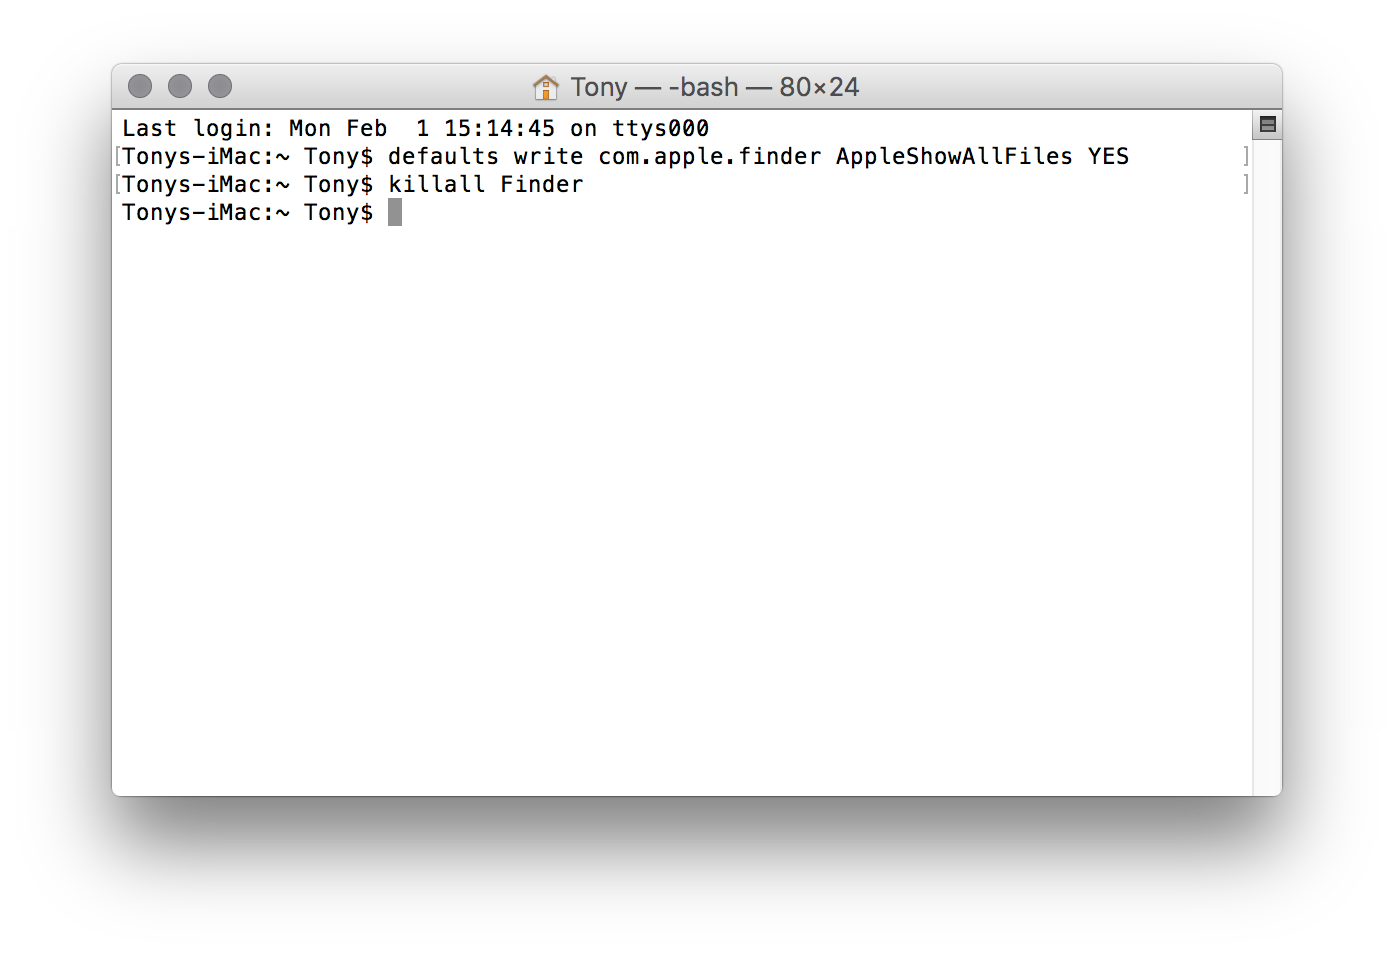
2. With the Terminal Window open copy and paste both lines listed below into Terminal one at a time, and press "Return" after each line:
defaults write com.apple.finder AppleShowAllFiles YES
killall Finder
Your Terminal window should look something like this:
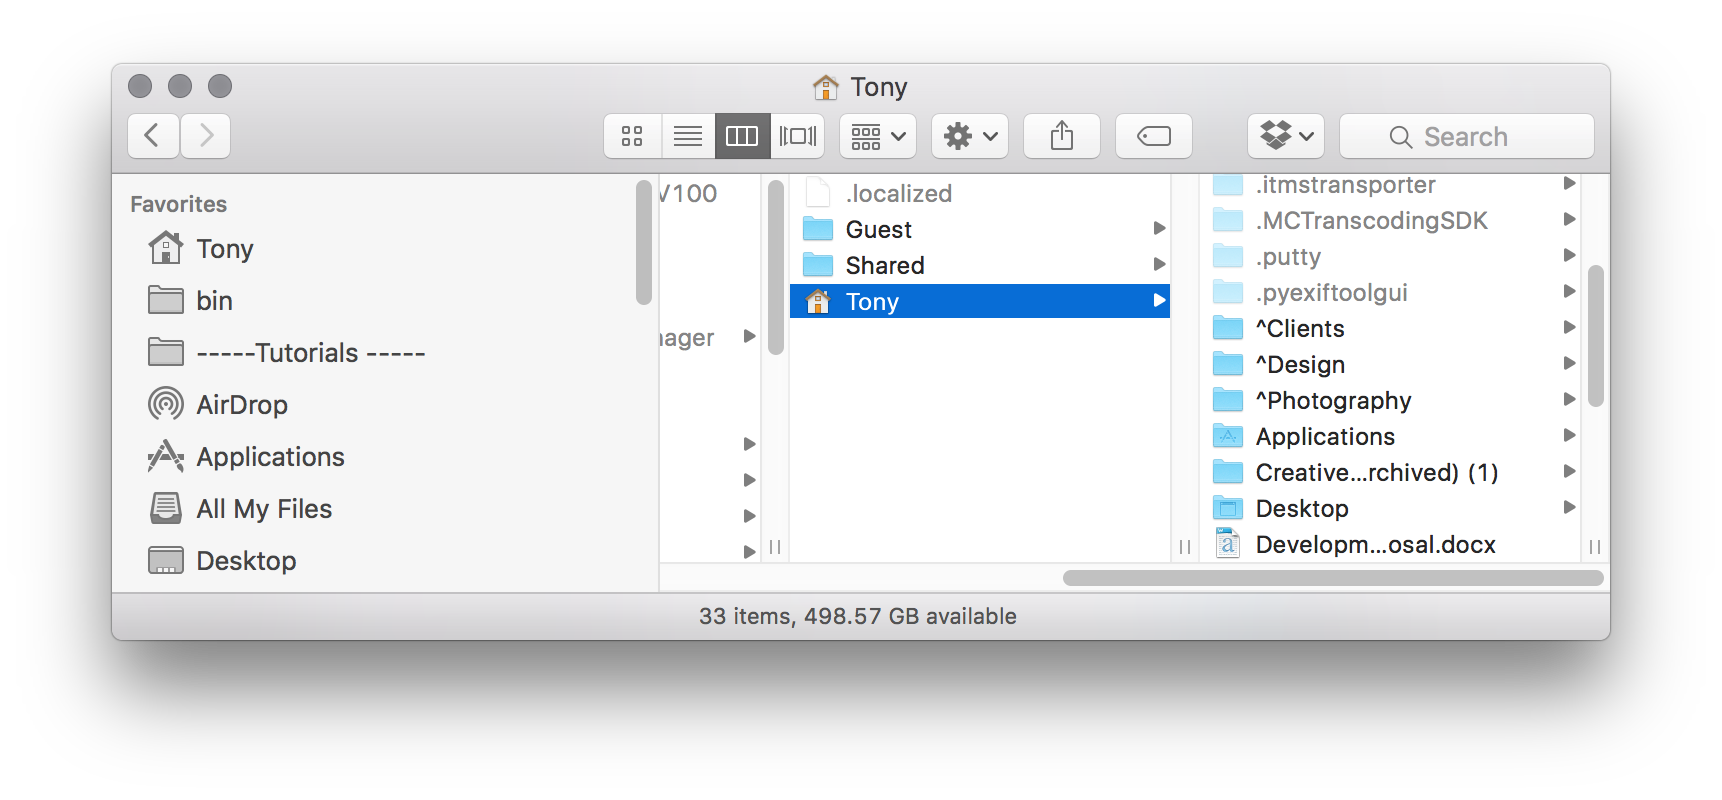
3. From the Finder window, select Menu/Go/Go to Folder and from the popup window type /Users// and select Go.

4. A new Finder window will open, this time displaying all the hidden files. Click on your username, in this case mine is "Tony"

5. Scroll down until you see the partially faded out .pyexiftoolgui folder. Click on it.
6. Inside the folder is the config.cfg file that we need to modify in order for pyExifToolGui to see the ExifTool Application.

7. Open the file in a text editor of your choice. In this case I'm using TextWrangler. You want to change the line alternate_exiftool = False to True. Save and close the file.

Finishing Up
1. If you want to change the status of the hidden files back to hidden simply open the Terminal Window, copy and paste both lines listed below into Terminal one at a time, and press "Return" after each line:
defaults write com.apple.finder AppleShowAllFiles NO
killall Finder
2. Restart your computer and open pyExifToolGui. You will still see the warning sign but this time once you have set the location of the ExifTool Application the program will continue running and display the interface.

Note: I've noticed that sometimes the pyExifToolGui may still quit on launch. But after one or two goes it opens. Let me know how you get on.
3. You can now use the tutorial Preparing 360˚ Panoramas for Google Maps on Mac OSX to prepare your images for Google Maps.
Thanks to Sam Rohn for casting an eagle eye over this tutorial and for the tip about using Text Wrangler as an alternative to the Terminal Window.
Thanks to Bill Moede for letting me know about the exiftooloption issue on a new install.
