Note: When using Photoshop 2018 it came to my attention that the actions in step #7 where a section of the panorama is duplicated to a new layer reduce the resolution of that replicated image and create a noticeable difference in the quality between the original and the retouched section when merged down.
Depending upon the nature of the section being retouched the loss of resolution in a number of cases wasn’t critical to the final image.
However in the most recent iteration of Photoshop, Version 20, the whole equirectangular image when viewed in the panorama layer now shows this loss of resolution.
What this means is that the cut and edit method may create less than acceptable results and you may need to find alternative workarounds.
In all tests it seems as though the ‘sphericalmap’ image retains its original resolution but the ‘3D panorama layer texture’ doesn’t.
When I get a chance I’ll write up a tutorial on exactly what works and what doesn’t.
For an alternative image editing program that does 360˚ I’d recommend Affinity Photo
Select the forward/back arrows to change between final and original panoramas
Announced on October 18 during Adobe Max, Photoshop 2018 includes 360 compatibility.
While 360 photos were supported in earlier versions, the ability to scroll around the entire view was lost, rendering the file into a rectangle. Now, 360 files can be imported using the spherical panorama options from the 3D menu options and exported through the same menu to maintain that scrolling format when sharing. The compatibility brings Photoshop tools, such as cloning and healing brushes for removing objects, into 360 photography.
This tutorial shows how to retouch out the tripod using Content Aware Fill, Drag and Drop library eps files and Nik Collection filters to style the image. Most of the work is done in a non-destructive mode.
You can find the Nik Collection at https://www.google.com/nikcollection/
Note: tap on any image for a larger view
Video
I've done a quick video of the non-destructive Content Aware Fill section of the tutorial. No audio yet but titles describing the actions. It's recorded in real time to give you an idea of the time actions take. Also this is an 8000 x 4000 equirectangular image, Tiff 16 bit with Alpha
FYI, if you don't want non-destructive layers and are happy to edit straight into the panorama then skip the first step where the panorama is converted to a Smart Object. It will make things faster as the Smart Object doesn't have to update when you switch between 3D and SphericalMap.
Step by step instructions are available below
Getting Started
Opening your image into 360˚ editing mode
1. Update to the latest version of Photoshop (2018) using the CC Desktop App
2. Open your equirectangular file into Photoshop
Image #2 - 360˚ Equirectangular loaded into Photoshop
3. Convert the layer to a Smart Object
4. With the layer selected. Select: Menu/Layer/Smart Objects/Convert to Smart Object
Image #4 - Convert layer to a Smart Object
#4 - Smart Object icon on thumbnail
5. With the layer selected create a new panorama layer
6. Select: Menu/3D/Spherical Panorama/New Panorama Layer From Selected Layer(s)
Image #6 - Create new Panorama layer
7. You may see a message window about switching to a 3D layer, just select "Yes"
Image #7 - Message window, select "Yes"
8. Your equirectangular is now open in 360˚ editing mode and you can pan around and zoom into your image by selecting the Move Tool (V) and dragging the image.
Image #8 - 360˚ Editing Mode
3. Show the rulers, if they are not already visible, set the values to % (percentage)
4. Create a horizontal and vertical guide at 50%
Note: The guides will help you to re-orientate the panorama to the nadir centre
Tip: Create a Photoshop Action that automatically adds the two guides and another to hide them
Image #4 - Create and add guides
Retouching the Nadir
At the nadir of the image you can see a section of the tripod that the camera was set on. Rather than covering it with a Tripod Cap in this example we will retouch it out using Content Aware Fill and some clone brush work.
Many people have found retouching the panorama to be a very, very slow process and some of the tools are ineffective. The trick to return the retouching tools to normal speed and useage is not to retouch directly on the panorama but on a new layer created above it.
Note: This is a non-destructive way to retouch the panorama. As such it adds a little more time to the project while the Smart Objects are created and update.
If you want a faster process and don't care about directly editing the panorama disregard this steps 1 - 5 and step 15
1. Open the 2D view by double clicking on the SphericalMap link under the panorama layer.

Image #1 - Open SphericalMap
Note: the SphericalMap is a separate .psb file that contains, amongst other things, the unmapped equirectangular image
2. The new .psb file opens in a new tab named Layer XX.psb displaying the equirectangular view of the panorama
Image #2 - new SphericalMap tab
3. Add a new layer above the panorama layer (Layer 0)
Image #3 - New layer added above the panorama layer
4. Select: ⌘S or Menu/File/Save
5. Select the tab containing the 360 file to return to it
Note: As you move between tabs you may see a message, 'Updating Smart Objects'. Just wait until it's finished. Updating maintains the status of Smart Objects shared between the 360 and 2D spaces.

#10 - Updating message
#11 - Project showing 360 and 2D tabs
Note: In the layer window of the 360 view you do not see the additional layer element created in the SphericalMap. It is contained within the layer that shows the panorama.
6. Use the Move tool (V) use it to tilt the panorama up so you can see the nadir and the tripod.
Note: It is important that from step #7 onward you do not move the panorama until step #13 when the 'Merge Down' command is applied! Any movement of the panorama will cause a misalignment between the layers.
Image #6 - Pan to view the nadir with tripod
7. Create a new layer above the panorama layer (Layer 0)
Image #7 - Create new layer
8. Select the new layer to make it active
9. Using the keyboard combination, Shift/Option/⌘ (Command)/E, copy the contents of all layers to the new layer (Layer 1)
Image #9 - Copy the contents
10. With the new layer selected use the Lasso tool to outline the shape of the tripod.
11. Right click in the selection, select 'Fill' and then from the Fill window select Contents: Content-Aware (use default settings, Blending Mode: Normal and Opacity: 100%)
Image #11 - Lasso selection and Content Aware Fill
12. Select 'OK' and the nadir is patched and the tripod is no longer visible
Note: At this point you can continue to refine the image by using any of the retouching tools including clone brush, patch tool etc. All of the tools will operate at normal speed and efficiency
Image #12 - Nadir retouching using Content Aware Fill and Clone brush
13. When you are satisfied with the quality of the patch, select the layer and select ⌘E or Menu/Layer/Merge Down
Image #13 - Merge down the retouch layer
Note: After Merge Down there is only one layer remaining in the layer window.
14. At this point you can select the Move tool (v) and pan around the panorama.
Image #14 - The panorama can be panned and the retouched area retains it's location within the panorama
15. Select the 2D tab to open the SphericalMap
Note: The retouched area is visible in the new layer that was added earlier, turning this layer on and off hides the retouching.
Image #15 - SphericalMap view showing retouched nadir and layer with the retouched elements
Adding Overlay elements
In this example I want to add a small graphic to highlight a feature on the island. The element is an eps file created in Adobe Illustrator and saved into my library.
I want this addition to be non-destructive so we will need to create another layer to hold the object
1. Add a new layer and make sure it's at the top of the layer tree and selected
2. Select: ⌘S or Menu/File/Save
Note: The layer that is selected when you save becomes the default
Image #1 - New Layer
3. Select the tab containing the 360 file
4. Pan the panorama to the point where you want to add the overlay object
Image #4 - Location for the Overlay Object
5. Open the Libraries tab and drag the Overlay object onto the main window (alternatively you can select: Menu/File/Place Embedded)
6. Resize the object to fit and adjust the placement
7. Select return to render the object
Note: At this point if you move the underlying image the object will remain where it is because it resides on another layer that isn't part of the 3D image.
Image #5-6 - Overlay Object in place and scaled
14. With the Object Layer selected, select: ⌘E or Menu/Layer/Merge Down
15. After Merge Down there is only one layer in the project and you can now move and pan the panorama with the retouching in place
Image #15 - Merge down completed
16. Select the 2D tab to open the SphericalMap
17. The Overlay Object is visible in the new layer that was added earlier, turning this layer on and off hides the object.
Adding nik Filters
Applying any kind of global effect is always done on the 2D view. Applying an effect in 3D will only apply to the visible area.
Note: To keep everything in non-destructive mode I'm going to use Smart Objects. Nik recognises the Smart Object and creates a Smart Filter.
1. Select the 2D tab to open the SphericalMap if not already open
4. Select the bottom layer (Layer 0)
3. With the layer active Select: Menu/Filter/Nik Collection/Color Efex Pro 4
Image #3 - Select Nik Collection, Color Efex Pro 4
Note: Nik Collection Color Efex Pro 4 opens a new window and displays a warning message.
4. Select 'OK'
Image #4 - Nik Collection window
5. Select the rendering effect you want to use. In this example I'm using Film Efex: Vintage
Image #5 - Nik Collection Color Efex Pro 4 window
6. Once you are happy with the effect select 'OK' to apply the effect.
Image #6 - Nik effect on the panorama layer
7. The next step is to apply the same filter to the retouch layer
8. Select the retouch layer and convert it to a Smart Object with Menu/Layer/Smart Objects/Convert to Smart Object
6. With the layer still active select: Menu/Filter/Color Efex Pro 4
Image #9 - Select Color Efex Pro 4
10. Repeat steps 4 - 6
Image #10 - SphericalMap view with filters applied to panorama and retouch layer
11. Select: ⌘S or Menu/File/Save
12. Select the 3D tab to view the final file
Image #12 - Final file ready for export
EXPORTING
1. Select the 2D tab to open the SphericalMap or double click on SphericalMap to open it
Image #1 - Final SphericalMap
2. Select: Menu/File/Save As...
3. In the Save As dialog box uncheck 'Layers' and Save
Image #3 - Save As dialog box
4. Leave the Tiff Options at default or if they have been changed set the to the following image. Select OK to save the image
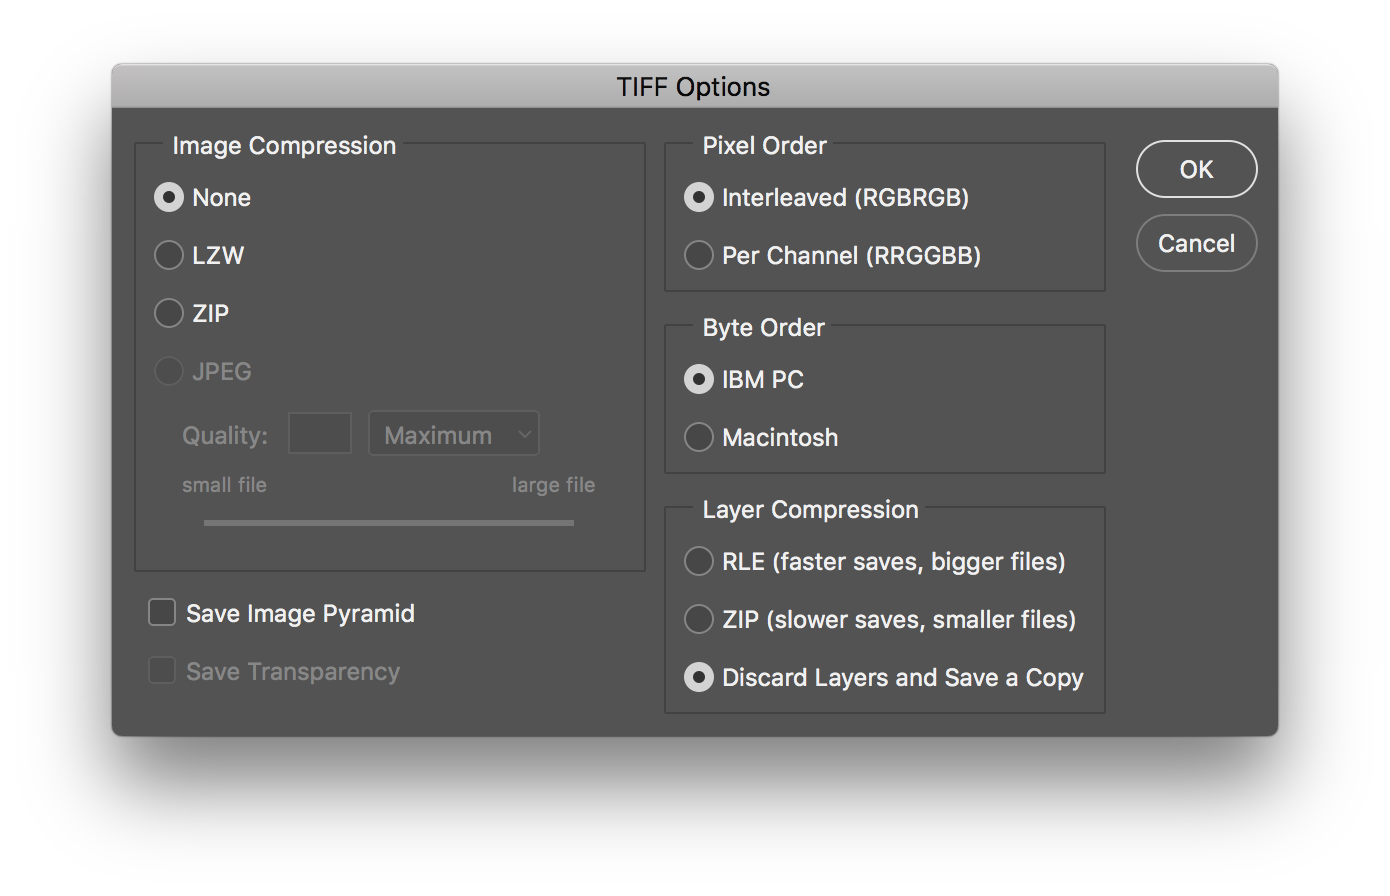
Image #4 - Tiff Option Dialog
Tips
If you ever find that the 2D file isn't reflecting the changes in the 3D environment, close the page and go back to the 3D page. Double click on the SphericalMap link and it will regenerate a new version.
There may be a delay after saving the SphericalMap and the SmartObject update when moving between the two tabs. Selecting the 'Move' tool and applying to the panorama seems to initiate the update.
Issues
"my 3D menu is greyed out and I can't select 'Spherical Panorama/New Panorama Layer from Selected"
This is a problem that a friend of mine, Alexander Pomnikow, ran into today on his MacBook and it took quite a bit of sleuthing between the two of us to work out a solution.
Alexander came up with the final piece of the puzzle and here are some things to try if you have greyed out 3D menu items.
1. Open Photoshop 2018
2. Select: Menu/File/Preferences/Performance
3. Make sure that 'Use Graphics Processor' is checked
Image #3 - Check Use Graphics Processor
4. Click on 'Advanced Settings'
5. Make sure '30 Bit Display' is checked (this is for systems where the "use native operating system GPU acceleration" is not available)
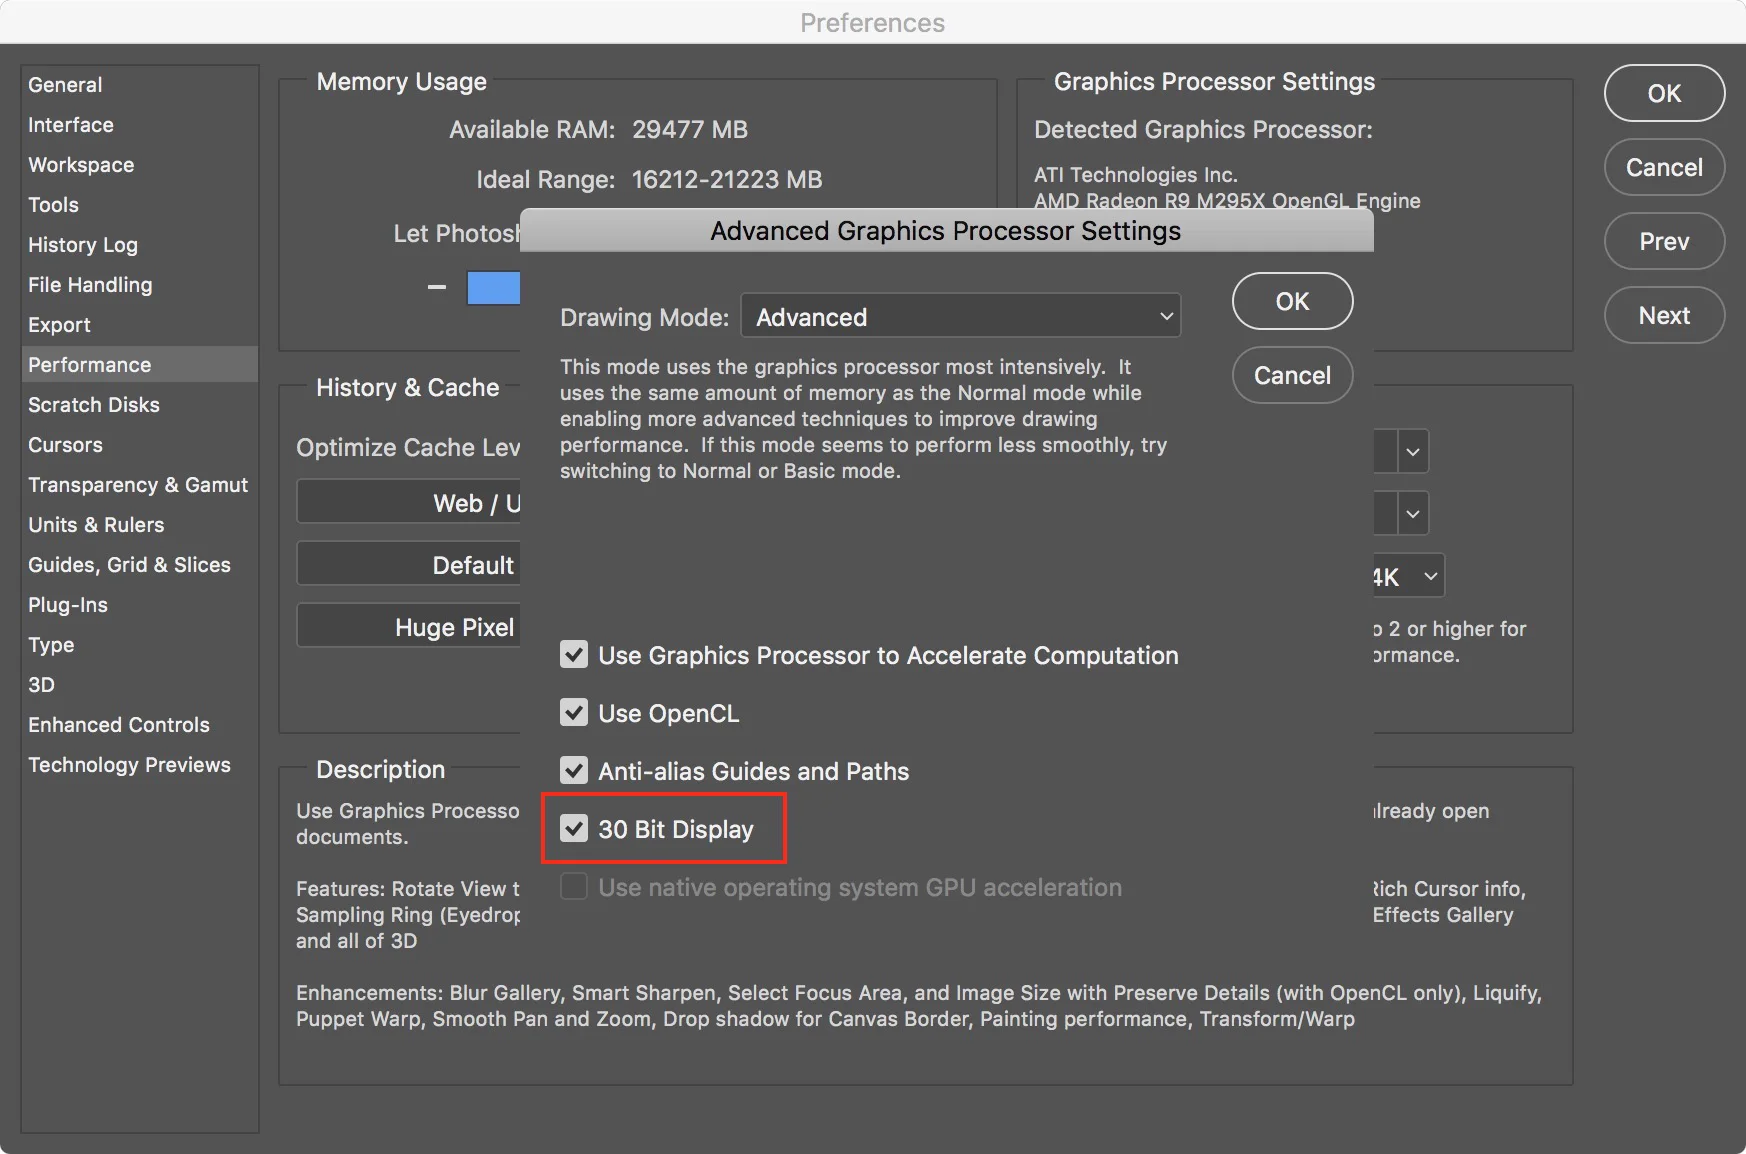
Image #5 - Check 30 Bit Display
6. For systems where the "use native operating system GPU acceleration" is available check it and uncheck 30 Bit Display

Image #6 - Use native operating system GPU acceleration
Summary
After exporting the 360˚ image you can view it in a VR viewer of your choice. As with any new functionality there may be some Filters or Adjustments that may not work across the 360 seam.
I am a proud supporter of Nodal Ninja 360˚ VR solutions. Tools that enable you to create stunning panoramas. Click the logo for more information.

