
Update: 4th January 2025 - AWS CLI Profiles: about Profiles and how to configure them.
One of the main issues encountered with hosting 360˚ panoramas on AWS buckets is the time it takes to upload the thousands of multiresolution tiles that make up the panoramas. Using the AWS Console to upload 360˚ Panorama projects can be incredibly slow however using AWS CLI the speed of the upload process can be dramatically increased.
Using CLI also negates the need to open up the console to update files as the project evolves or changes.
Note: this 3 part tutorial requires you have administration access to an AWS Account
Part 1: Install takes you through Download, Installing and Testing the AWS CLI Application
Part 2: Configure shows you how to create an Identity Access Management (IAM) user, collect configuration data and configure the CLI.
Part 3: Upload shows how to upload your local files to your S3 Bucket/s and highlights some other useful Command line operations.
Part 4; Download shows how to download a single file or a complete folder from your S3 Bucket/s.
Configuration Data
Now that we have installed and tested our CLI Application it’s time to create our IAM user and configure the app. In order to complete the configure, there is some information that we need to have on hand to enter in the following fields;
AWS Access Key ID,
AWS Secret Access Key,
Default region name,
Default output format. (figure #1)
Figure #1: Terminal entries required
We can gather most of these details are from the AWS Web Console.
Gathering the Data
1. Log in to AWS (figure #2)
Figure #2: Logged into AWS
We will start with the Default Output format and Default Region Name
Note: the default output format refers to the way the data generated by CLI Application is presented within the Terminal window, for now, we are going to use ‘Json’ (this can be changed later if you want).
For more information on AWS CLI Output formats visit: https://docs.aws.amazon.com/cli/latest/userguide/cli-usage-output-format.html
Note: the default region name refers to the location selected by you as the place where you are storing your data and the location of your S3 buckets. Regions are located geographically around the world.
For more information on AWS Regions visit:
https://docs.aws.amazon.com/AmazonRDS/latest/UserGuide/Concepts.RegionsAndAvailabilityZones.html
2. In the main menu click on the Region name, in my example, Sydney. The location dropdown menu will highlight your region name. In my example its ap-southeast-2 (figure #3)
Figure #3: Default Region Name ap-southeast-2
Next are the Access Key ID and Secret Access Key
Note: the AWS Access Key ID, AWS Secret Access Key will be part of an AWS Identity and Access Management (IAM) user’s credentials. If you don’t already have an IAM user we are going to create one.
An IAM is a web service that helps you securely control access to AWS resources. You use IAM to control who is authenticated (signed in) and authorized (has permissions) to use resources.
For more information on AWS IAM visit:
https://docs.aws.amazon.com/IAM/latest/UserGuide/introduction.html
3. In the search bar enter IAM and it will display a link to the IAM services.
4. Mouse over to view more options and click on the Users link. (figure #4)
Figure #4: Search IAM and Users link
5. Click on the ‘Add user’ button (figure #5)
Figure #5: IAM Users section with Add user button
6. Enter a name for IAM User and check Programmatic access for the Access type. Click on the ‘Next: Permissions’ button (figure #6)
Note: we are using Programmatic access as the IAM user will only be accessing AWS via the CLI and not via the web console.
Figure #6: User Name & Access type
Note: at this point we want to use the easiest way to get started so we will use a pre-built policy for the user.
7. Click on the ‘Attach existing policies directly’ button (figure #7)
Figure #7: Click on Attach existing policies directly button
8. Enter s3 into the Filter policies search field and from the results check AmazonS3FullAccess. Click on the ‘Next: Tags’ button (figure #8)
Note: this policy provides full access to the S3 buckets including the ability to delete them!
Figure #8: AmazonS3FullAccess
9. Click on the ‘Next: Review’ button (figure #9)
Note: in this step we will not be adding any tags.
For more information on AWS IAM Tags visit:
https://docs.aws.amazon.com/IAM/latest/UserGuide/access_iam-tags.html
10. Review the settings and click the ‘Create user’ button if everything is correct (figure #10)
Figure #10: Review
11. Download the user security credentials by clicking on the ‘Download.csv’ button (figure #11)
Note: the .csv contains the AWS Access Key ID and the AWS Secret Access Key. Also once you click Close you will not be able to see or download the credentials again.
Figure #11: Download the CSV
12: Give the .csv file a recognisable name, create a folder to hold the file, and click the ‘Save’ button (figure #12)
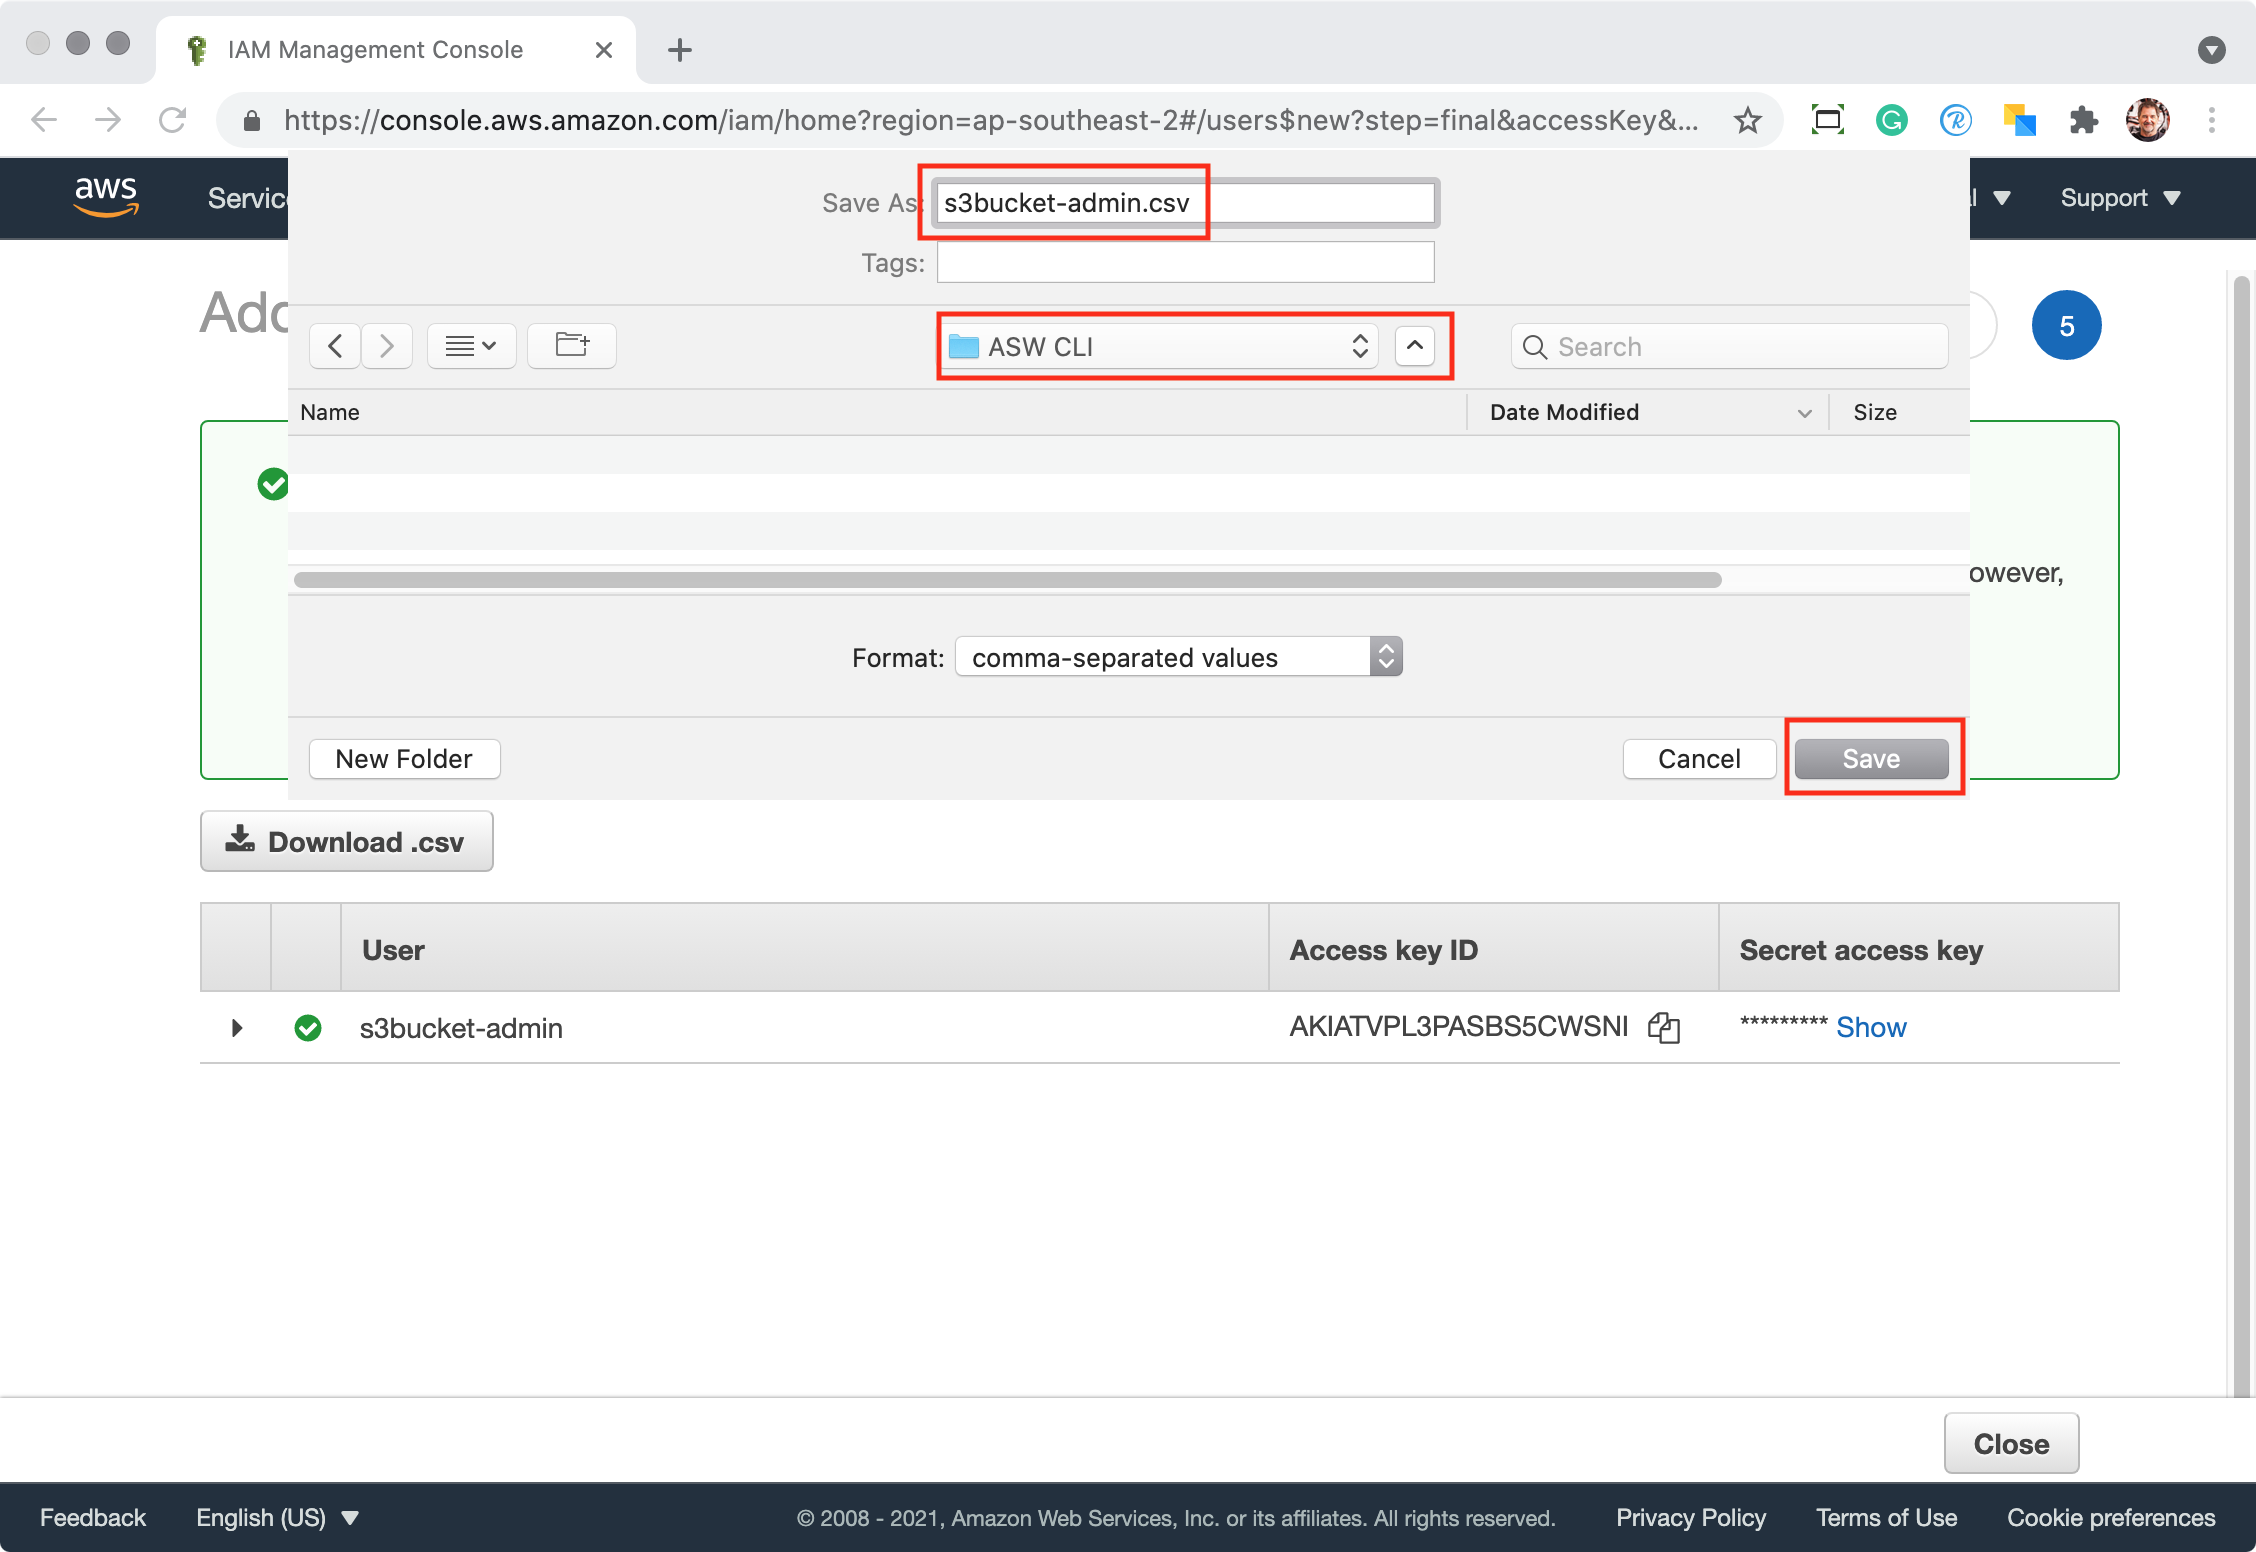
Figure #12: Save the .csv file
13. Once the file is saved open it in a text editor or spreadsheet application such as Numbers (figure #13)
Figure #13: .csv file open in Numbers
14. You can now go back to the AWS Web Console and click the ‘Close’ button to close the Add User window
Configure the AWS CLI App
1. Open the Terminal App if it’s not already open and, at the prompt, type in the command line aws configure (figure #14)
Figure #14: aws configure
2. Select the ‘Return’ key to display the first entry field, AWS Access Key ID (figure #15)
Figure #15: Access Key ID entry
3. Enter your AWS Access Key ID. In my example it’s AKIATVPL3PASBS5CWSNI and select the ‘Return’ key (figure #16)
Note: you can cut and paste from the .csv file into the Terminal App
Figure #16: Access Key ID
4. The second entry field, Secret Access Key, is shown. Repeat step 3 with the Secret access key, in my example it’s ccKn1bp/0AbJyhhexbq2N4YHFUr4ck4WG1ZuzeIz and select the ‘Return’ key (figure #17)

Figure #17: Secret Access Key
5. Add your Default region name, mine is ap-southeast-2 and select the ‘Return’ key (figure #18)
Figure #18: Default region name
6. Add your Default output format, in this case we will use ‘json’, and select the ‘Return’ key (figure #19)
Figure #19: Default output format
7. Test the configuration by typing the following command line aws s3 ls at the prompt and selecting the ‘Return’ key (figure #20)
In the Terminal window we can see the S3 buckets created in AWS. In this example I have two s3 buckets s3360panos and s3threesixtypanos.
Note: we have connected with AWS (aws) go to S3 (s3) and provide a list (ls) all of the buckets that have been created.
8. Quit the Terminal App, reopen it, and type in the Command Line aws configure at the prompt. Now the data is automatically entered into the data fields and we are ready to go to the next stage (figure #21)
Figure #21: Data is automatically added to the Terminal App
AWS CLI Profiles ⇑
When you configure the AWS CLI, it stores your credentials and configuration settings in a file on your computer. By default, these files are located in the following locations:
Credentials file:
~/.aws/credentials(on Linux, macOS, or Unix) orC:\Users\<username>\.aws\credentials(on Windows). This file stores your access keys (figure #22)Config file:
~/.aws/config(on Linux, macOS, or Unix) orC:\Users\<username>\.aws\config(on Windows). This file stores configuration settings such as the default region and output format (figure #23)

Figure #22: Credentials default

Figure #23: Config default
These files allow the AWS CLI to use your credentials and configuration settings without requiring you to enter them each time you run a command by creating a Profile.
Using profiles allows you to easily switch between different AWS accounts or roles, manage multiple sets of credentials, and specify different regions for various tasks, enhancing flexibility and security.
A good example of using a profile with the AWS CLI is when you manage multiple AWS accounts, such as personal and work accounts, or different environments like development, staging, and production.
Scenario:
Imagine you are a developer working on two projects:
A personal project hosted in your personal AWS account.
A work project hosted in your company's AWS account.
Configure Profiles:
You would create two profiles:
personalandwork.
aws configure --profile personal
aws configure --profile work
Switch Between Profiles:
To access all the S3 buckets in your personal account:
export AWS_PROFILE --profile personalTo access all the S3 buckets in your work account:
export AWS_PROFILE --profile work
Creating a basic Profile to Access AWS
Note: as it has been quite a while since this tutorial was created I’m not working on a different computer (Mac Studio) and OS (Sonoma) so my terminal is now running under -zsh rather than -bash. However this doesn’t affect any of the command prompts. (figure #24)

Figure #24: Terminal screen on the Mac Studio / Sonoma
1. Enter the prompt ‘aws configure --profile [your profile name]’
Note: I’m going to use the profile name ‘awspano’ (figure #25)

Figure #25: Profile name awspano
2. Enter return until the configuration is complete (figure #26)

Figure #26: Configure completed
3. Open the Credentials and Config files to see the new profile just created. (figures 26 & 27)

Figure #26: Credentials with profile

Figure #26: Config with profile
This brings us to the end of Part 2: Configuration and we are ready to move onto Part 3: Upload where we will upload some files and look at other options open to us.
Support
"Hey there! 👋 If my tutorials have made your tech life a little easier (or a lot less confusing), consider buying me a virtual coffee! ☕️ Retirement means more time to help you, but sadly, less income for snacks. Click the Donation button 🙌 and thanks for the love!"
