Forum Post
“In my next project I'd like to create an interactive workflow. When the panorama starts, a text box should appear with an instruction. When the text box is closed, the first hotspot appears. Clicking on the hotspot opens another text box with an instruction or a video/animation. After closing, the view moves to the next displayed hotspot. This continues until the last instruction is shown. I think I'll have to work a lot with variables. Does anyone have any ideas on how I can implement this project?”
My response was, “I built something similar in the past and posted it to the forum and the response was, “It's exactly what I was looking for.”
So I’ve gone ahead and created a tutorial for others who would like to implement something along the same lines.
The Tutorial
The tutorial will start with some basic elements built into the skin. The interaction comes from the use of variables to track the number of “next” clicks and show and hide elements based on these numbers.
Note: this tutorial is designed for Pano2VR V7. You can download the software here. In following these tutorials a working knowledge of Pano2VR is an advantage.
Note: Click on any image to enlarge it
Project Overview
In this tutorial, we will be using the following steps;
Final Output ⇑
Figure: Tutorial Folder
Figure #2: Project
3. Open the Hotspot_Reveal.ggsk (figure #3)
Figure #3: Skin
4. Publish the Project
Note; Now all we are going to see is the green panorama and the information popup. Clicking the “Next” button has no effect as there are no actions assigned to the button yet. (figure #4)
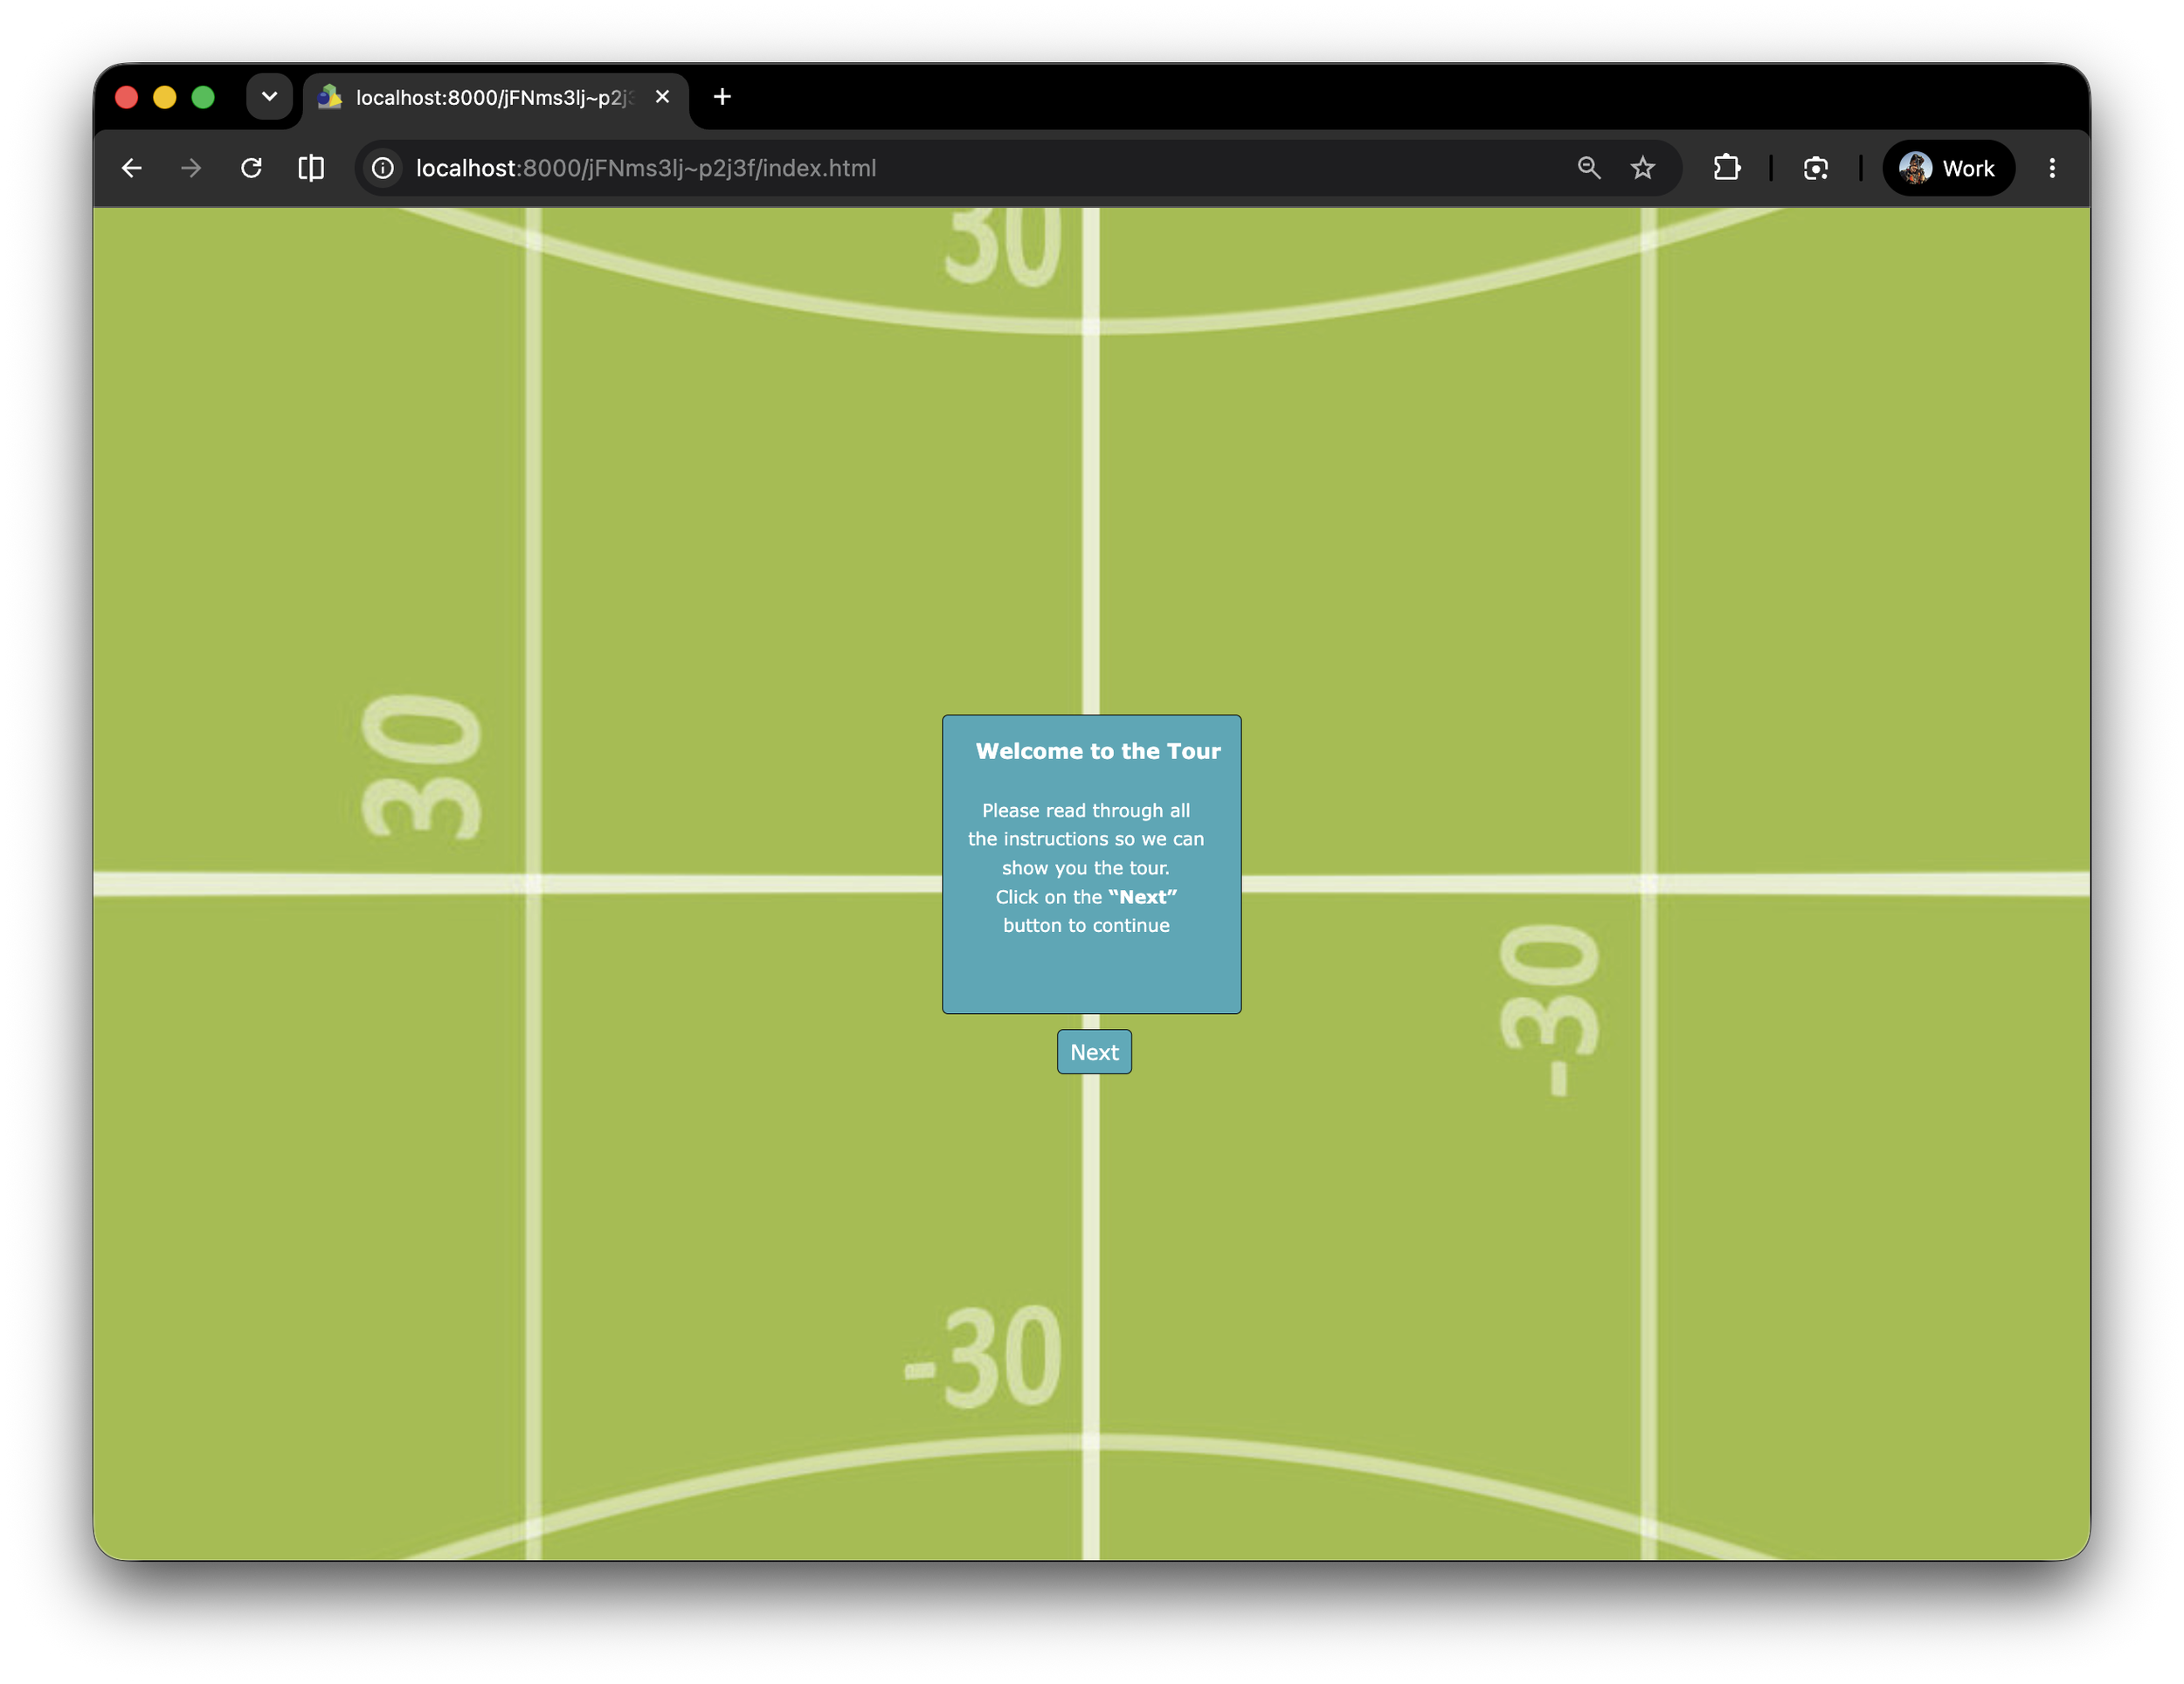
Figure #4: Initial output
Adding our first Reveal Point Hotspot ⇑
The first step is to add and position a Point Hotspot in the project file viewer.
1. Double click in the viewer to add a Point Hotspot
2. Set the Skin-ID: = ht_node
3. Set the Position: Pan: -30.00 | Tilt: 0.00
4. Set the Custom Property: Hotspot Target: 1
5. Save the project as Hotspot_Reveal_V1 (figure #5)
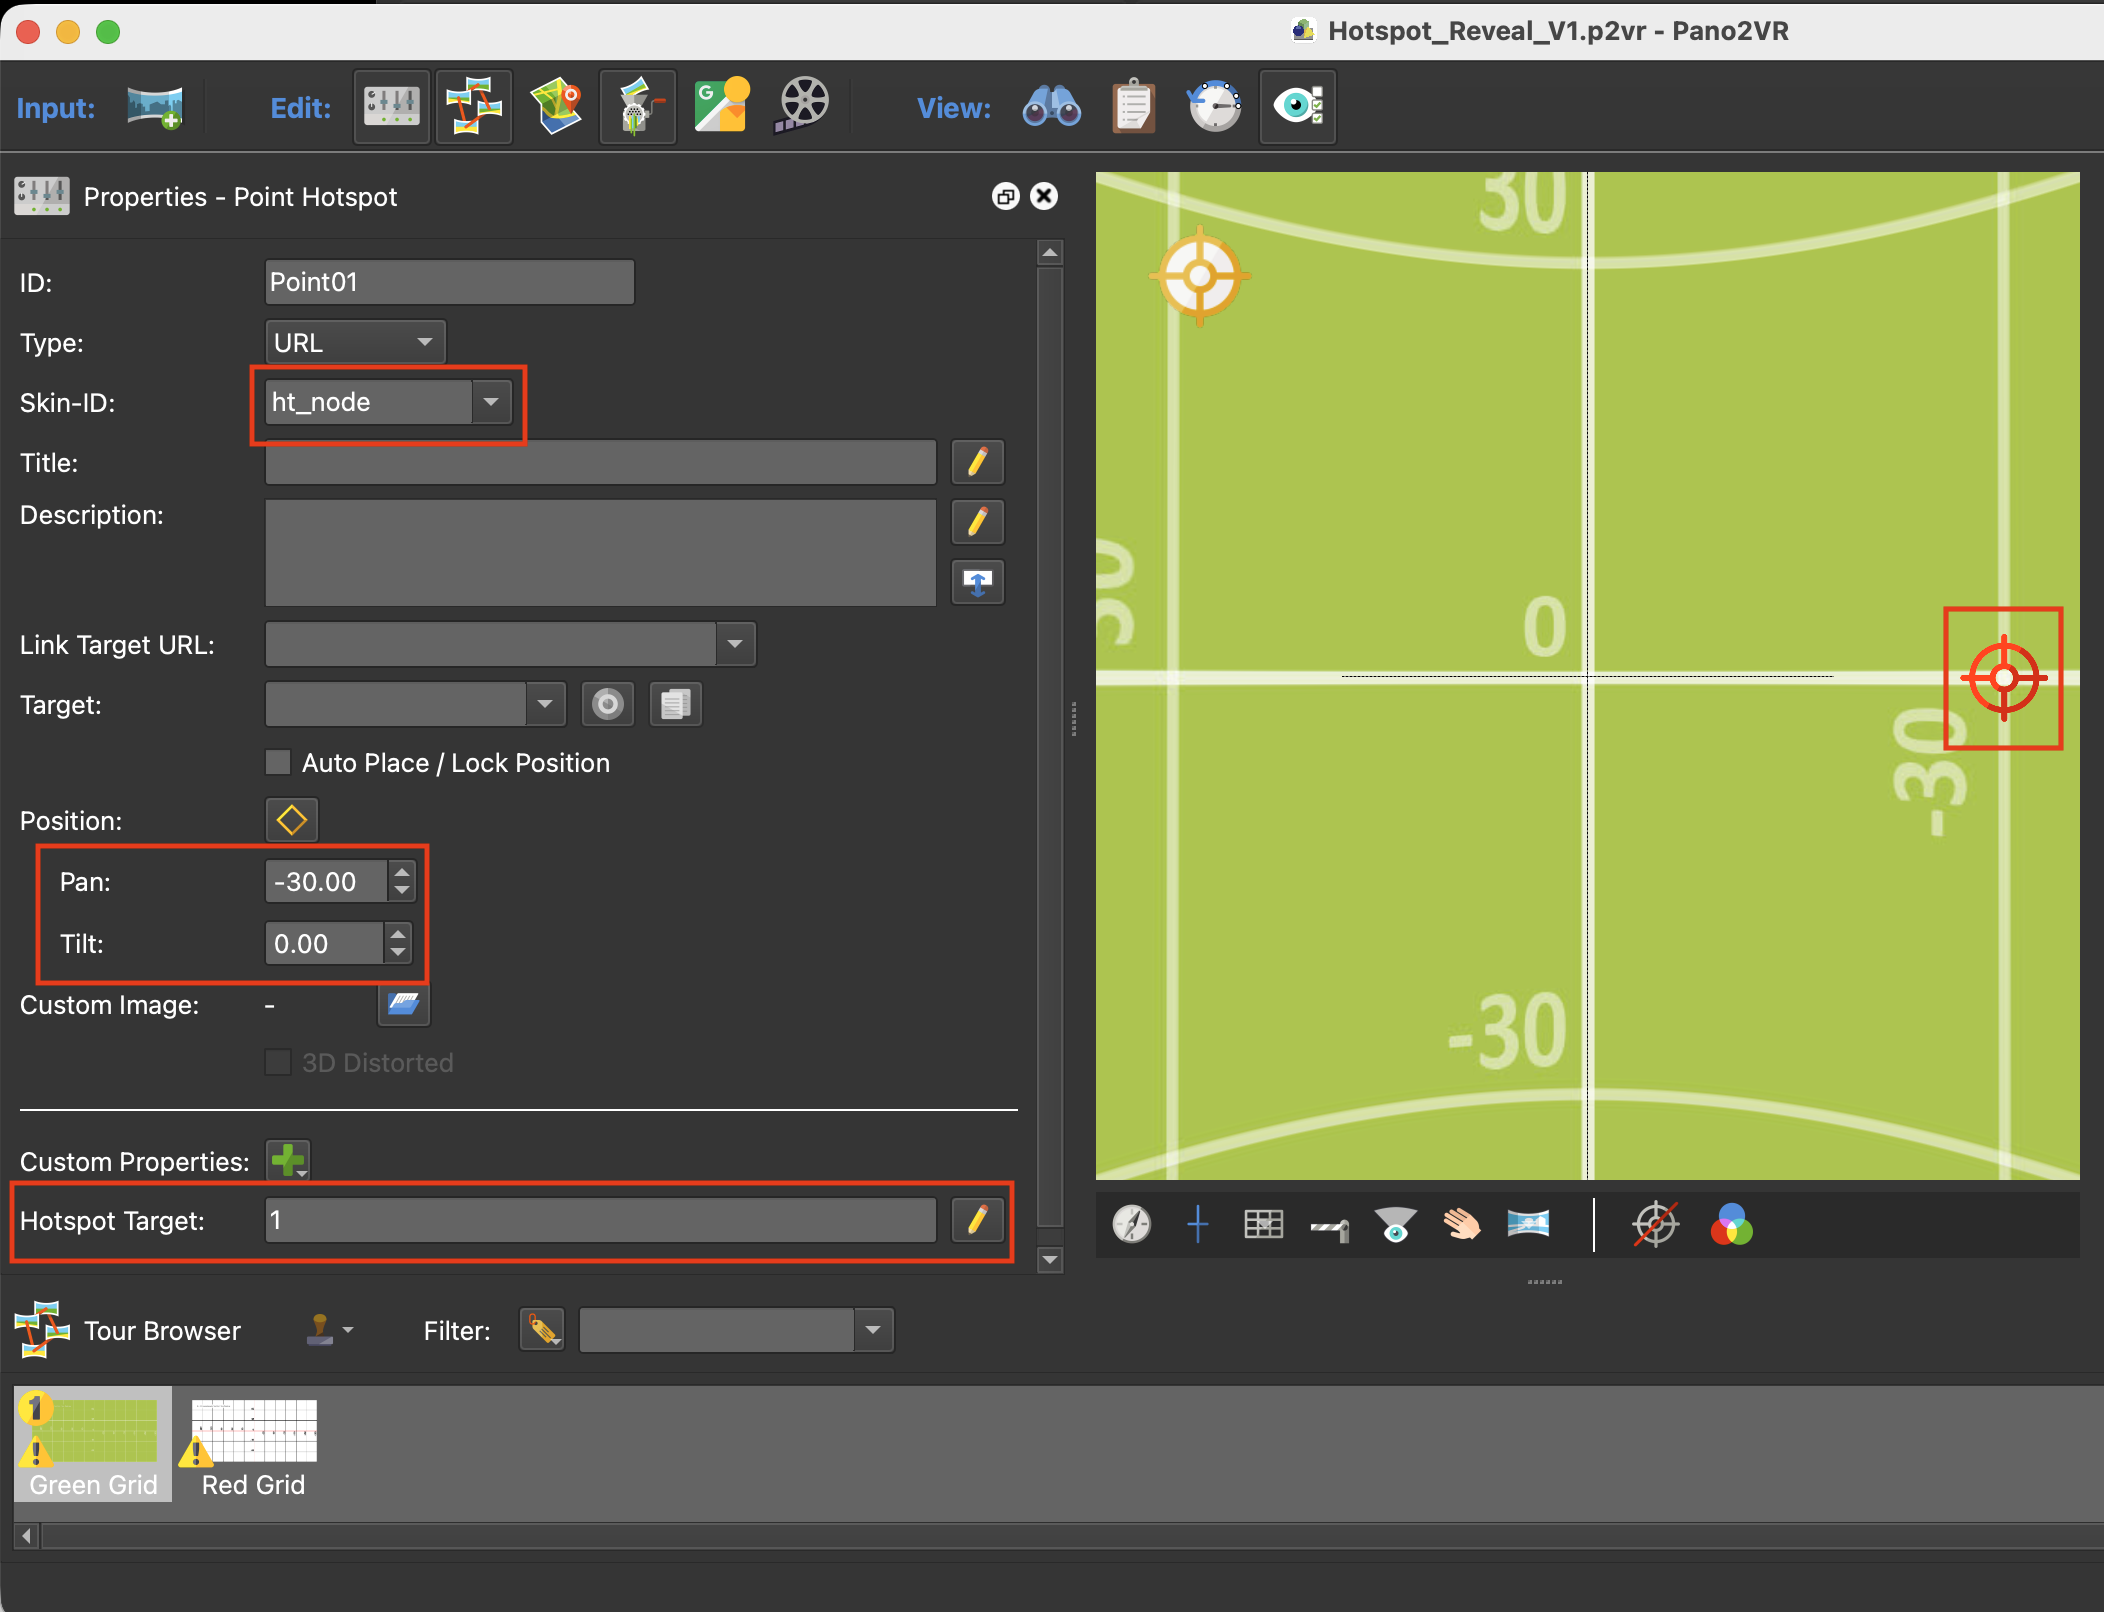
Figure #5: Hotspot Reveal 1
Editing the Skin
1. In the Tree, in information_popup > select the ‘Next Button’
2. Open the Properties > Action menu
3. Add the following Actions (figures # 6, 7, 8, 9, 10, 11, 12)
Figure #6: Next Button actions
Figure #7: Add
Figure #8: Mod
Figure #9: Copy value
Figure #10: Visability
Figure #11: Movement
Note: the Move to View has a modifier, so add the following
Figure #12: Hotspot number
Note:
1. The Add (+) 1.00 adds 1 to the click variable every time we click “Next”
2. The mod(%) 5 resets the click variable to 0 after the variable reaches the count of 5
3. The set= $(*click_text) sets the numerical value to a text value so it can be compared to another text value
4. The set= false sets the variable vis navigation to false and hides the popup
5. The -30/0/$(af) is the postion of the Point Hotspot we are targetting. Using $(af) maintains the current FoV and 1.00 is the speed to move to that position. (figure #13)
Figure #13: next_button Actions
4. Select the ht_node Hotspot Template
5. In Properties > Appearance > Visible select the logic block
6. Set the logic to *vis_navigation = true | Visible = false (figure #14)
Figure #14: ht_node Appearance > Visible logic block
Note: this will hide the Point Hotspot while the information popup is visible.
7. With the ht_node still selected 0pen the Properties > Action menu
8. Add the following Action Mouse Click | Set Variable Value | Set(=)/true | vis_navigation (figure #15)
Figure #15: ht_node action
9. Open the ht_node and select the ht_image
10. In Properties > Appearance > Visible uncheck the checkbox
11. Select the Visible logic block
12. Set the logic to *click_text = $(*click_target) | Visible = true (figure #16)
Figure #16: ht_image Appearance > Visible logic block
Note: When the click text value (set in the Move to View modifier action) and the click target number (set in the custom property) are the same, the targeted Point Hotspot will be revealed.
13. Save the skin as Hotspot_Reveal_V1.ggsk
14. Close the skin
15. Open the Edit Skin Configuration window
16. Check "Show Variables”
17. Publish the project
Note: now when you click on the next button the Information Popup is hidden, the #1 Point Hotspot is revealed and the panorama pans to bring it to the center of the window. See below…
Adding a Second Point Hotspot ⇑
In this section we are going to add another point hotspot to the same node.
1. Double click in the viewer to add another Point Hotspot
2. Set the Skin-ID: = ht_node
3. Set the Position: Pan: 0.00 | Tilt: -30.00
4. Set the Custom Property: Hotspot Target: 2 figure #17)
Figure #17: Menu slider element
Note: we are going to update the ‘header’ and ‘copy’ button in the information_popup container > popup rectangle
5. Select the ‘header’ button
6. In Properties > Text > Text select the logic block
7. Set the logic to *click_text = 1 | Text = Step 1. A Great Start (figure #18)
Figure #18: Header Text
8. Select the ‘copy’ button
6. In Properties > Text > Text select the logic block
7. Set the logic to *click_text = 1 | Text = This is a great start you've clicked on Step 1. Lets continue. Click on the **"Next"** button to continue (figure #19 & 20)
Figure #19: Copy button Enter Text copy
Figure #20: copy button text logic button
8. Select the ‘Next Button’
9. Open the Properties > Action menu
10. Add a new Move to View Action and Modifier (figures # 21, 22)
Figure #21: New Move to View Action
Figure #22: New Move to View Action modifier
9. Save the skin as Hotspot_Reveal_V2.ggsk and close it
10. Save the project as Hotspot_Reveal_V2.p2vr
10. Publish the project
Moving Between Nodes ⇑
Note: In this final section we will be adding two more Point Hotspots on the second node in the tour and transitioning from node 1 to 2 as we click through the reveals.
1. In the Viewer move to node 2
2. Add two Point Hotspots at 0/30 and 30/0
3. Set the Skin-ID = ht_node and Hotspot Target = 3 & 4 respectively (figure #23)
Figure #23: Two new Point Hotspots
5. Open the Hotspot_Reveal_V2.ggsk
6. Select the ‘header’ button
7. In Properties > Text > Text select the logic block
8. Create 3 new logic entries as per the image below
Note: you can select copy from the button at the bottom of the window. Close and reopen the logic block and then paste 3 times. Then you can update just the Value and Text fields. (Figure #24)
Figure #24: Header logic
9. Select the ‘copy’ button
10. In Properties > Text > Text select the logic block
11. As per the header click the ‘copy’ button and paste 3 times
12. Update the logic entries as per the image below (Figures #25,26, 27 & 28)
Now we are moving, you've clicked on Step 2. Lets continue.
Click on the **"Next"** button to continueNow we are getting somewhere, you've clicked on Step 3. Lets continue.
Click on the **"Next"** button to continueYou made it to the end at Step 4. Lets finish up.
Click on the **"Next"** button to continue
Figure #25: Step 2
Figure #26: Step 3
Figure #27: Step 4
Figure #28: Copy logic
13. Select the ‘Next Button’
14. Open the Properties > Action menu
15. Add a new ‘Open Next Panorama’ and 3 ‘Move to View’ Actions and Modifiers (figure #29)
Figure # 29 Actions
Note: Both the Open Next Panorama and the Move to View just after it will both have modifiers *click_text = 3
The next Move to View has *click_text = 4 and the last has *click_text = 0
The final Move to View brings us to the center of the view
16. Save the skin as Hotspot_Reveal_V3.ggsk and close it
17. Publish the project
Wrapping it Up ⇑
The final step will be to hide the variables and show the ‘Finished’ and ‘Reset’ button.
1. Open the skin as Hotspot_Reveal_V3.ggsk
2. Select the finished_txt element
3. Open the Properties > Appearance logic block
4. Add new logic entries:
clicktext = 0 | And
*vis_navigtion = false | Visible = true (figure #30)
Figure #30: Finished_txt visible logic
5. With the ‘finished_txt’ still selected open Properties > Actions
6. Add the Actions as shown below (figure #31)
Figure #31: finish_txt actions
7. Save the skin as Hotspot_Reveal_V4.ggsk and close it
8. In the project window open the Edit Skin Configuration window and check ‘Show Reset’ and uncheck ‘Show Variables’. (figure #32)
Figure #32: Edit Skin Configuration settings
Note: Checking ‘Show Reset’ will display a small text button at the bottom of the screen that allows you to start over if you want to test the functionality again.
9. Publish the project
Summary ⇑
This brings us to the end of the tutorial. If you have any questions let me know.
"Hey there! 👋 If my tutorials have made your tech life a little easier (or a lot less confusing) consider buying me a virtual coffee ☕️ or even lunch 🍔 Retirement means more time to help you, but sadly, less income for snacks. Click the Donation button 🙌 and thanks for the love!"
