An Unexpected Benefit
Fortunately it doesn't happen very often, but if you've come to the realisation that somehow you've lost your final equirectangular image it can be a real blow and the images often difficult to recreate.
If, however, you have created and published your Pano2VR project using the Output/Image/Multi-resolution option you have the "unexpected benefit" of a hidden backup that can be used to restore your final equirectangular image in high resolution.
This "unexpected benefit" requires a little preparation and some manual setting that may pay you dividends in the future.
About the Tutorial
In Part 1. this tutorial takes you, step-by-step through the process of calculating your multi-resolution tile and level sizes to create the perfect set of tiles for your project. In Part 2. I look at extracting the high resolution tiles, renaming them and in Part 3. re-assembling them to restore your equirectangular image.
The tutorial is based on the Macintosh OS and shows a Mac only program for renaming the tiles. At this time we are still looking for a suitable Windows application and would appreciate any feedback or recommendations.
Note: this tutorial assumes a working knowledge of Pano2VR V5.2.3
This tutorial is broken down into 3 parts, this is Part 1: Create the Tile Size and Levels. The other parts are;
Part 1. Create the Tile Size and Levels
Part 2. Extracting and renaming the Tiles
Part 3. Reconstructing the Panorama
A Collaboration
This tutorial was made possible by Michael Buster's essential contribution of the extraction, re-assembly process and the required software that makes it possible. It was also Michael's post on the Pano2VR forum that prompted this exploration that revealed the hidden backup.
What is Multi-resolution in Pano2VR
360˚ equirectangular images tend to be much larger files than traditional photos, so one of the challenges faced by software developers was the delivery of high quality imagery that allowed panoramas to load quickly on a range of devices from mobile phones to more powerful desktop computers as well as supporting the ability to zoom into the image.
In the early days of mobile devices, slow internet and large screens delivering the full-resolution photo immediately could stall new content from populating as people scroll, as well as use large amounts of memory to process the photo.
Faced with this challenge, Pano2VR was engineered to create “tiled” storage to improve the serving of photo content.
In the application there is an option to export Single Resolution or Multi Resolution images. In the case of Multi Resolution the equirectangular image is converted to a cube map. These cube maps in turn are stored at multiple resolutions (layers), and each of these resolutions is split into small, individual images. This allows different zoom levels to maintain good quality resolution.
When a multi resolution images is viewed, Switch Bias settings in the software, determine at which zoom levels the tiles will change. This is accomplished by comparing screen and image pixels.
Part 1. Create the Tile Size and Levels
In this example I'm going to using a 360˚ Panorama I shot from the rooftop of the Moreno Hotel in Buenos Aires. It's 13,500 x 6,750 pixels and contains good resolution. The skin I'm using is a standard simplex.ggsk and I've saved the project as BA-Moreno-Rooftop. (figure #1)

figure #1: Pano2VR V5 interface
Squaring up the Tiles
Note: It's very important, if we ever want to reconstruct the panorama, that the tiles created are all square.
Multi-resolution tiles created automatically in Pano2VR V5 may have irregular shaped tiles, these make the reassemble of the cube very very difficult.
For example a column of Level 3 tiles, created automatically, using the default settings...(figure #2)

figure #2: default Multi Res settings
Look like this... 6 square images and 1 rectangle (figure #3)

figure #3: cube face 0, level 3, Column 0
What we want instead are tiles that are all square like this (figure #4)

figure #4: cube face 0, level 3, column 0
To achieve this we need to set the 'Level Tile Size:' and 'Levels' manually
To help you determine the settings I've developed a form that allows you to input your 'Panorama Width' and then it automatically calculates the required 'Level Tile Size' and 'Level widths'.
1. To start just enter your width and select 'Return' on the keyboard
2. Once you have your settings open the Pano2VR project if it's not already open.
3. Open the 'Image' dropdown and set the 'Level Tile Size' to that in the calculator (figure #5)

figure #5: Enter Level Tile Size
Note: in this example even though the Level Tile Size, in the calculator, is 268 I'm going to set my Level Tile Size at the same size as the smallest level. This means that level 1 will just be a single image 536 x 536 pixels and level 4 will be 64 images each 536 x 536. Too small a Level Tile Size can result in a large number of tiles being generated. I suggest testing it with your work relative to the devices the project will be viewed on.
4. Select 'Manual'. The Width field opens with a value assigned to it (figure #6)

figure #6: Manual option and Width field
5. Replace that with the 'Level 4 Width' value as shown in the generator (figure #7)
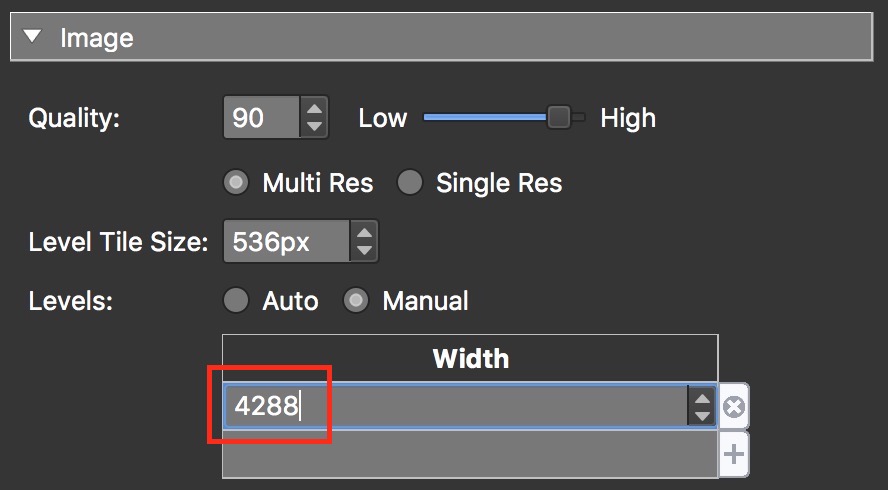
figure #7: Level 4 width
6. Add the remaining levels by selecting the '+' sign. The values will be automatically entered (figure #8)

figure #8: Use '+' sign to add the additional values
7. Test the settings by outputting the project
8. Open the output folder and drill down to the 'tiles' folder. Then node1/cf_0/l_3/c_0 or in plain english node 1 /cube face 0/level 3/column 0.

9. Select a tile and right click 'Get Info'
Note: when you look at the tile size it shows 538 not 536! This is due to a default setting, in the Advance dropdown, that creates an overlap of 1 pixel per side to avoid any issues with edges when the viewer joins them all together. This setting can be changed but for now we will continue without it.
This concludes Part 1. Create the Tile Size and Levels please click here to continue to Part 2. Extracting and Renaming the Tiles
