Part 2a, Generating your Apple Certificates
This, step by step, tutorial describes how to use Adobe PhoneGap to create an app that you can install on your iOS device to play Pano2VR or Krpano projects offline. It can also be used to distribute apps to clients for use on their specified iOS devices.
The tutorial is presented in three parts, this is Part 2a.
Note: This tutorial is designed for users on Apple Computers and iOS devices iPhone and iPad. In order to create a PhoneGap build containing your VR project you will need to have an Adobe ID, an Apple ID and an Apple Developer Account. If you have all of these then continue with this tutorial. If not please follow the step by step instructions in Part 1: ID's, Apple Developer and PhoneGap Build Accounts
Part 1: Adobe ID, Apple ID, Apple Developer Account
- Creating your Adobe ID
- Creating your Apple ID
- Signing up for an Apple Developer Account
- Setting up the Certificate
- Generating the Certificate Signing Request (CSR) file
- Creating the iOS Development Certificate
- Creating the .p12 Certificate
- Creating the App ID
- Register Devices
- Provisioning Profile
Part 3: Project and Required Files
- Assets
- Config.xml
Part 4: Preparation, Required Files, App Build and Deployment
- PhoneGap App Build
- Deploying to iOS
Before we start:
Development on IOS is very controlled. Apple requires you to digitally sign each application with a digital key before it can be loaded on a device. This is true for both the development and release versions of your application regardless of the fact that you may only want to load it onto your own iOS device.
As you might expect, this process is much easier on a Macintosh. It is possible to do this on a Windows machine, but it is not covered in this tutorial.
In this part the assets we are creating will only have to be generated once. So be sure to save them somewhere safe so you don't have to recreate them.
Setting up the Certificate
We will start by creating our 'Development Certificate'. This is the first step in toward enabling our applications to run on registered IOS devices.
The first step is to setup the Certificate in your Apple Developer Account.
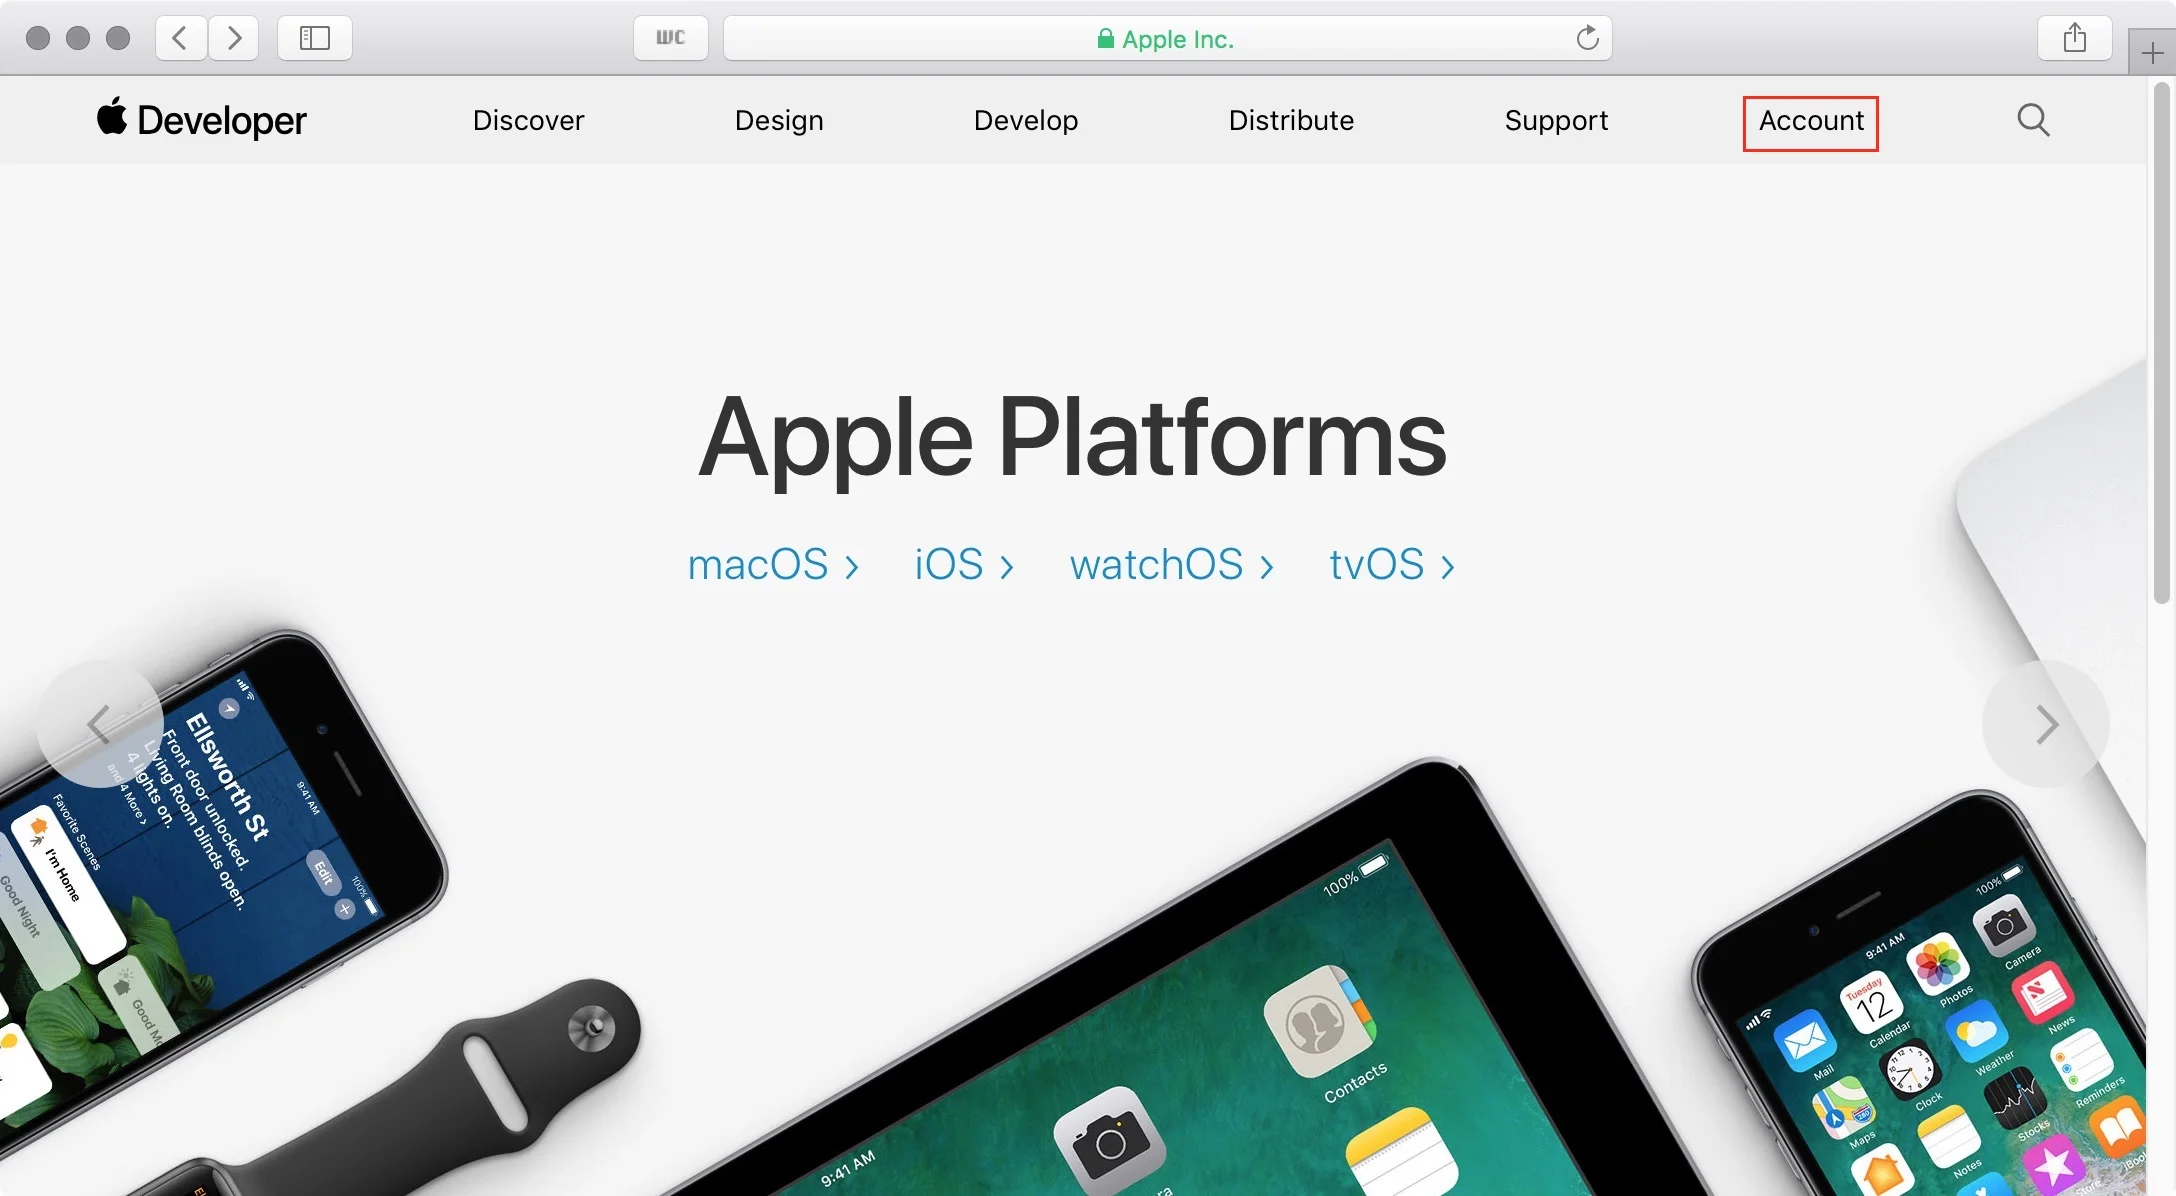
1. Open Safari and browse to developer.apple.com then click on 'Account' (figure #1)
figure #1: Apple Developer Homepage
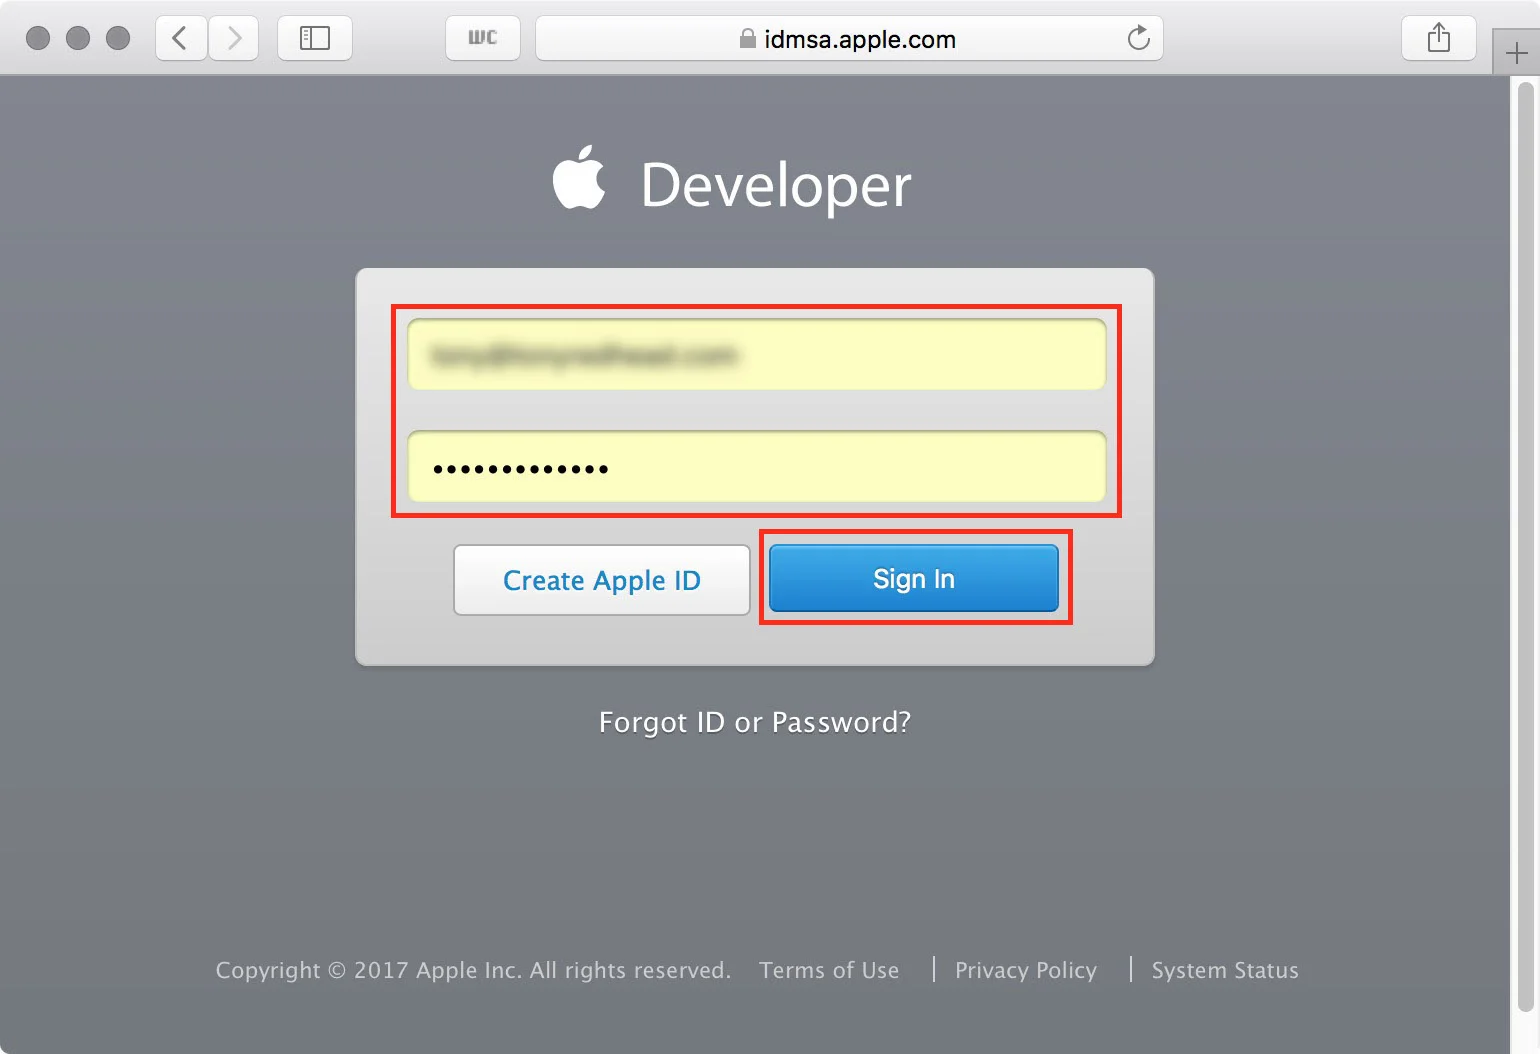
2. Enter the email address and password set up for the Apple Developer account. Click on 'Sign In' to enter. (figure #2)
figure #2: Apple Account login
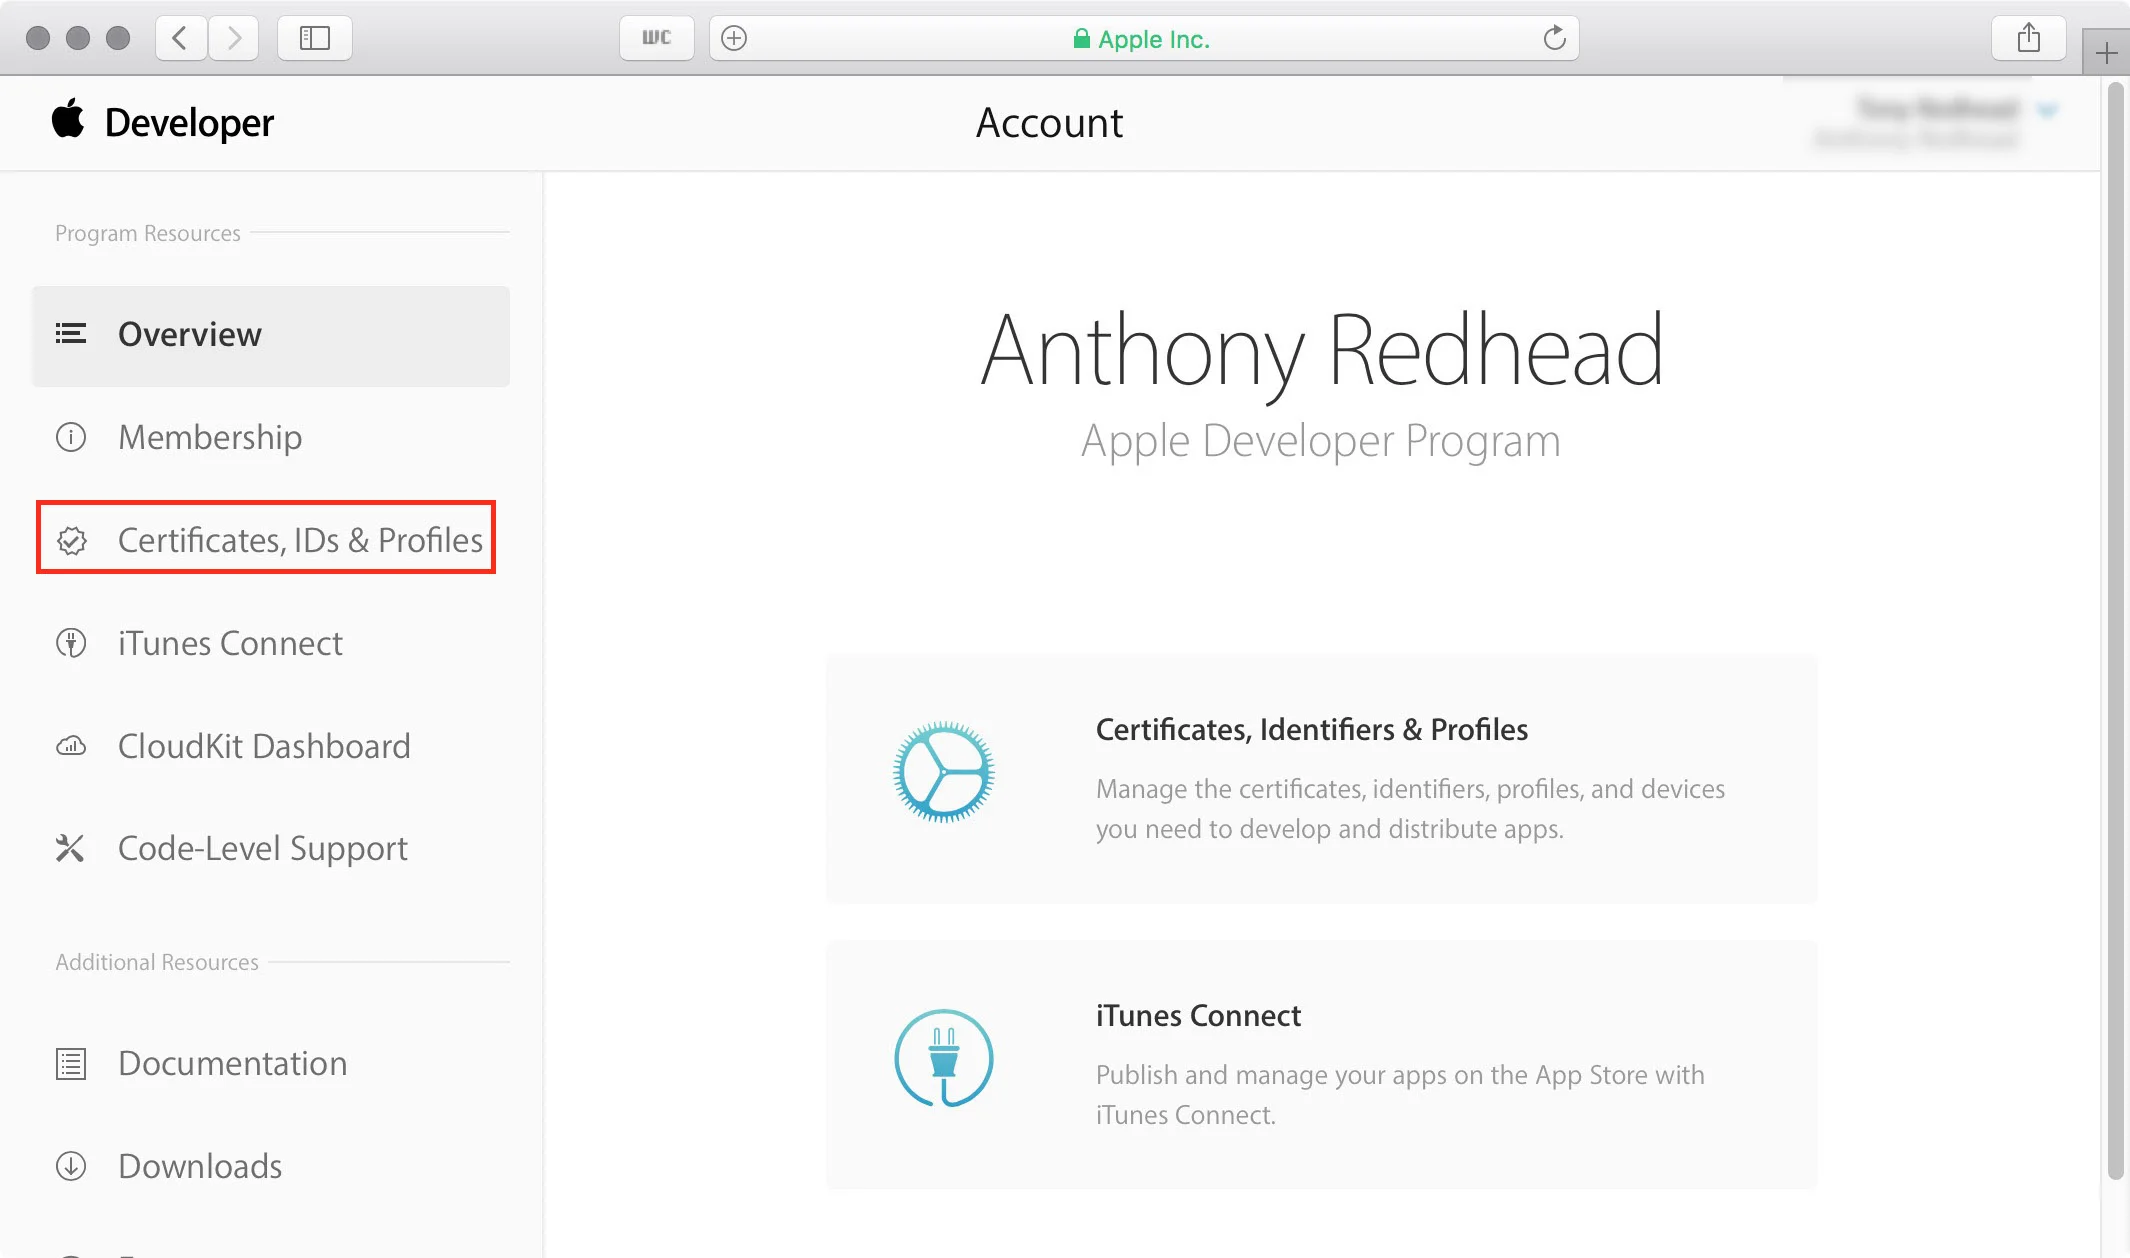
3. In your Account Page, click on 'Certificates, ID's & Profiles' to open the iOS Certificates pages (figure #3)
figure #3: Account Page
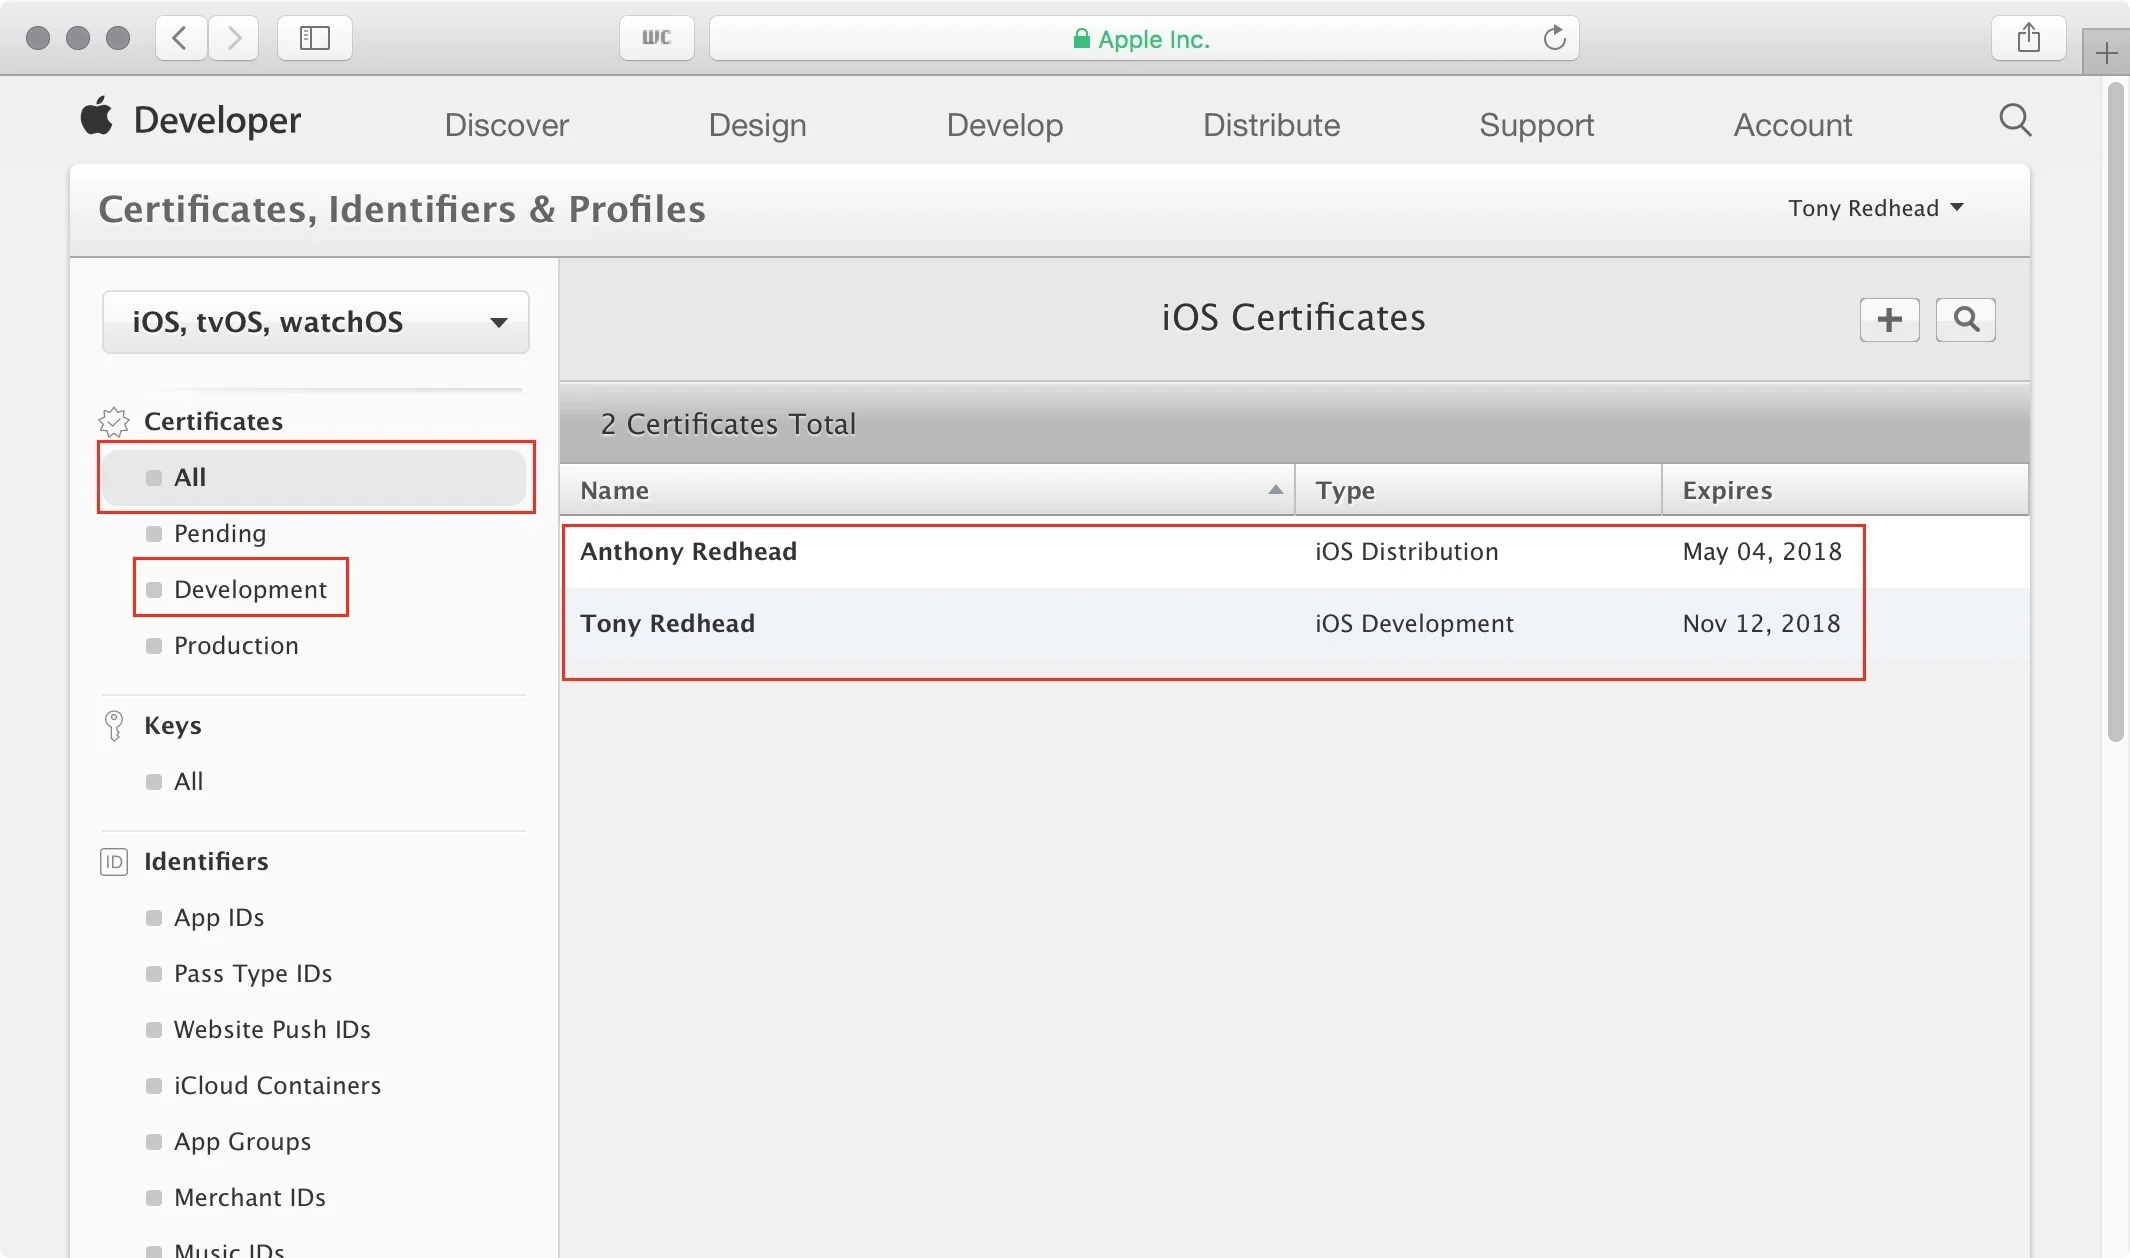
4. The default selection in iOS Certificates page is "All" and you can see I already have two certificates in this section, one distribution and one development.
Note: if this is your first time in the Certificates, Identifiers & Profiles section you will have 0 Certificates Total
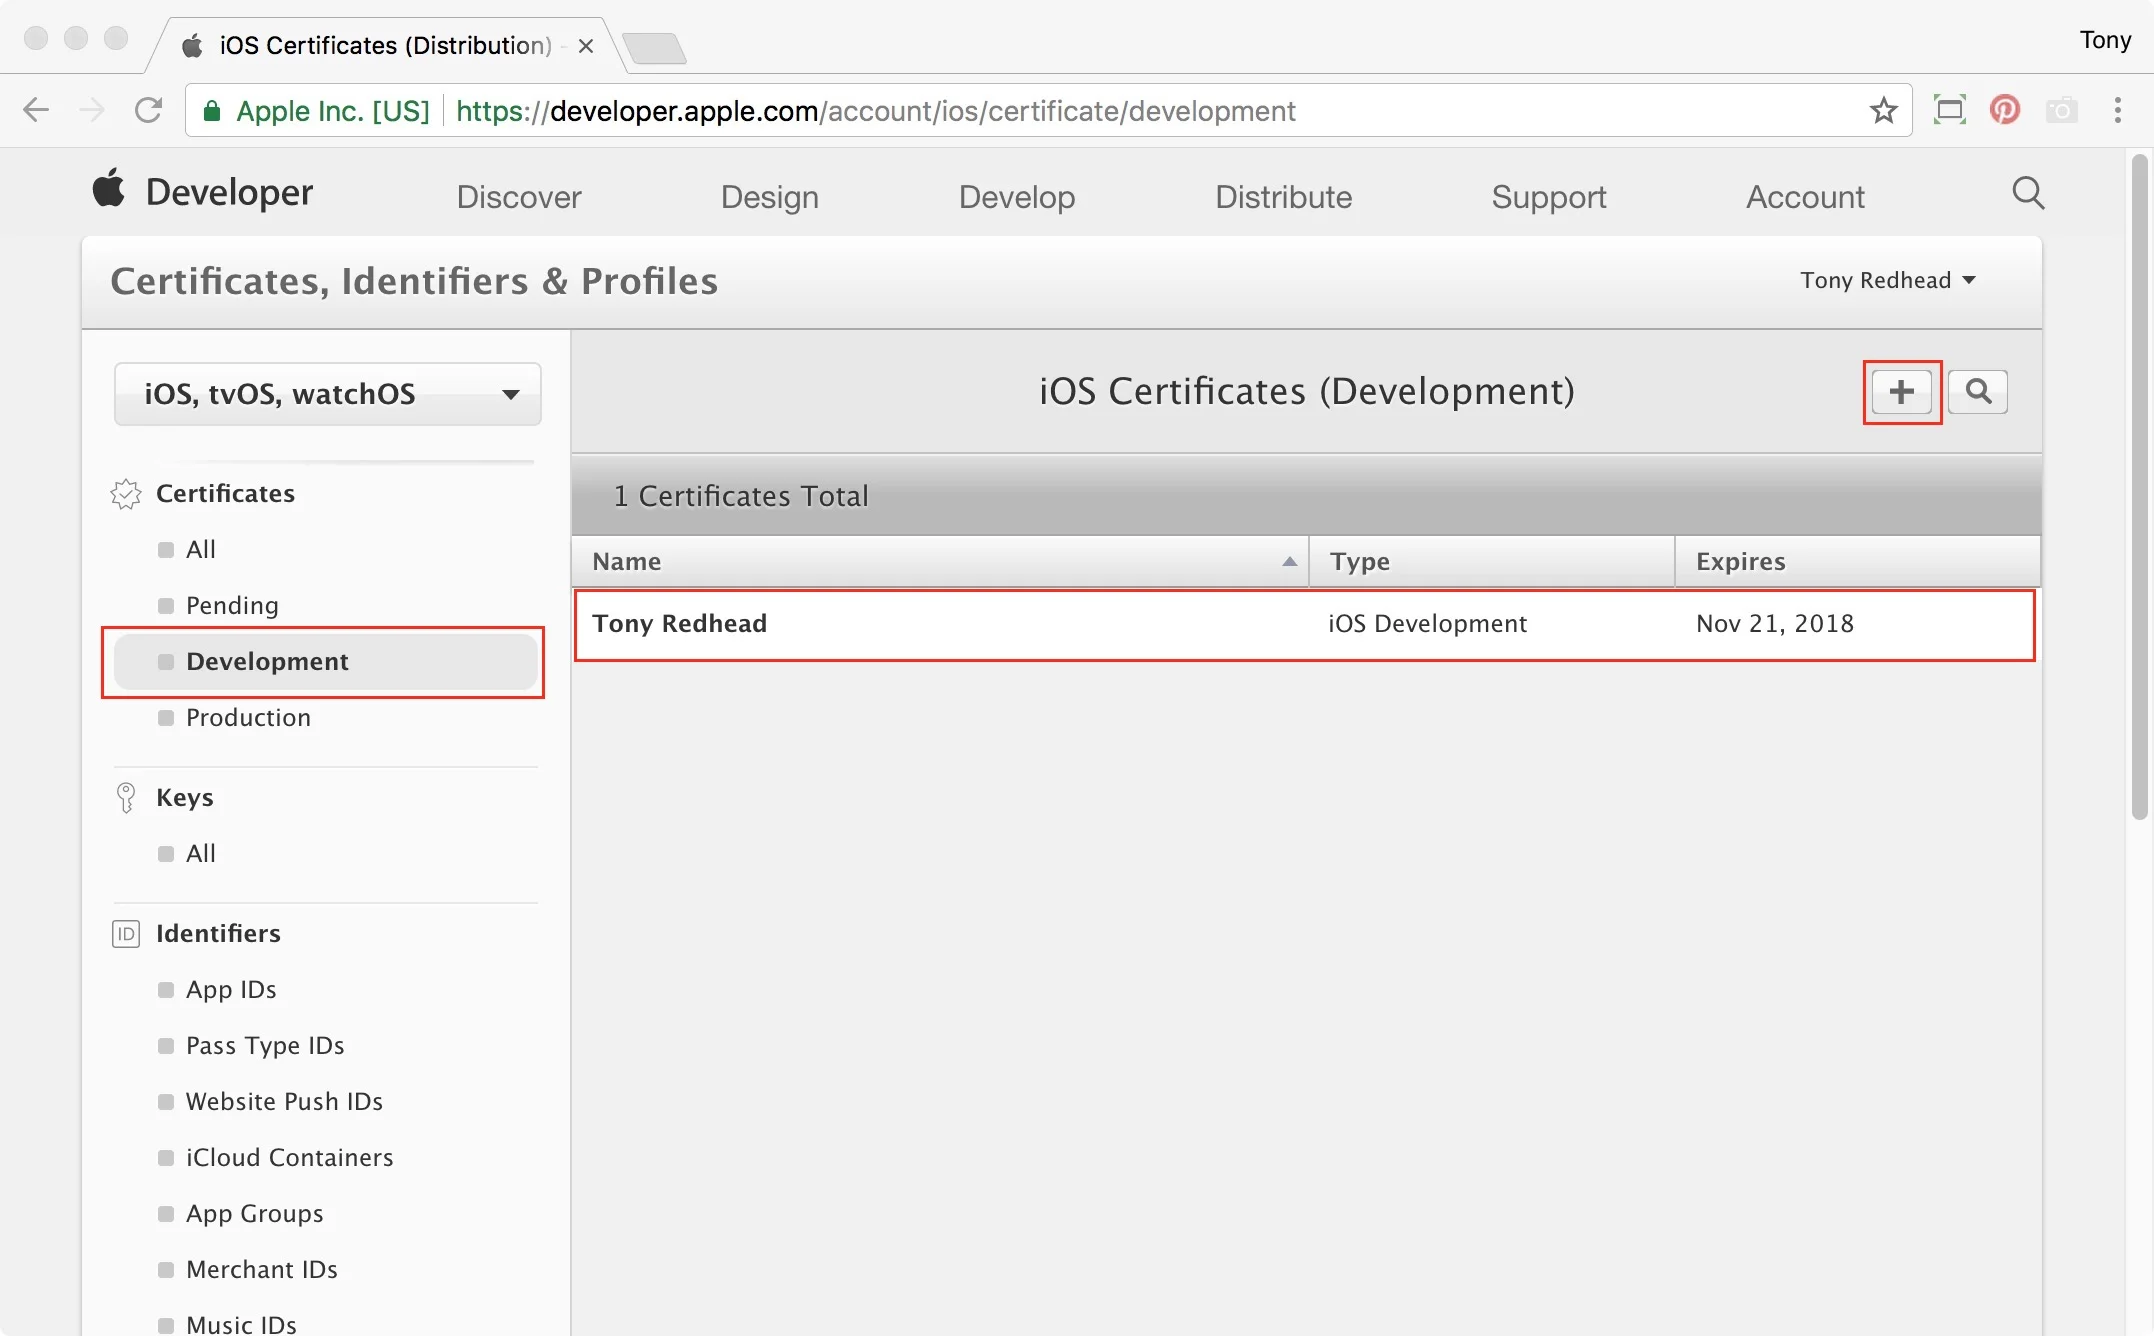
To view only the development certificates click on 'Development' to open the iOS Certificate (Development) page (figure #4)
figure #4: iOS Certificates
5. The iOS Certificates (Development) page shows any current Development Certificates if they exist. To create a new Development Certificate click on the '+' button to open the Add iOS Certificate page (figure #5)
figure #5: Development Certificates
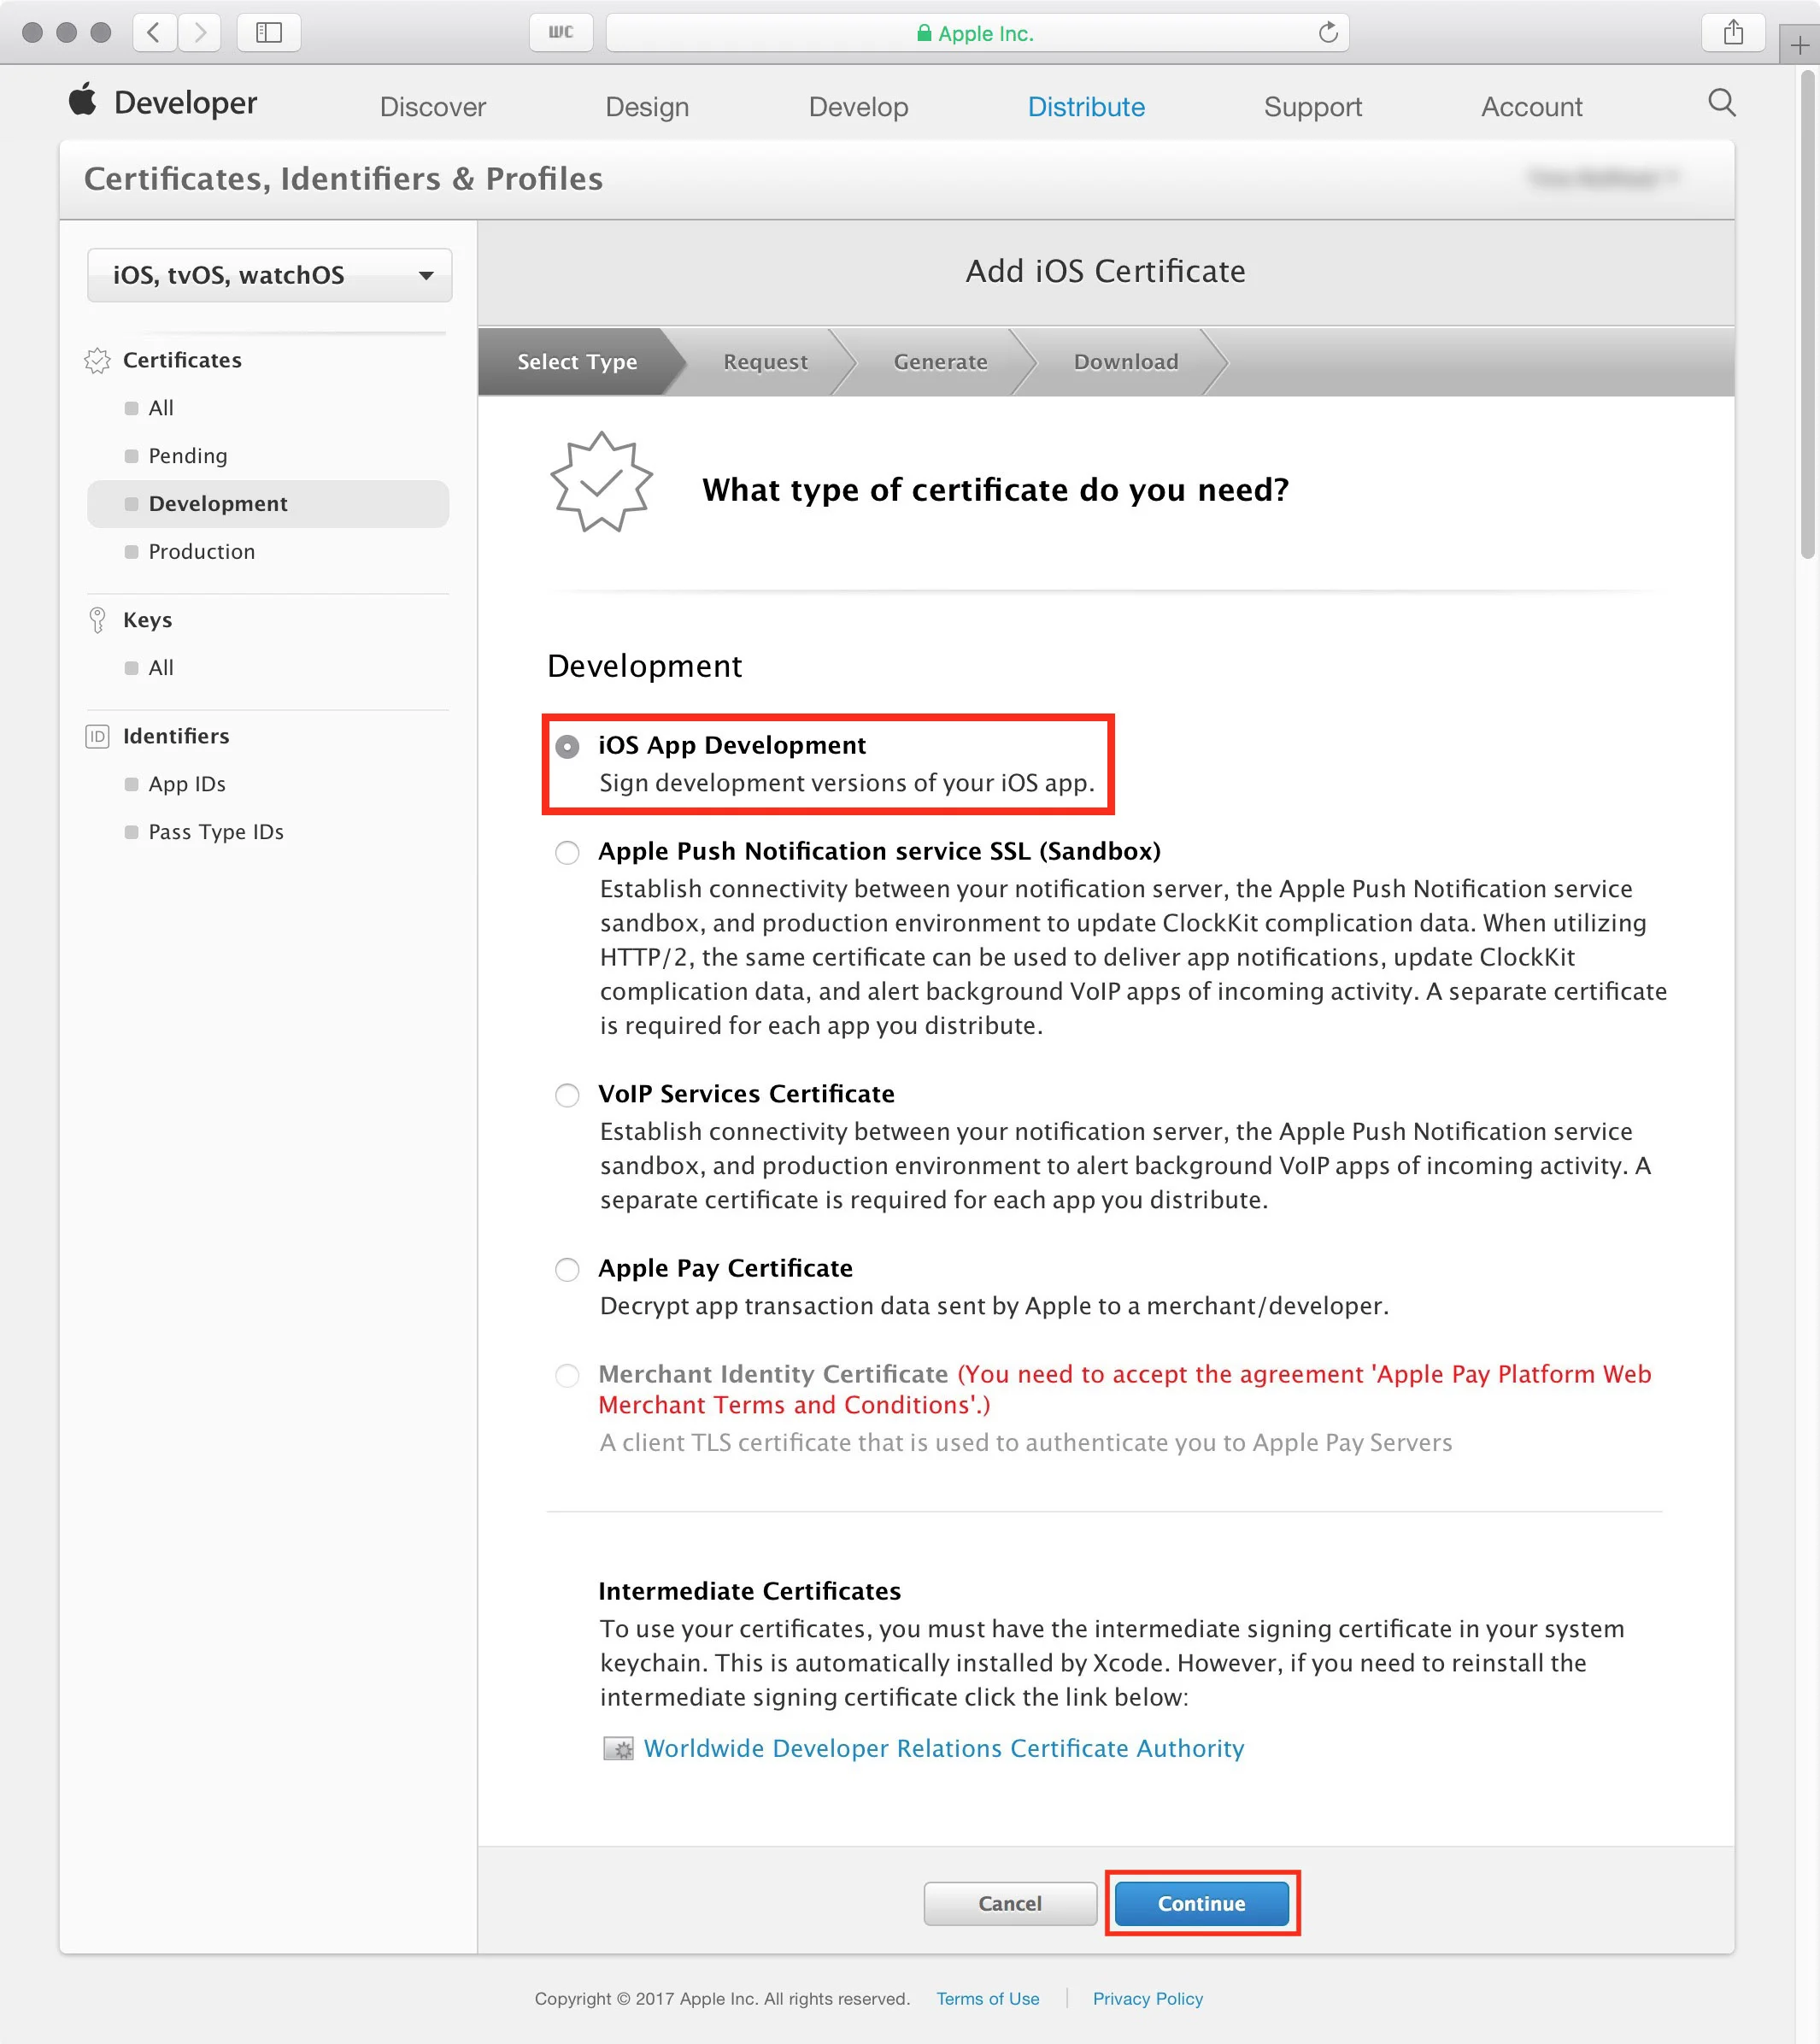
6. There are a number of options on this page but we only need to click on the radio button for 'iOS App Development'. After it's selected scroll down to the bottom of the page and click the 'Continue' button (figure #6)
figure #6 Selecting App Development
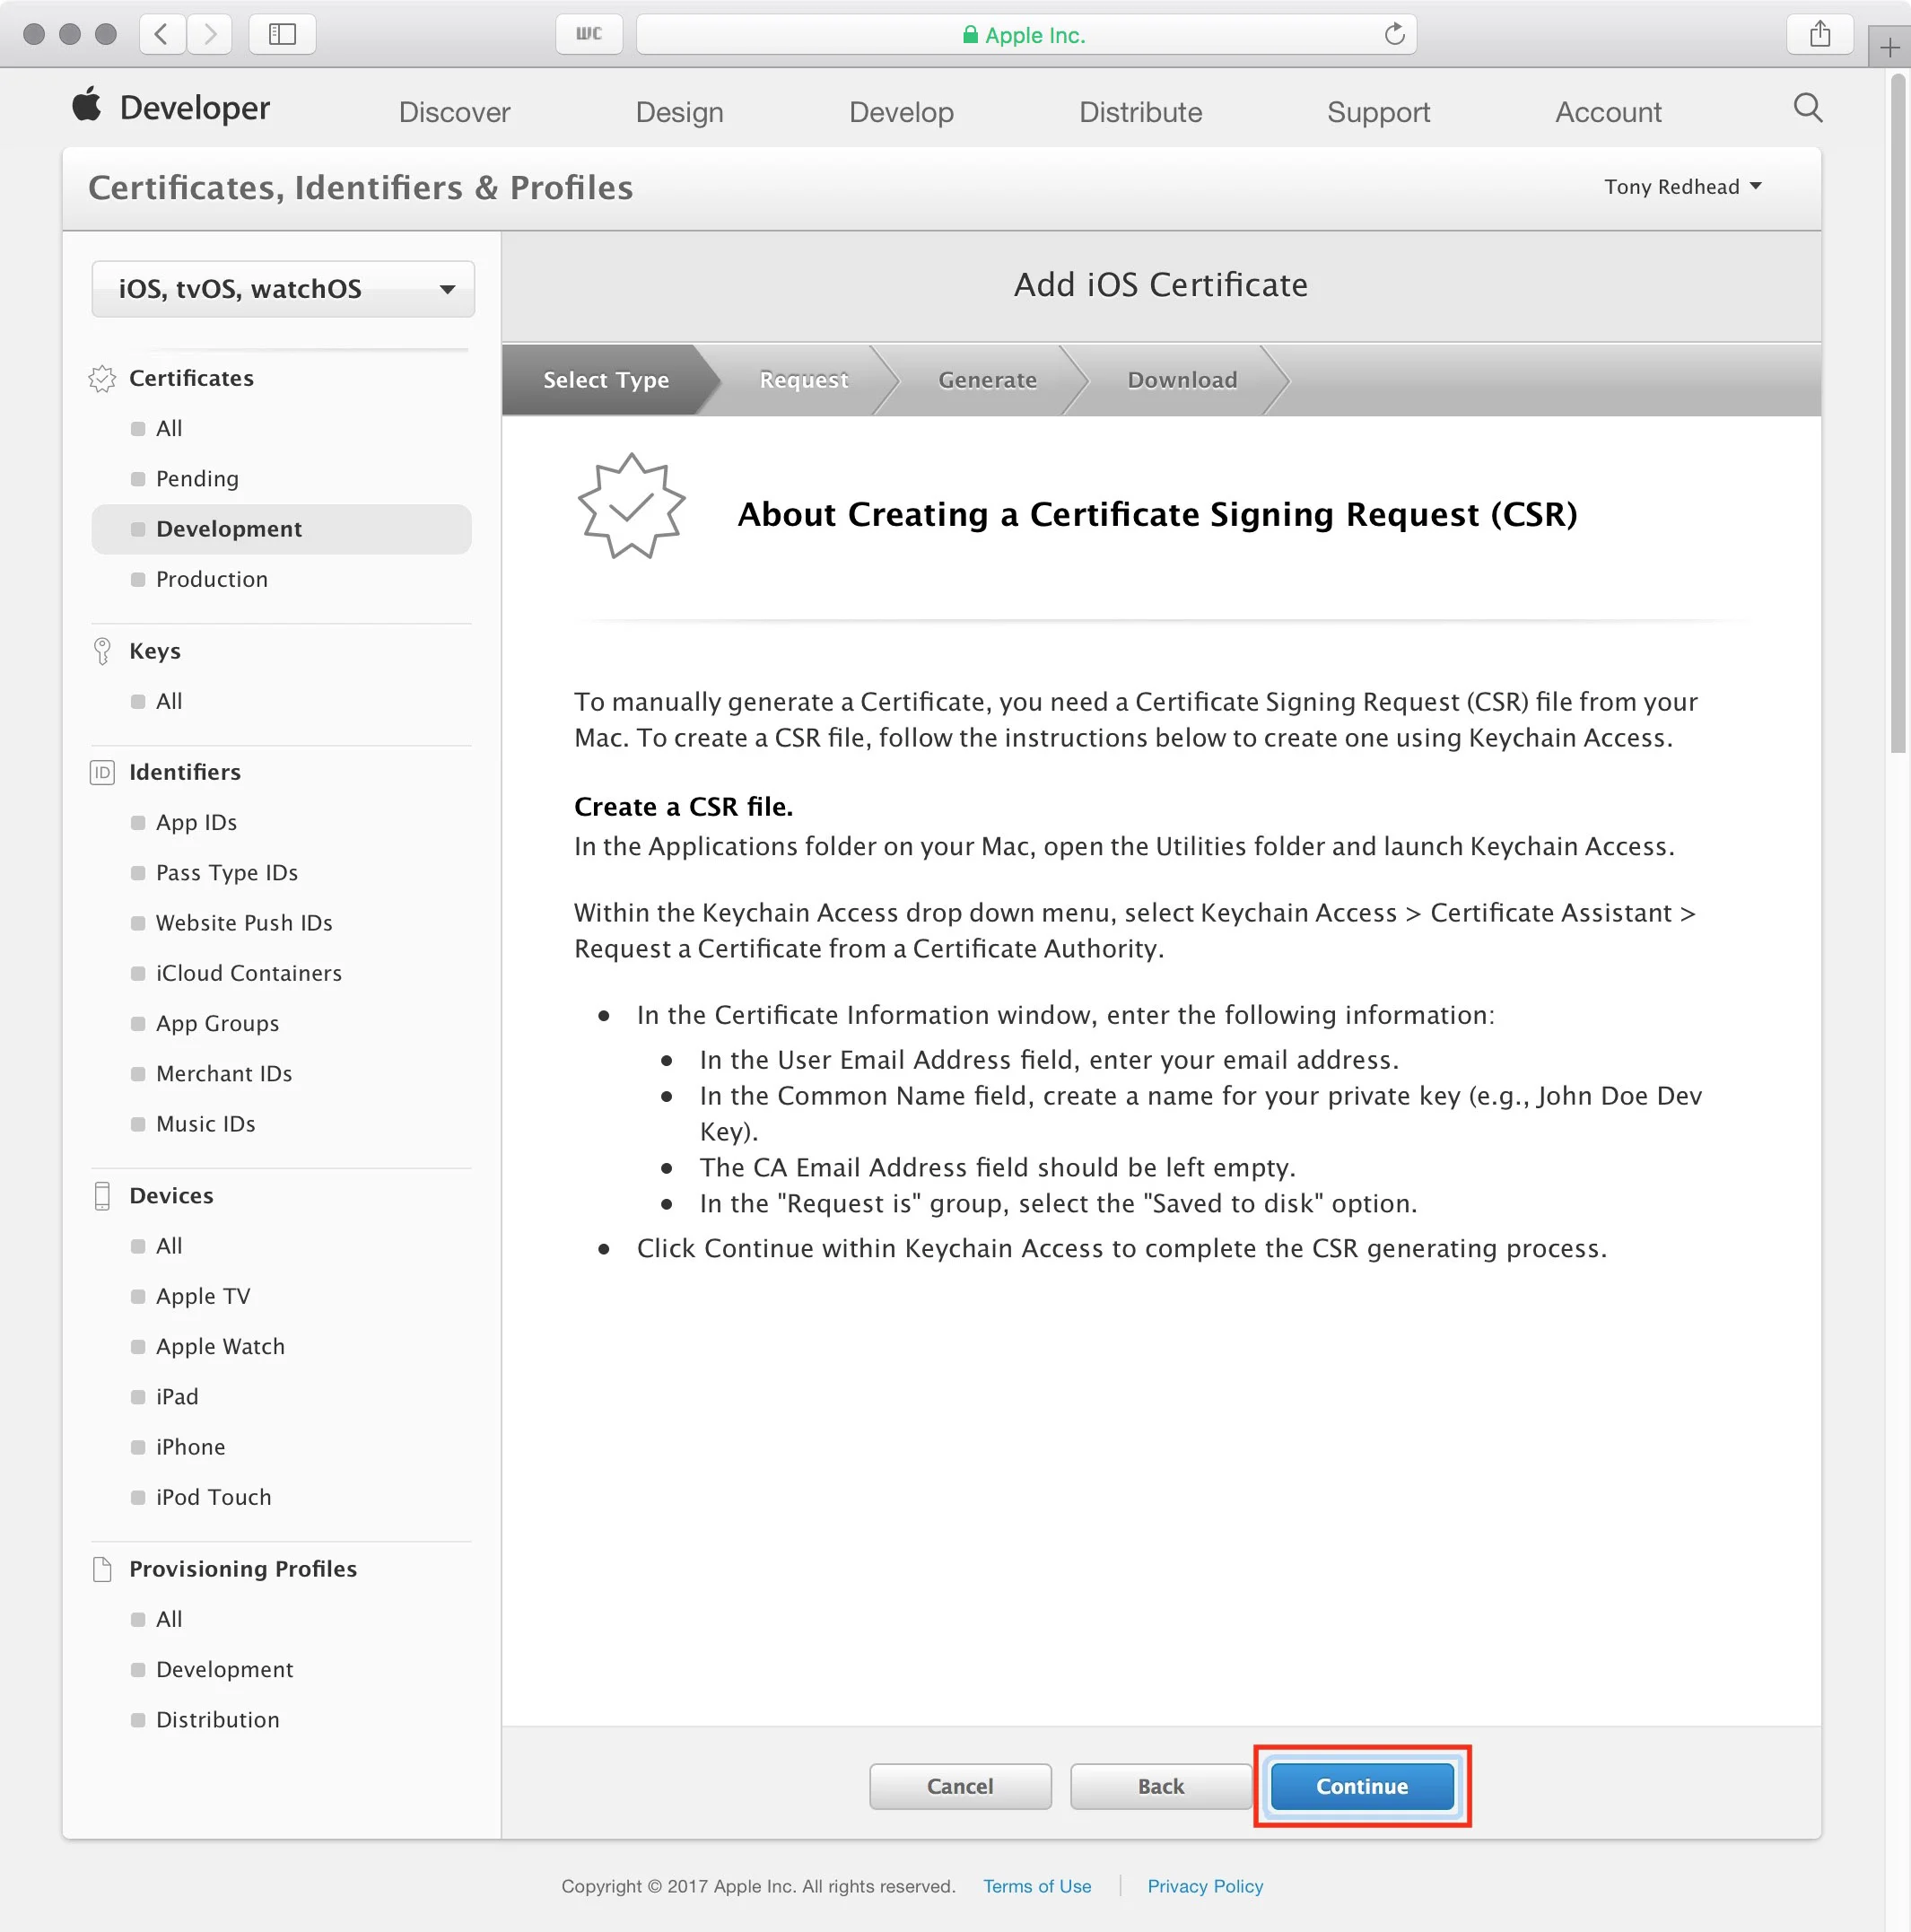
7. The next page provides information on how to create the certificate using the Keychain Access application. We will be going through these instructions in the following steps. For now click on the 'Continue' button (figure #7)
figure #7: Information on how to create a CSR
8. The Generate your certificate page requires a CSR file to upload. As we haven't created this yet we will temporarily leave Safari and return to the desktop to create it.
Note: don't close Safari as we will be returning to this page shortly.
Generating the Certificate Signing Request (CSR) file
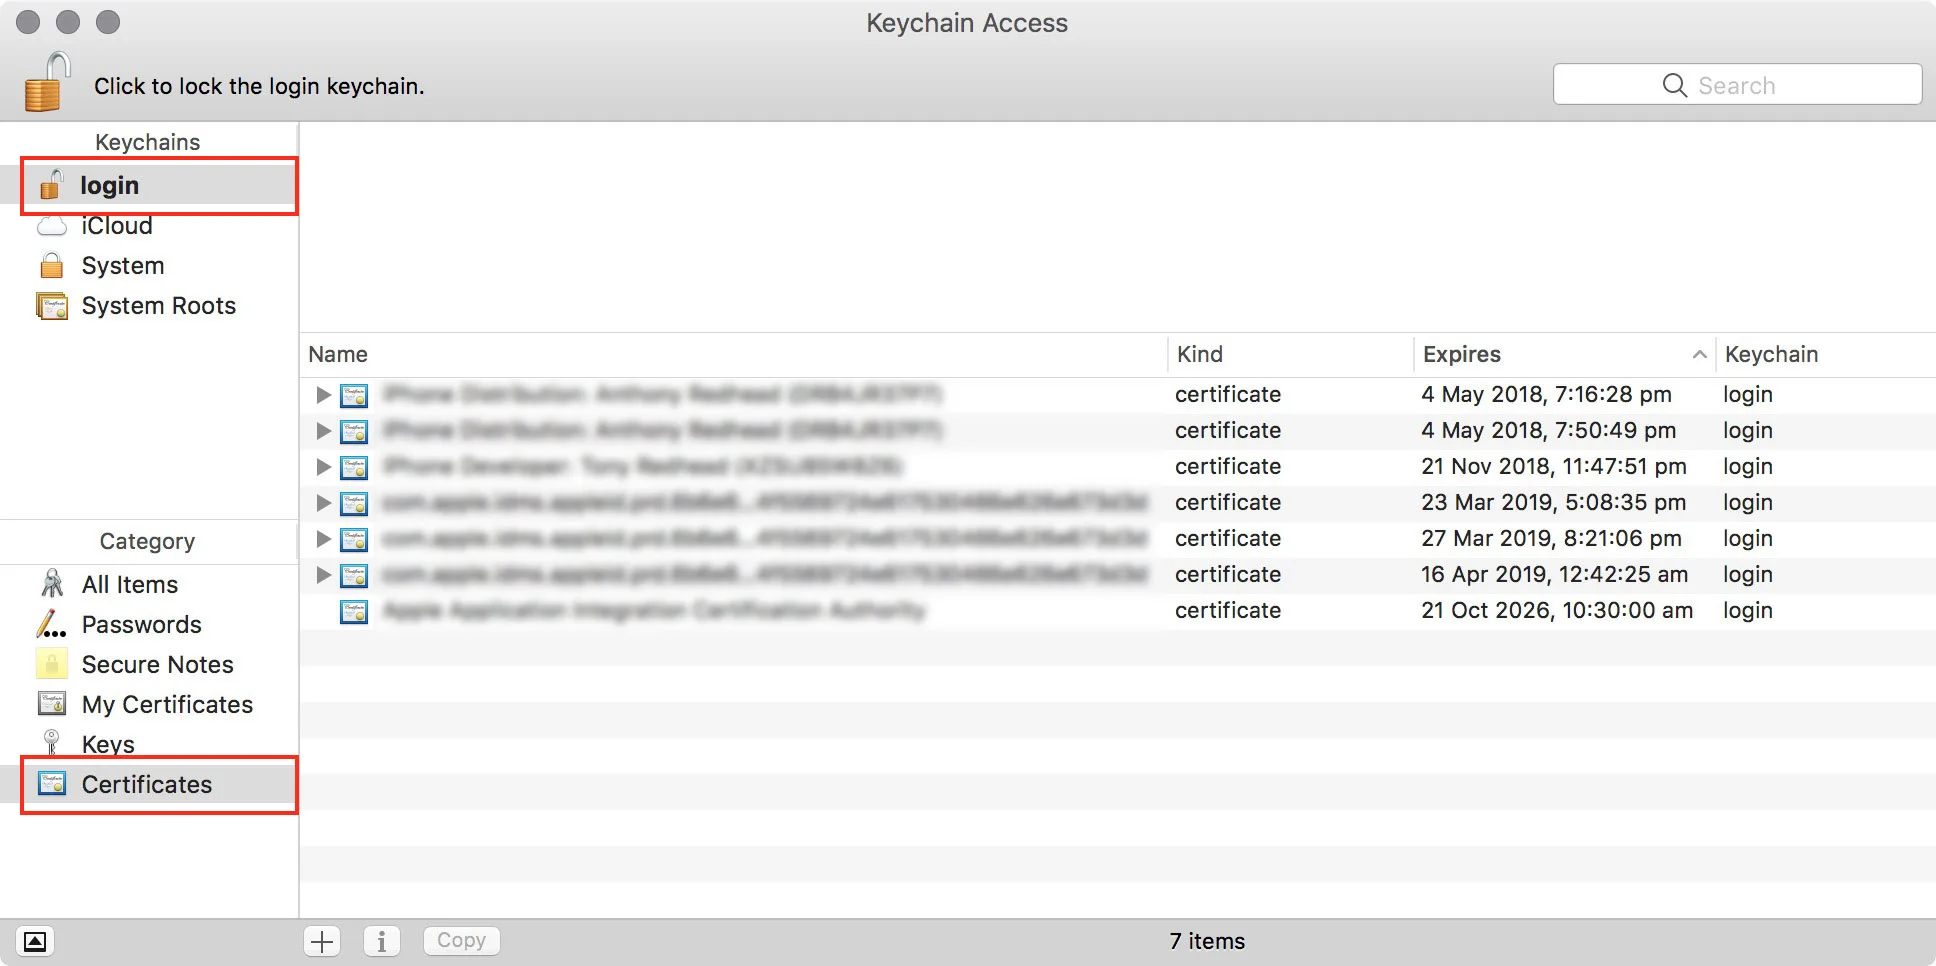
1. Back on the desktop open the Keychain Access application. You can search for it using Spotlight Search or it can be found in the Utility folder (figure #8)
Note: Make sure you have "login" and "Certificates" options selected
figure #8: Keychain Application
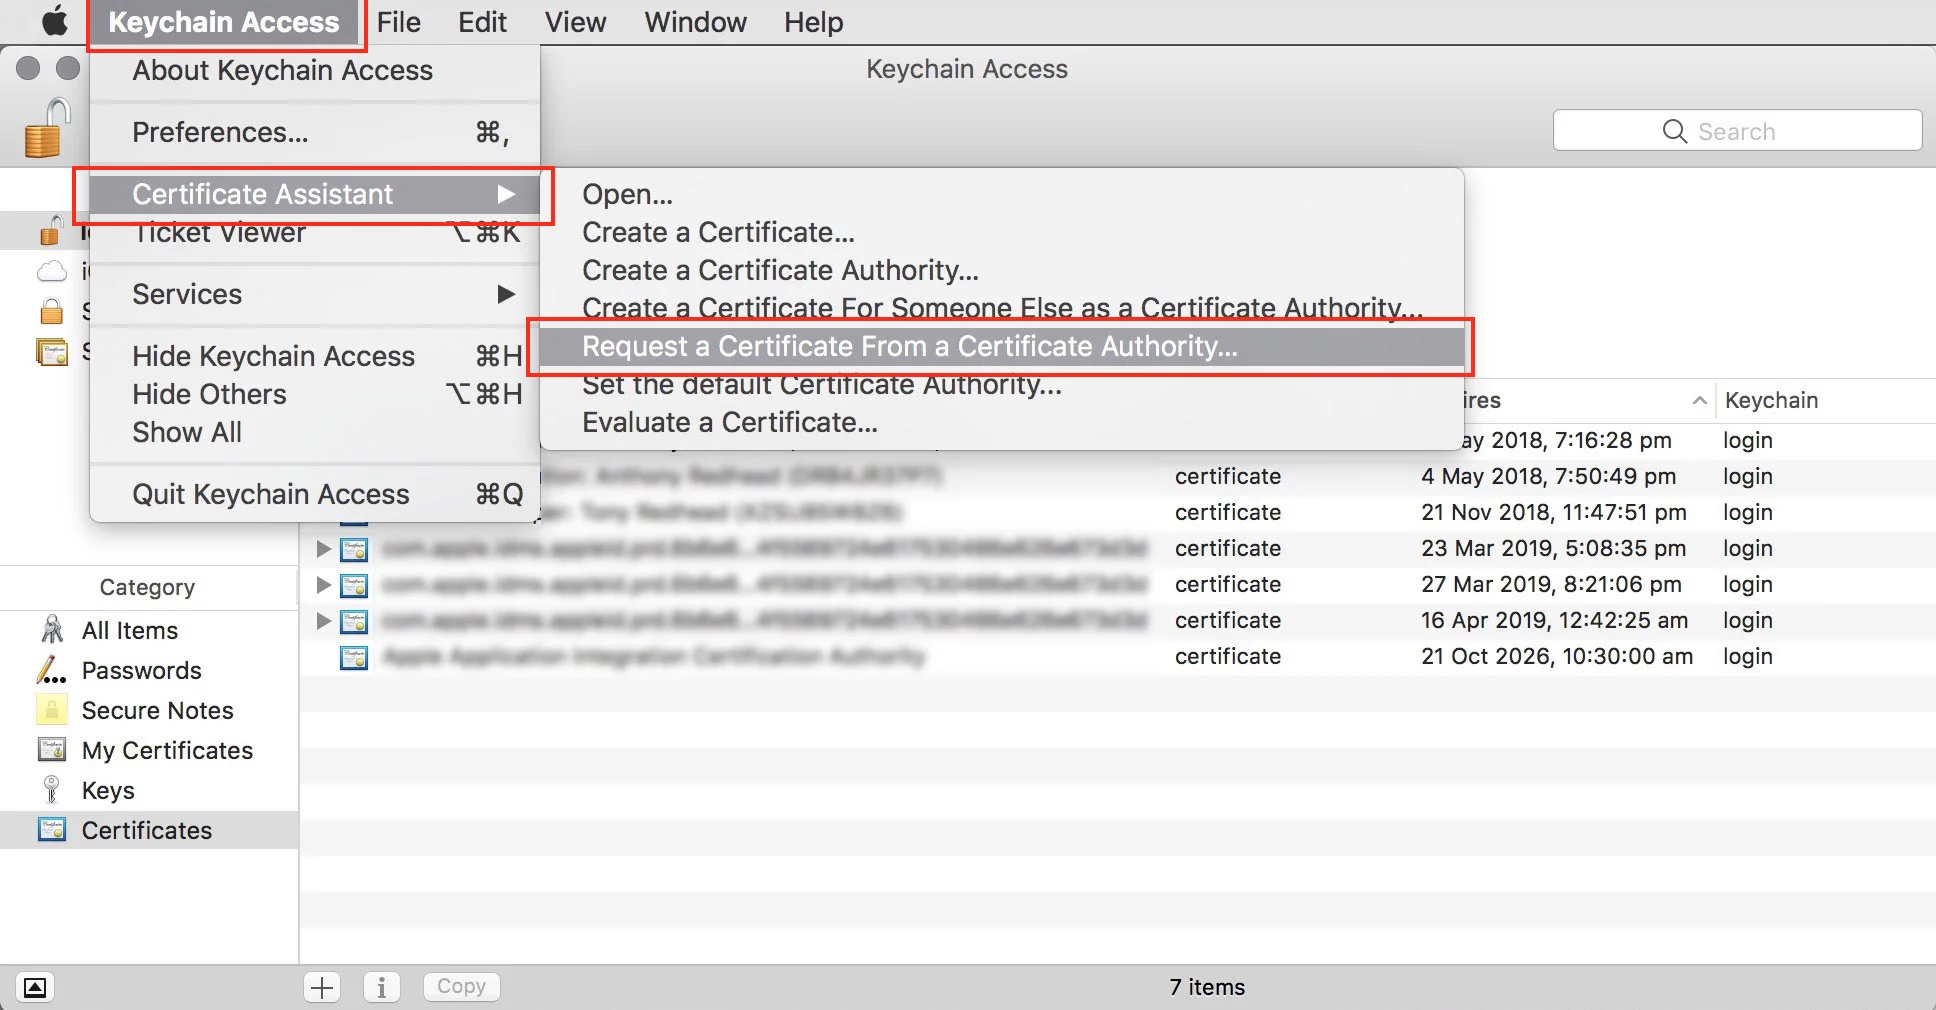
2. With the Keychain Access application open, select 'Menu/Keychain Access/Certificate Assistant/Request a Certificate From a Certified Authority...' (figure #9)
figure #9: Select 'Request a Certificate From a Certificate Authority'
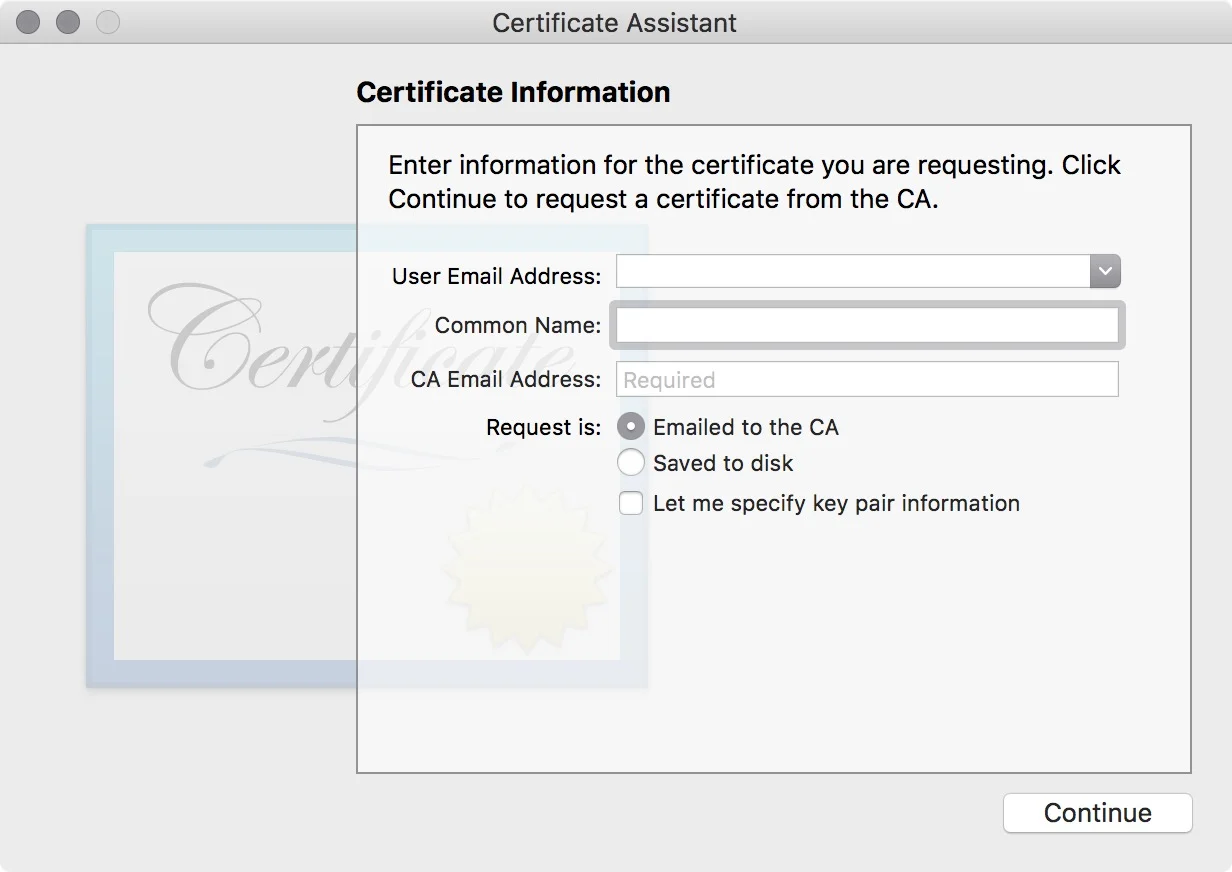
3. This will open the Certificate Assistant window (figure #10)
figure #10: Certificate Assistant
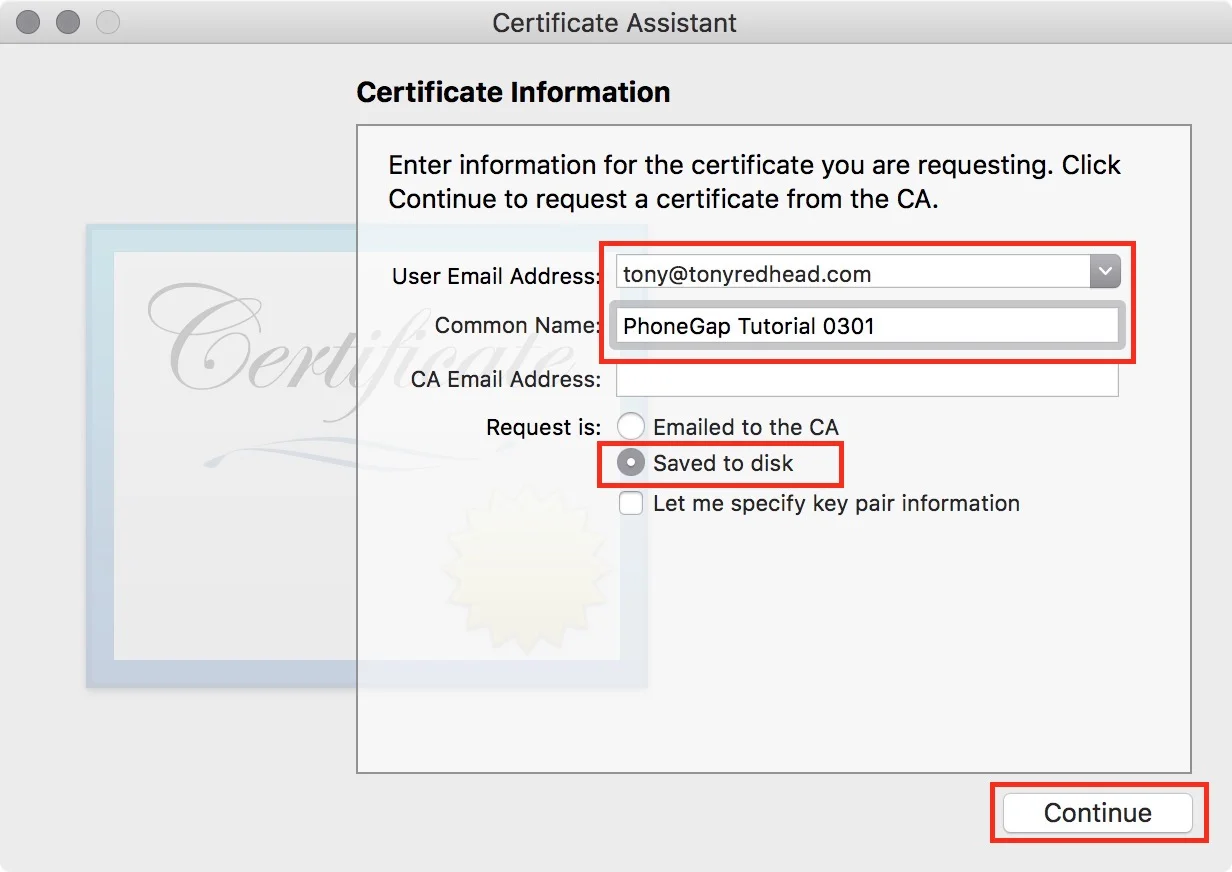
4. Enter your email address in the User Email Address field. Enter a name in the Common Name field, in this example I'm going to use 'PhoneGap Tutorial 0301'.
Change "Request is:" to 'Saved to disk' and select the 'Continue' button (figure #11)
figure #11: Information entered
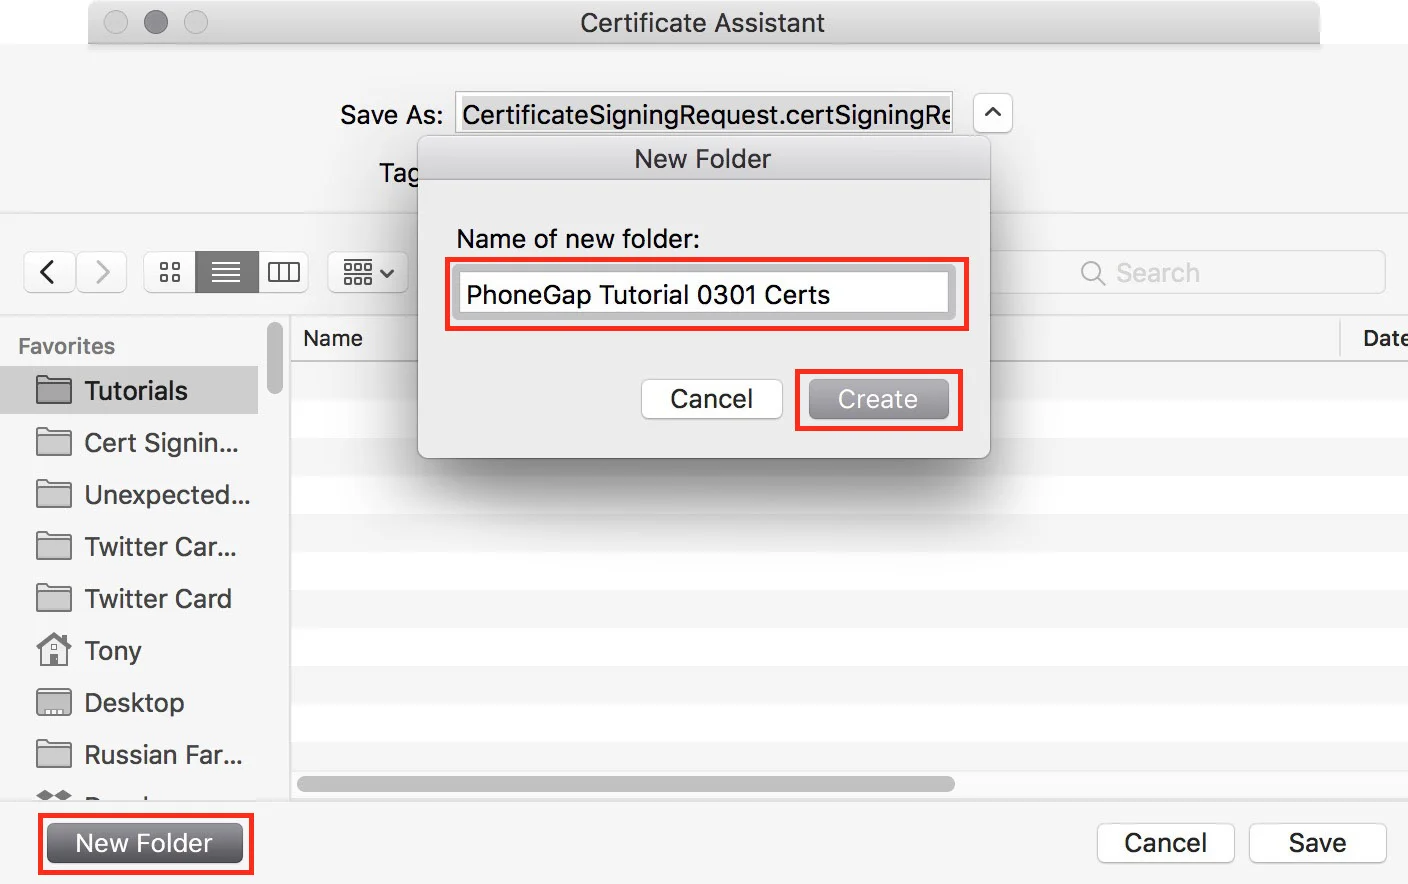
5. Create a New Folder in which to save the certificate, in this example I'm going to create a new folder called PhoneGap Tutorial 0301 Certs and select 'Create' (figure #12)
figure #12: Create a new folder to hold your certificates
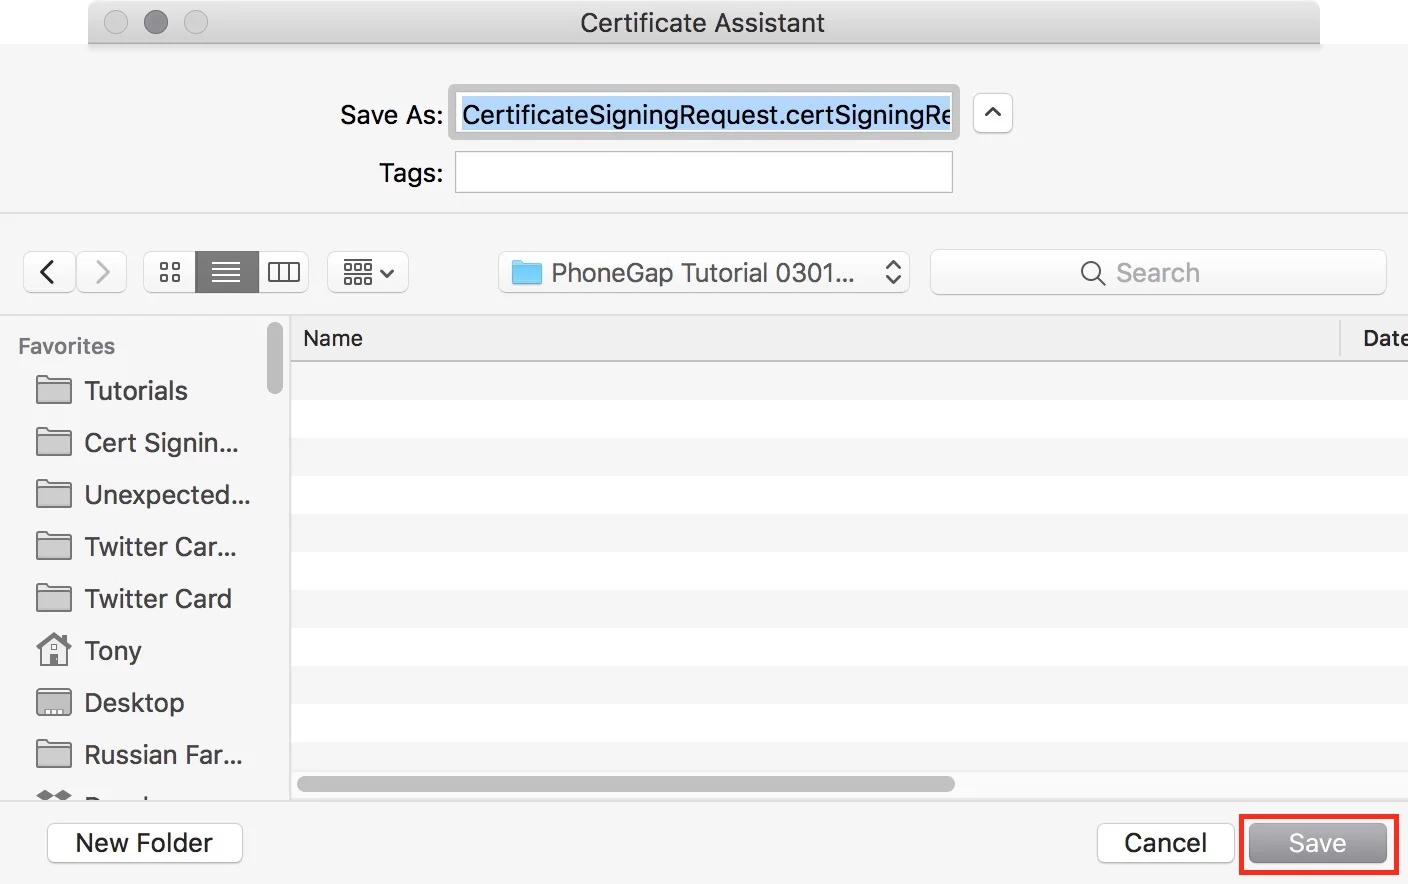
6. With the new folder open select 'Save' (figure #13)
figure #13: Save the certificate to the new folder
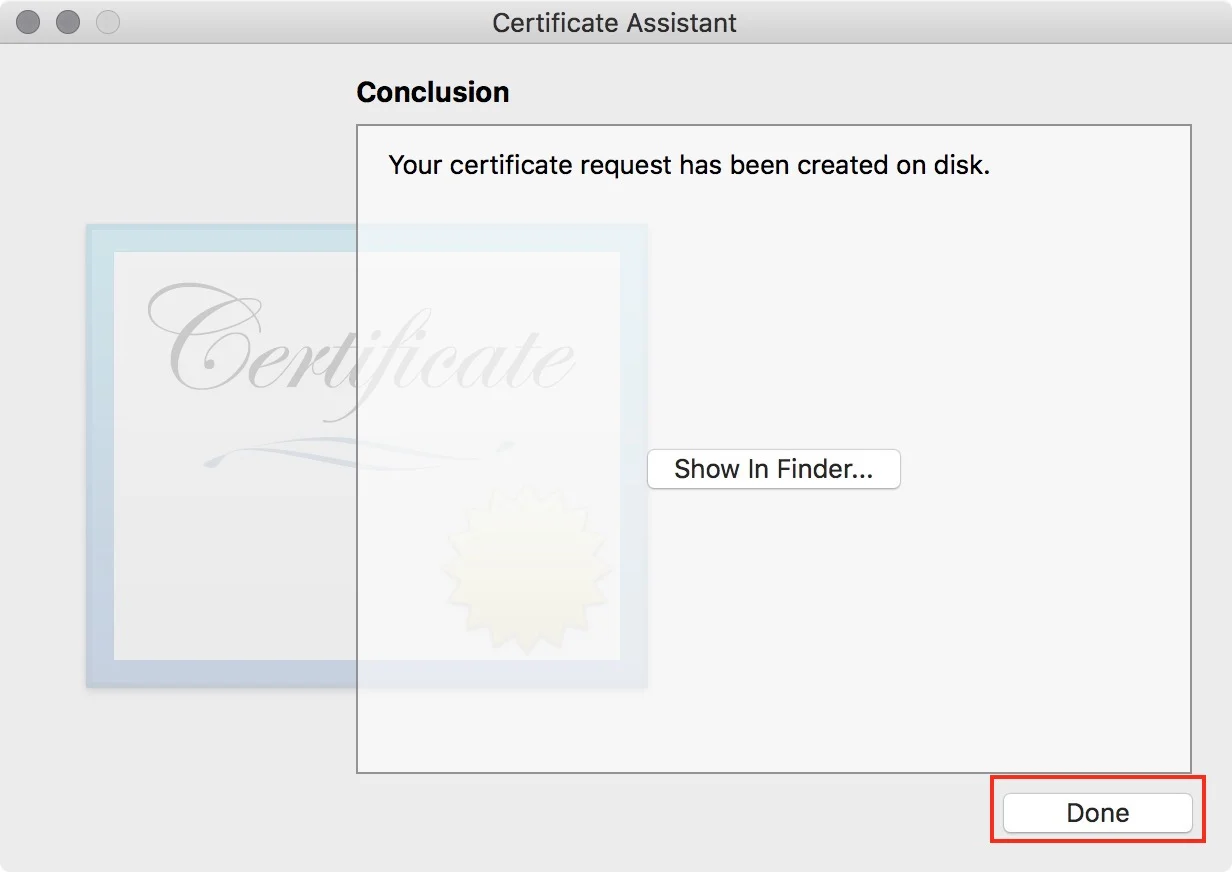
7. Once the Certificate has been saved. Select the 'Done' button (figure #14)
figure #14: After saving your certificate select 'Done'
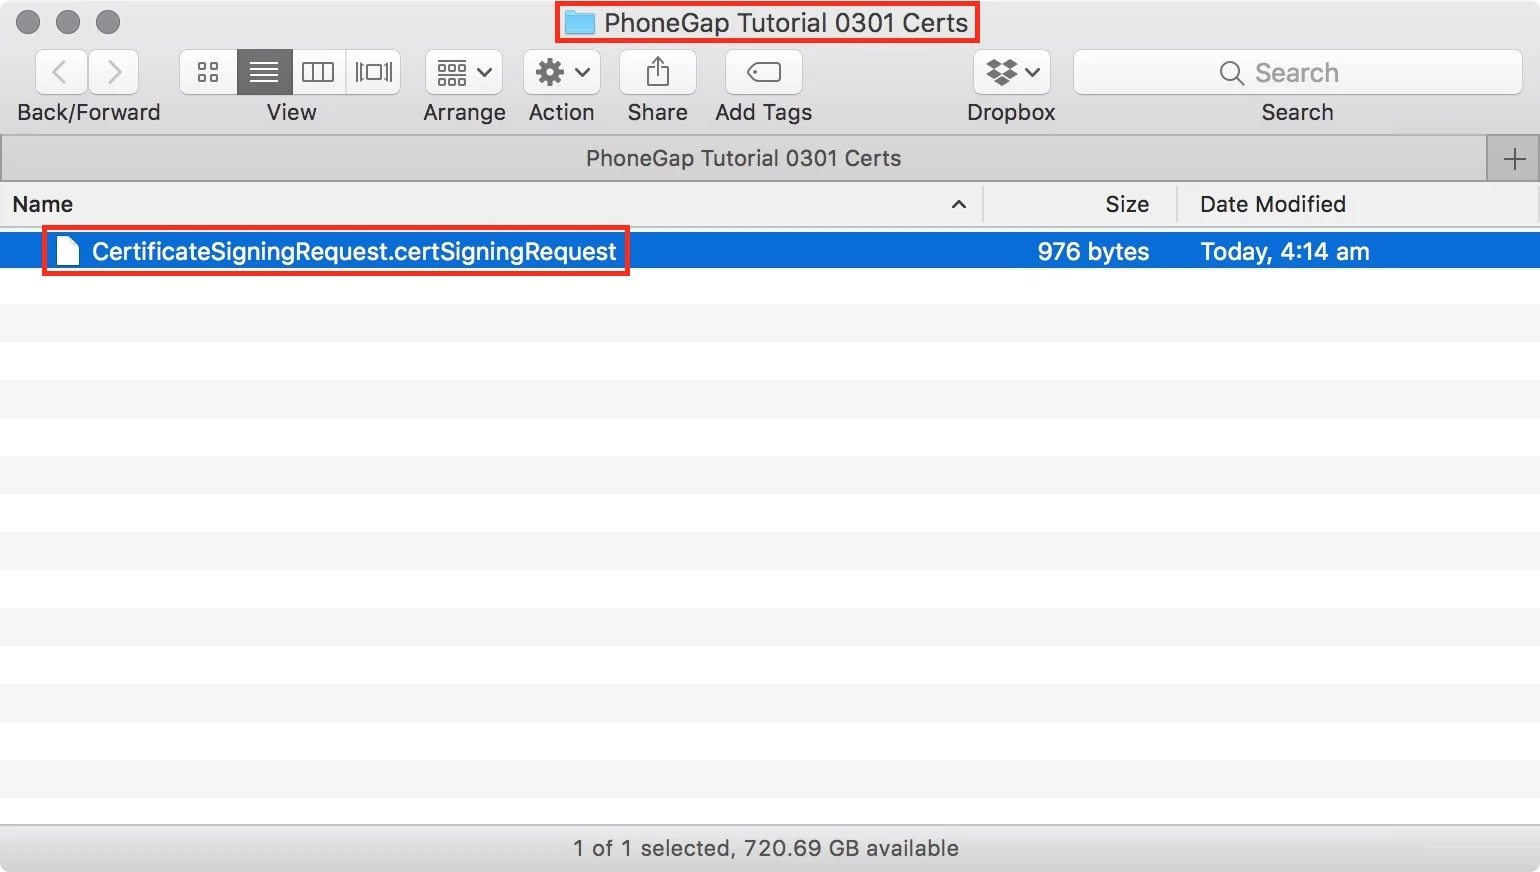
8. With our CSR request file saved it's time to head back to Safari (figure #15)
figure #15: CSR request file saved into your assets folder
Creating the iOS Development Certificate
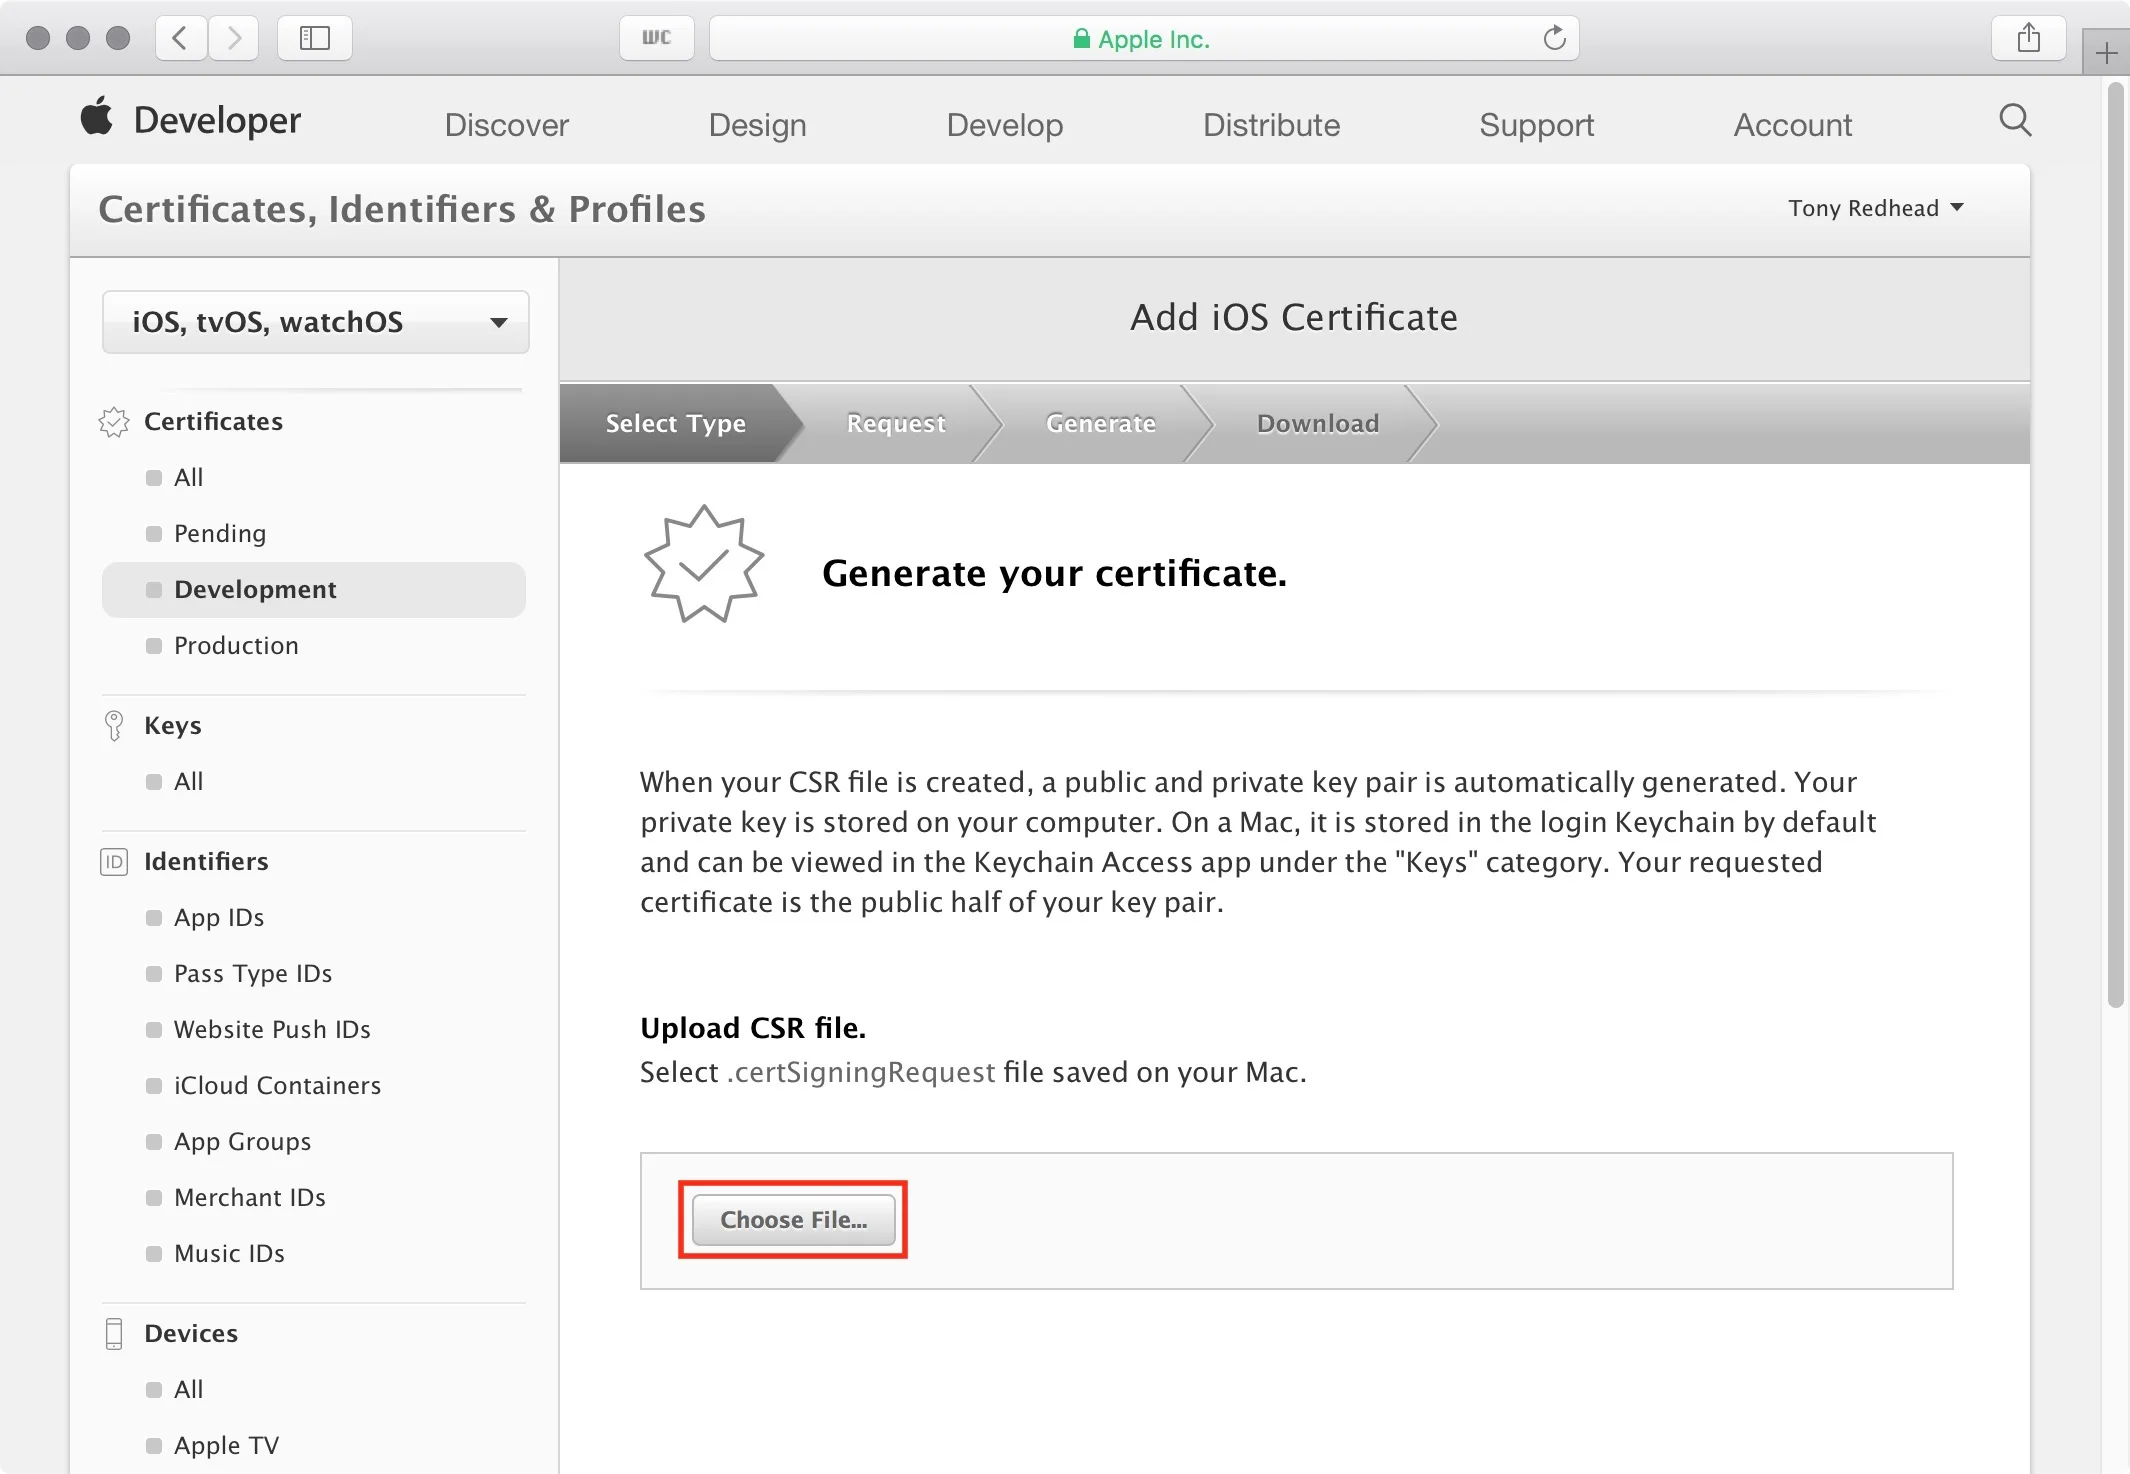
1. Return to Safari and to the last page we had open, the Add iOS Certificate page . To upload the CSR request file we just generated, click on the 'Choose File...' button (figure #16)
figure #16: Uploading our CSR file
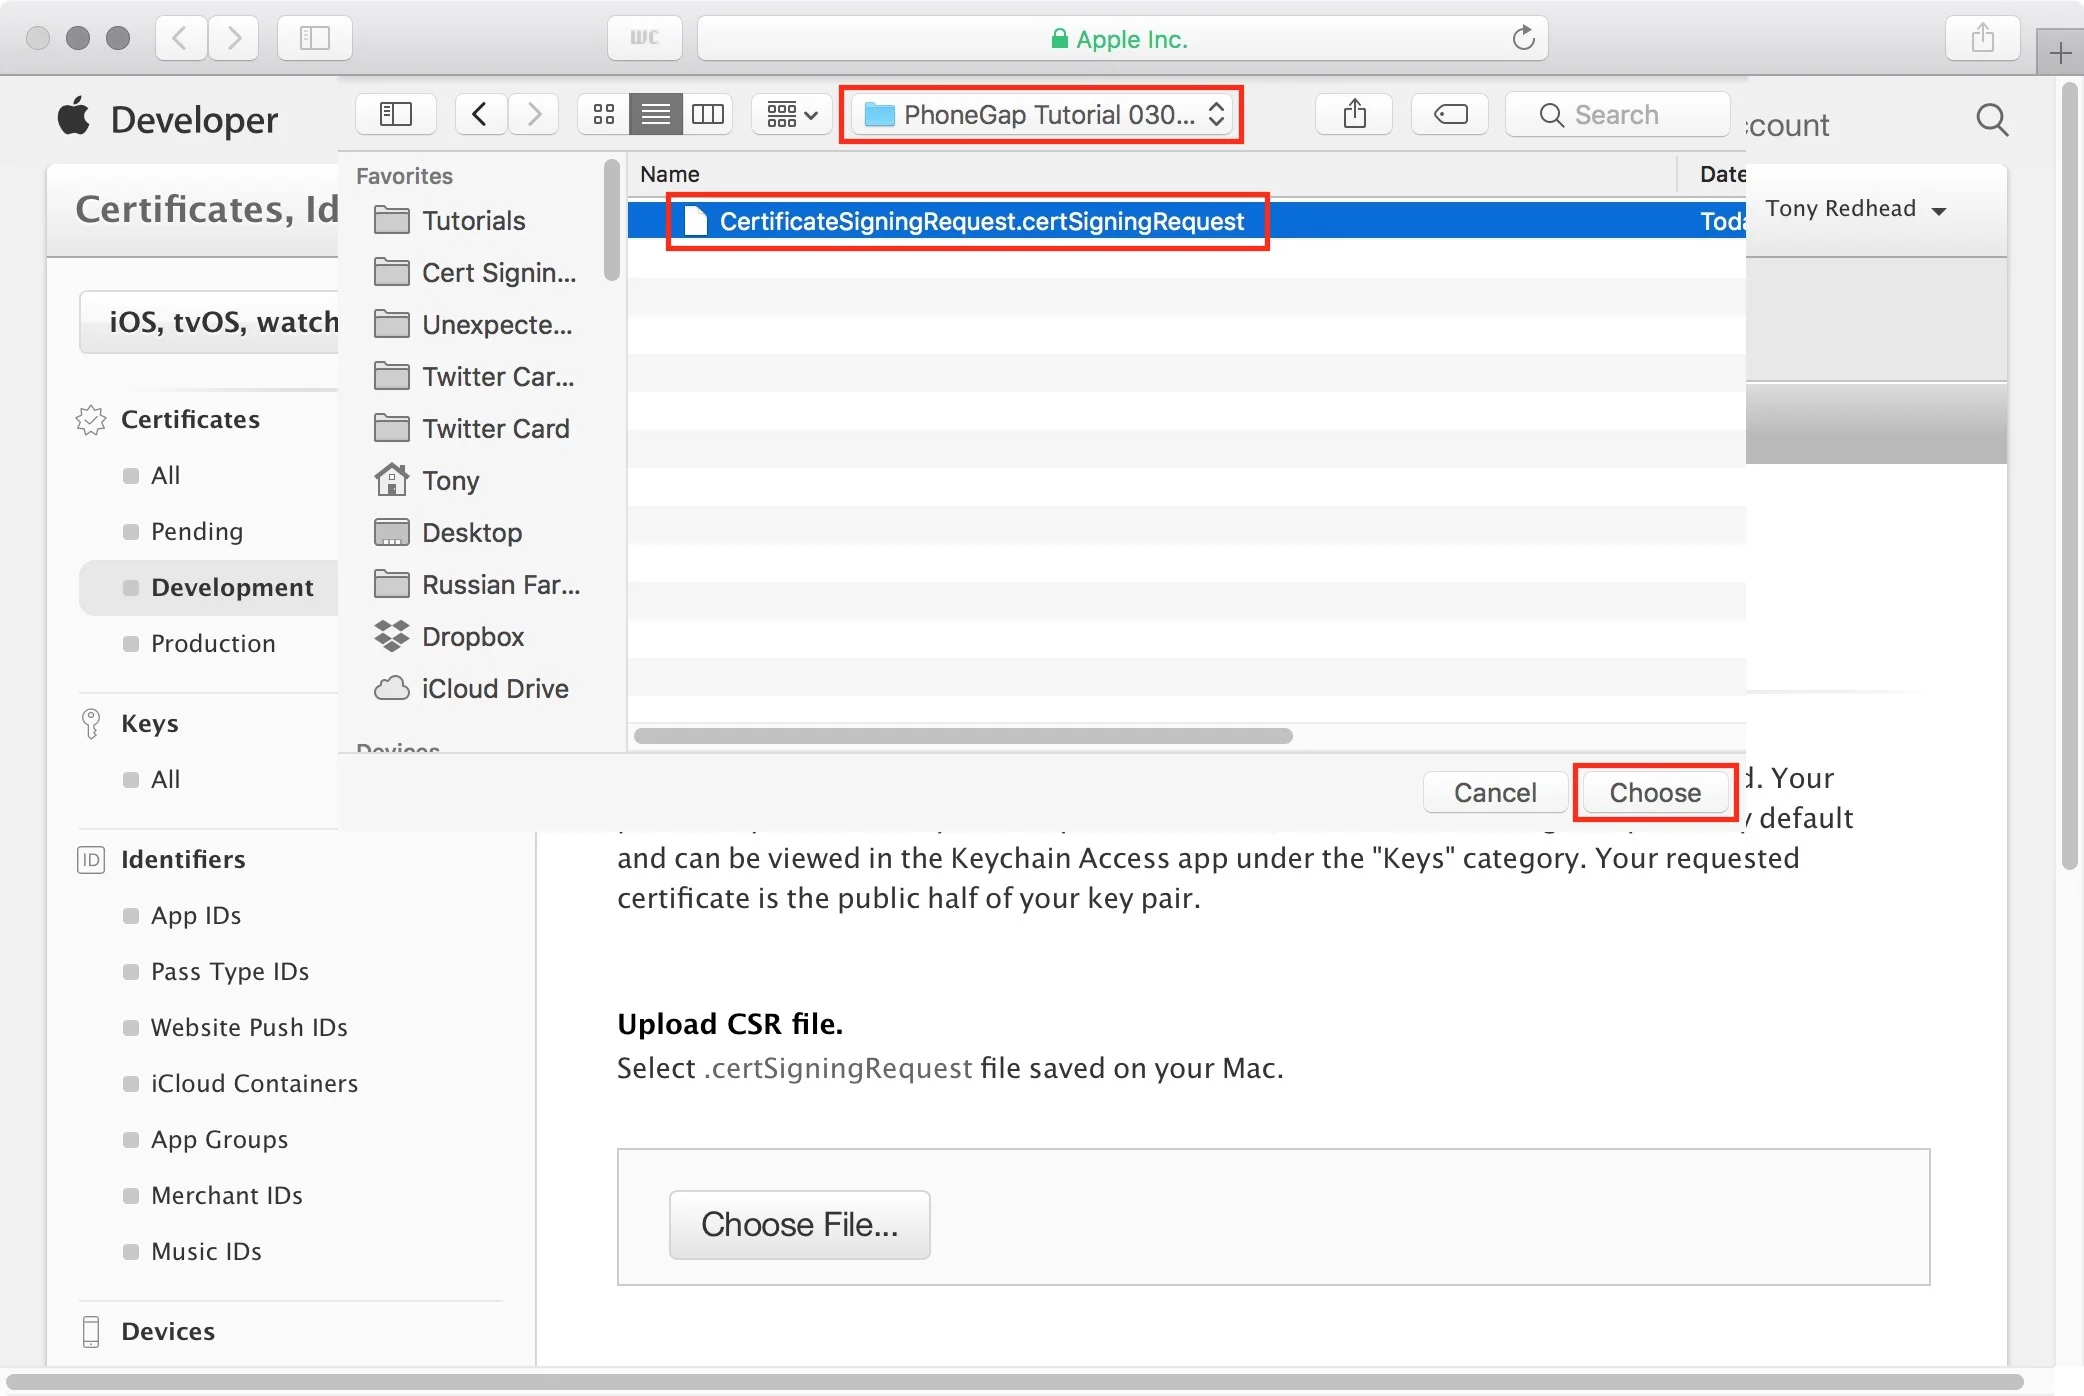
2. Navigate to your Assets folder from the dropdown menu, select your 'CSR request' file and click on the 'Choose' button to select it (figure #17)
figure #17: Choosing your CSR file
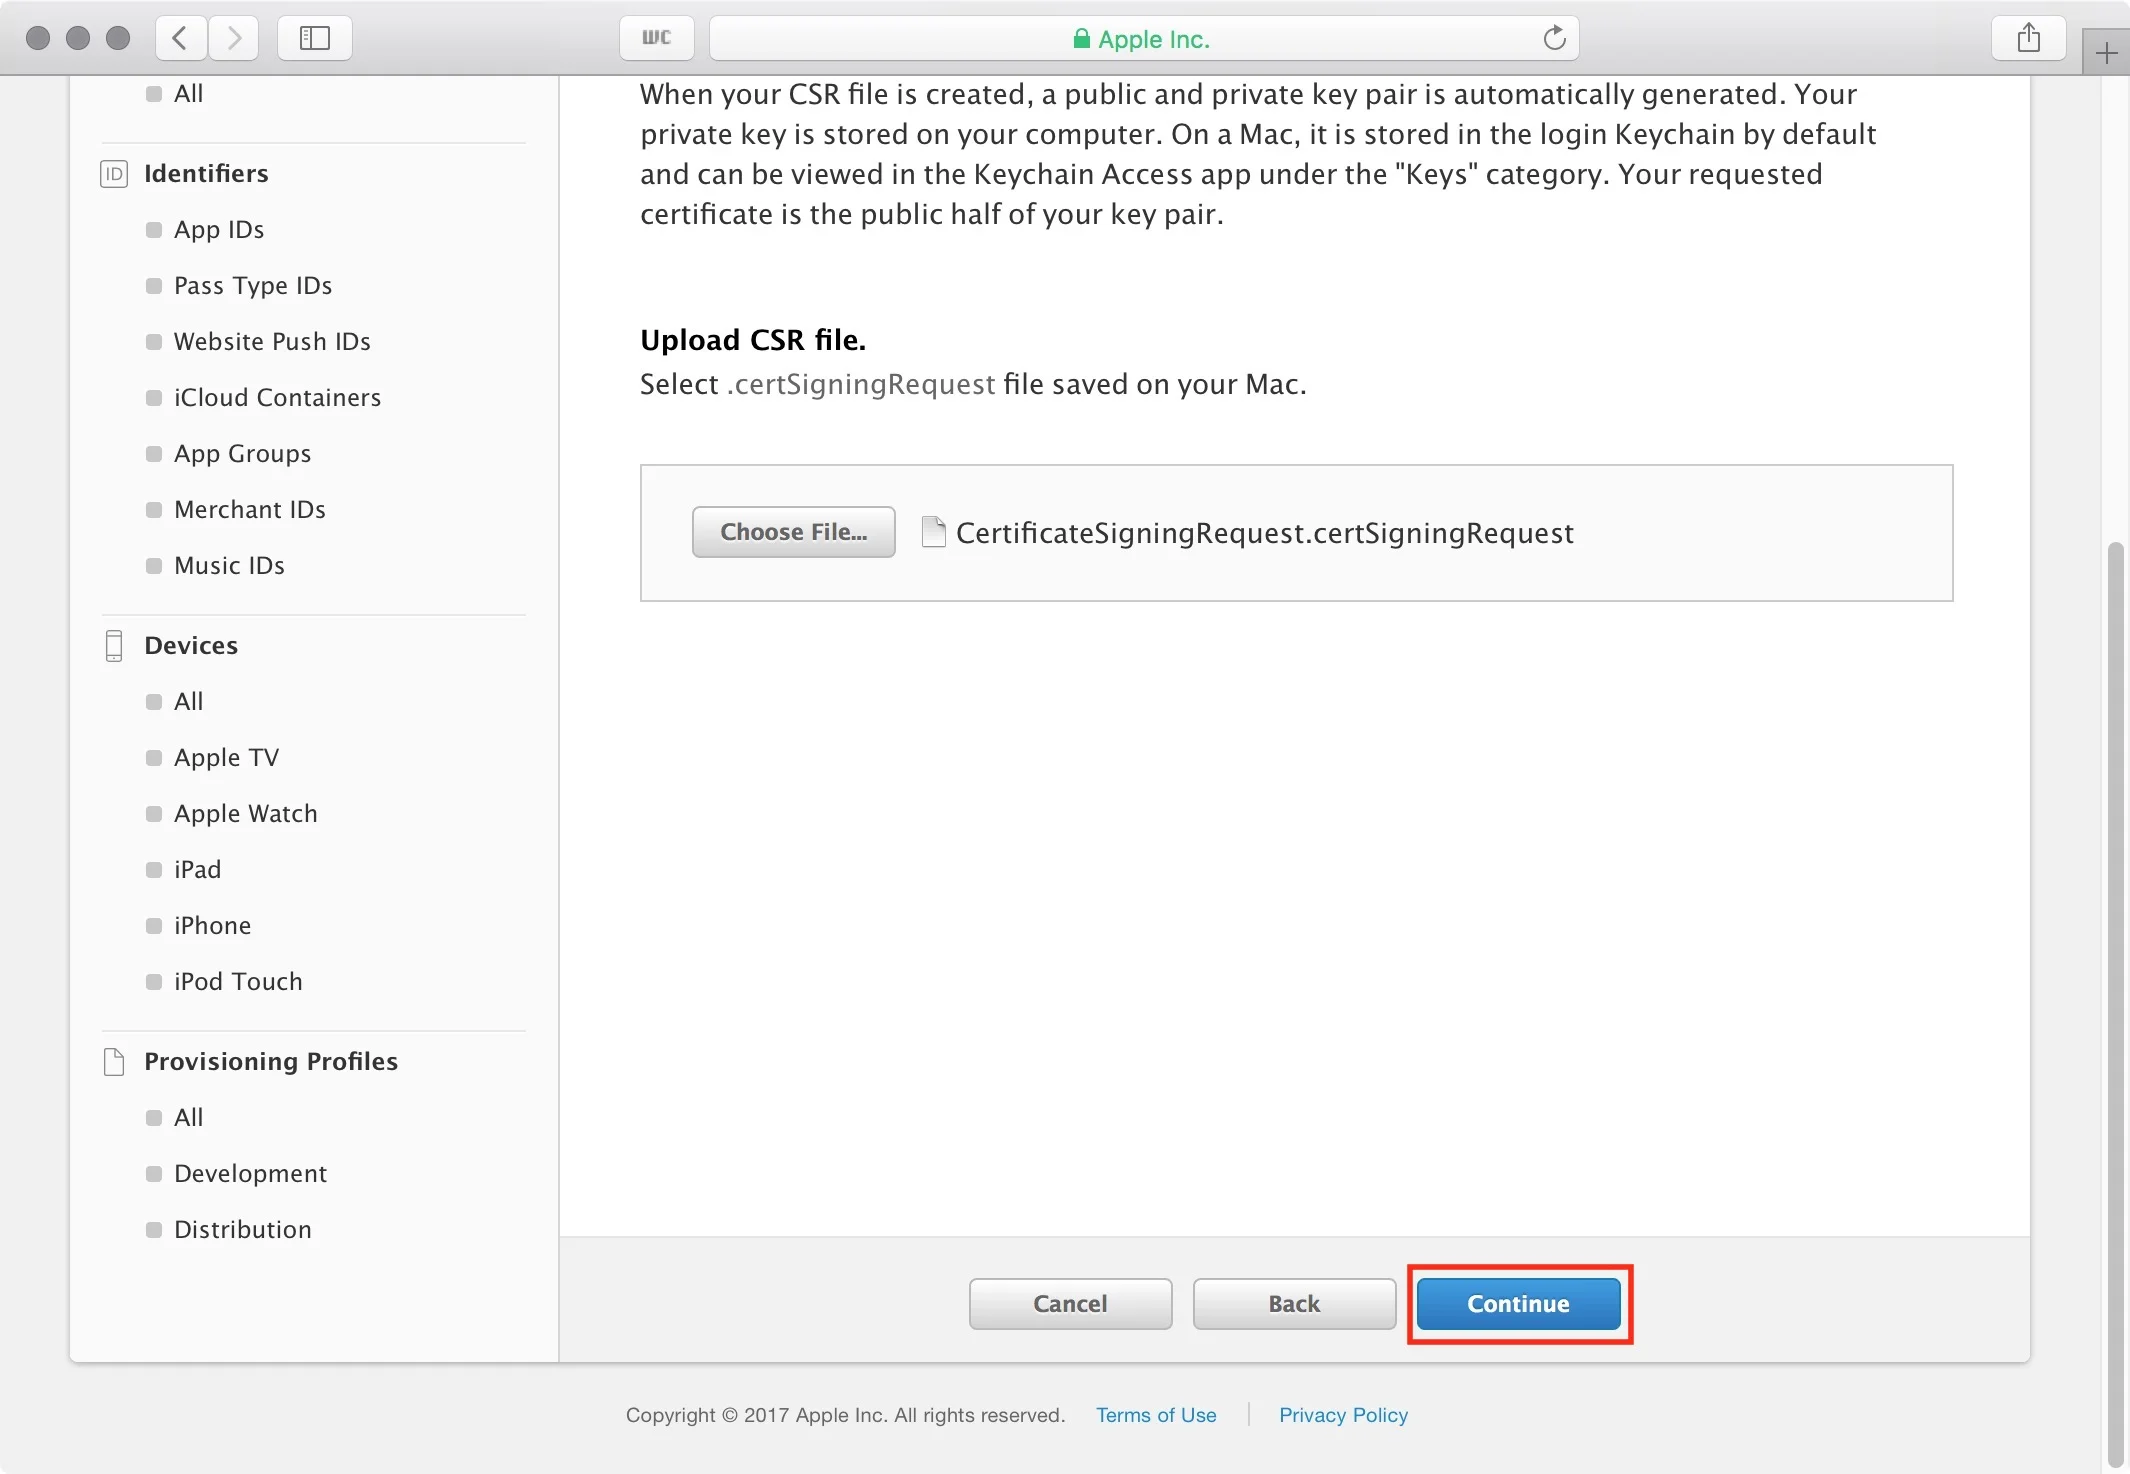
3. The file name will appear next to the 'Choose File...' button. To finish the upload, scroll down the page and click on the 'Continue' button (figure #18)
figure #18: Select Continue to upload the file
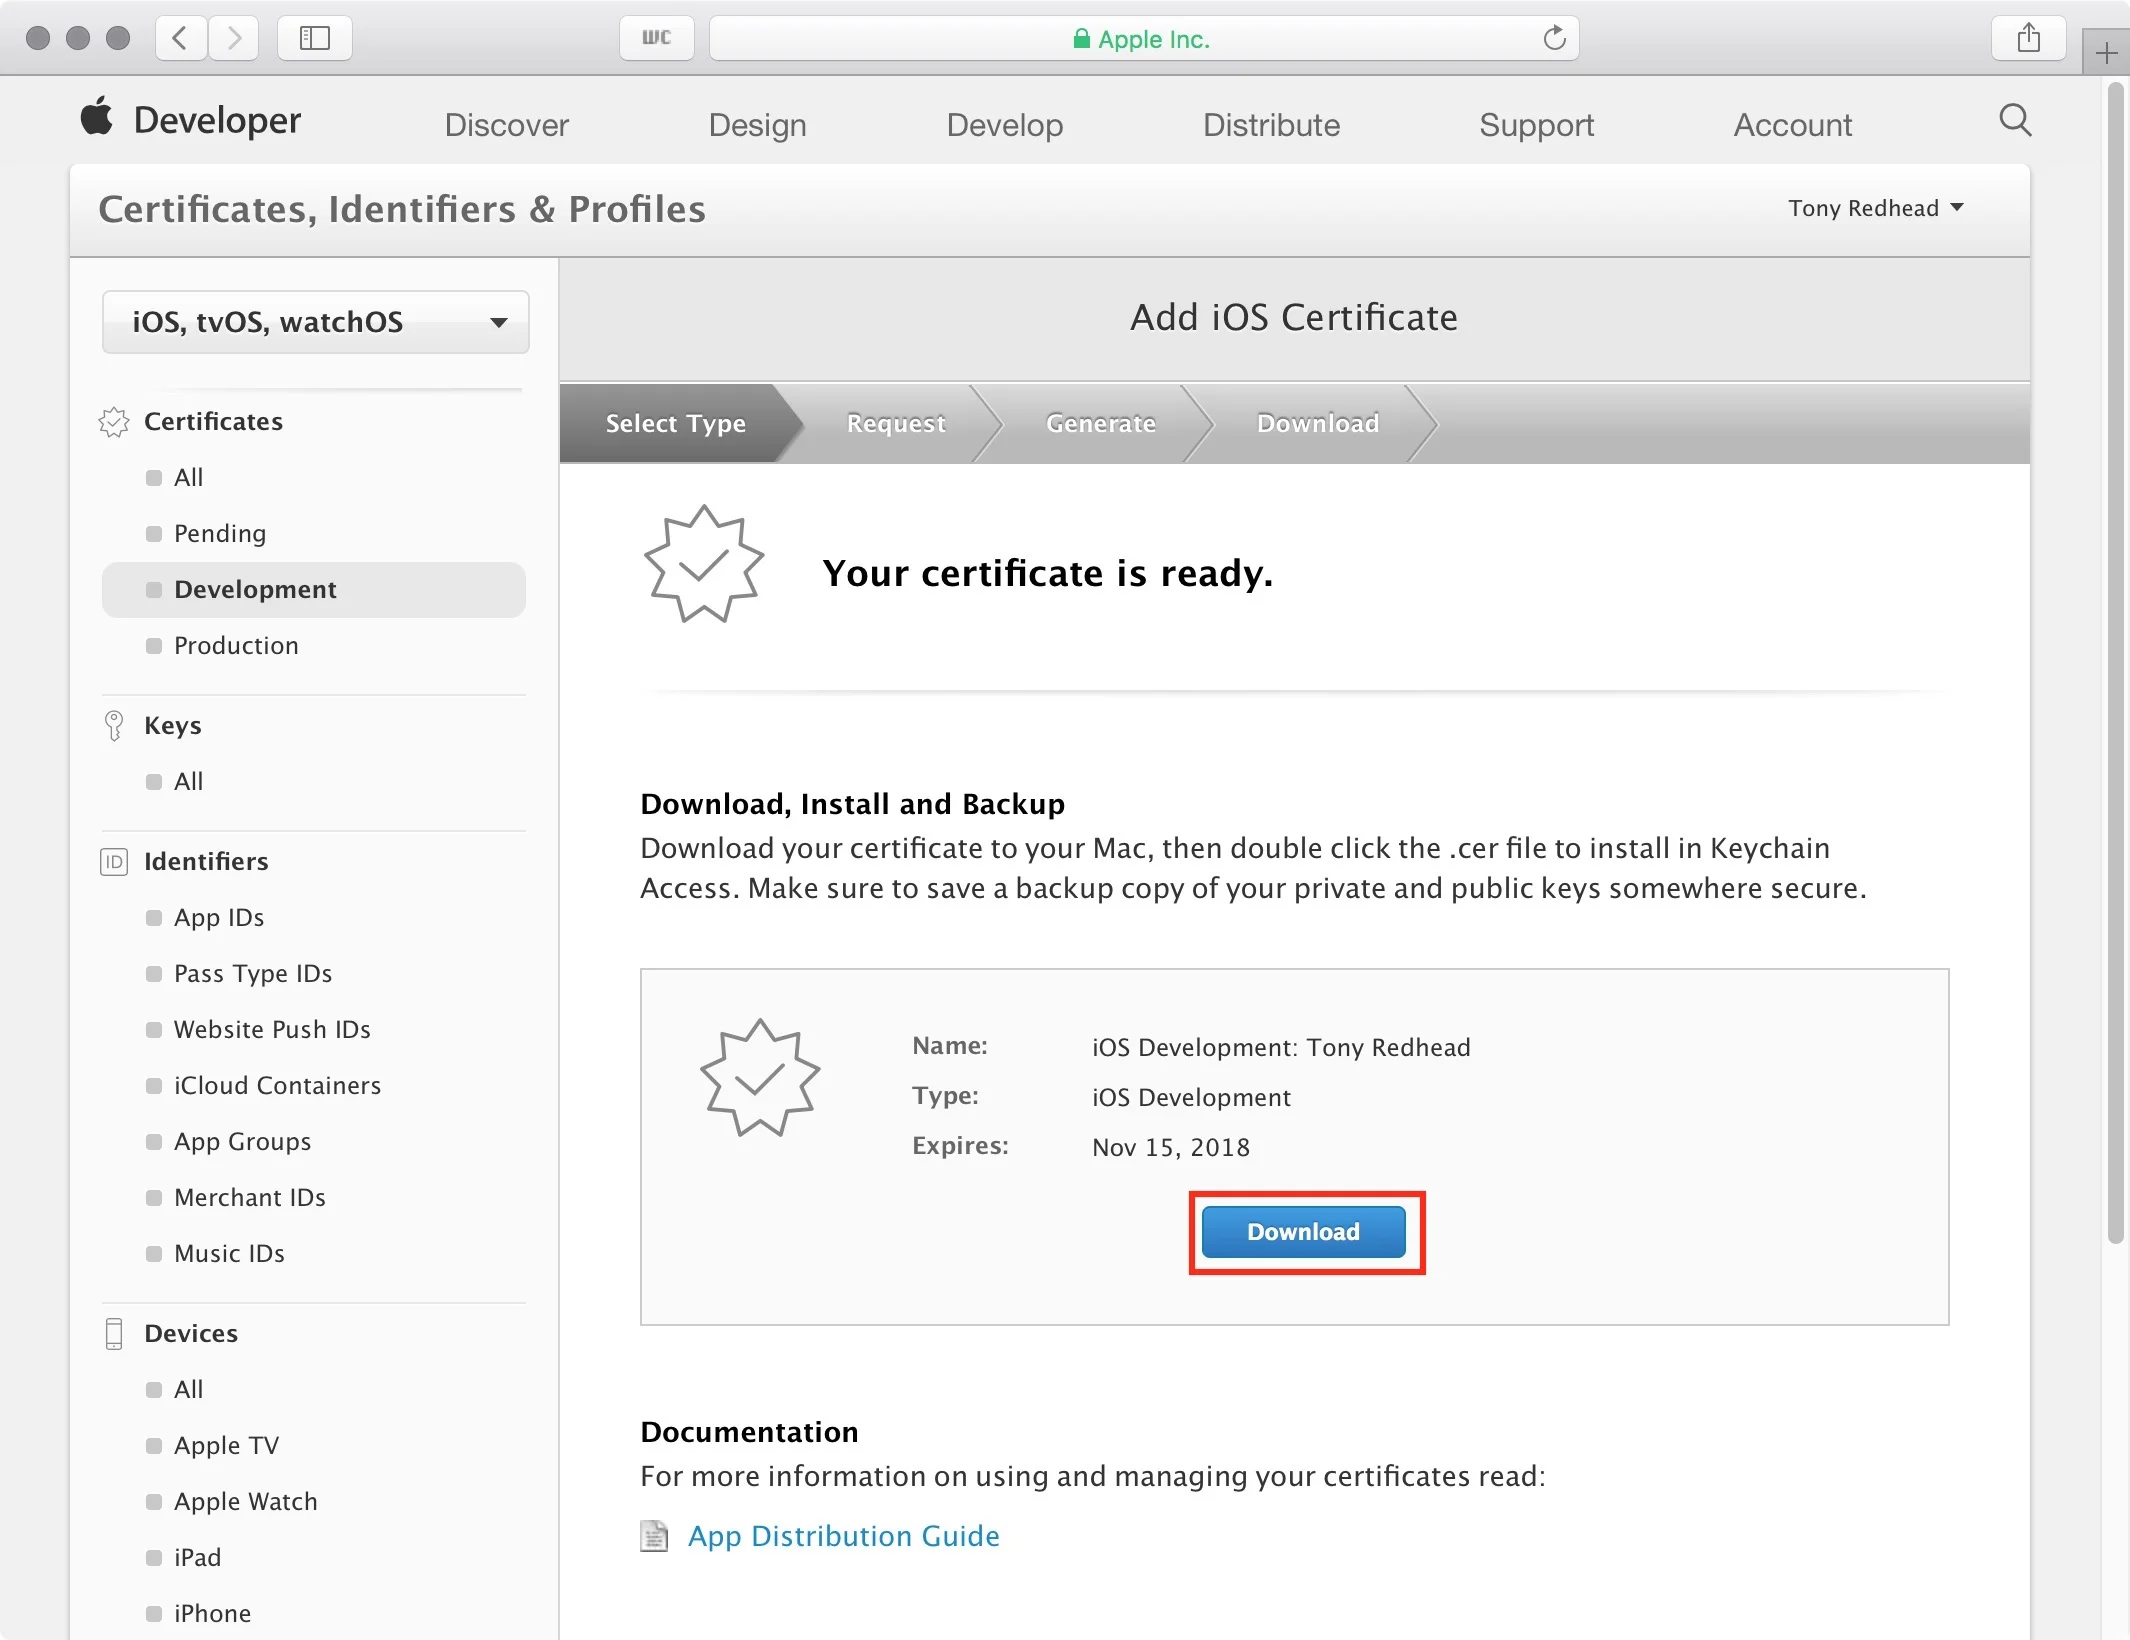
4. Now that we have uploaded the CSR request file to the Developer Portal, the actual CSR Certificate has been generated and is now ready to be downloaded. Go ahead and download this file by clicking on 'Download' (figure #19)
figure #19: Download CSR to desktop
5. The certificate that we just downloaded needs to be installed back into our Keychain. So let's go ahead and minimize Safari here.
Note: don't close Safari as we will be returning to this page shortly.
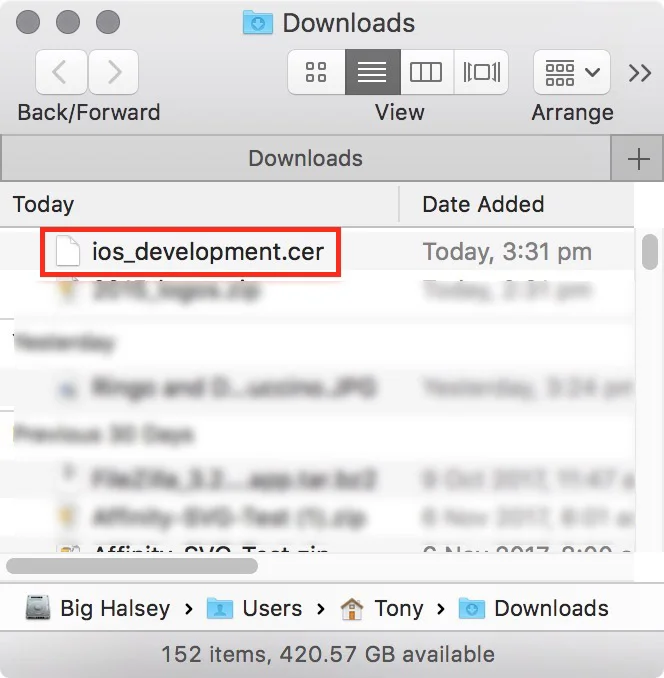
6. On the desktop you can find the certificate, ios_development.cer, in the "Downloads" folder (figure #20)
figure #20: Downloads folder
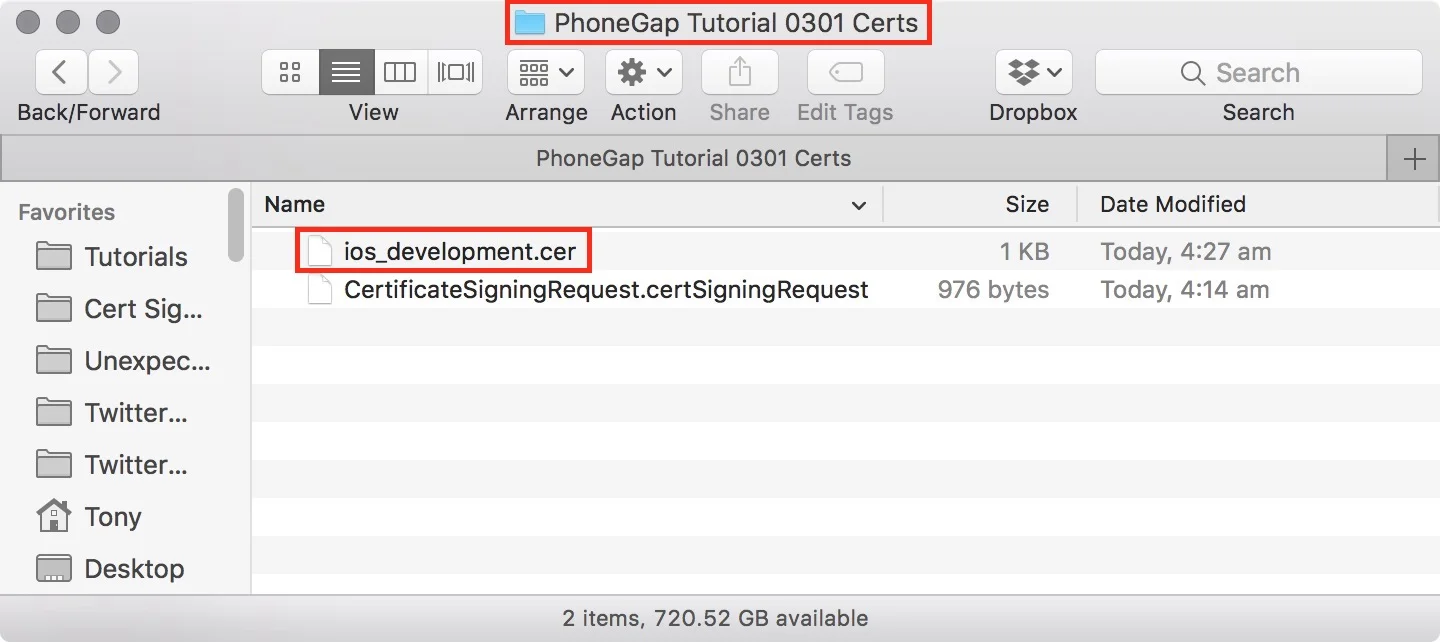
7. Move it to the same folder that you saved the CSR file into. In my example I will have both files in the Phonegap Tutorial 0301 Assets folder (figure #21)
figure #21: The iOS Development certification copied into the assets folder
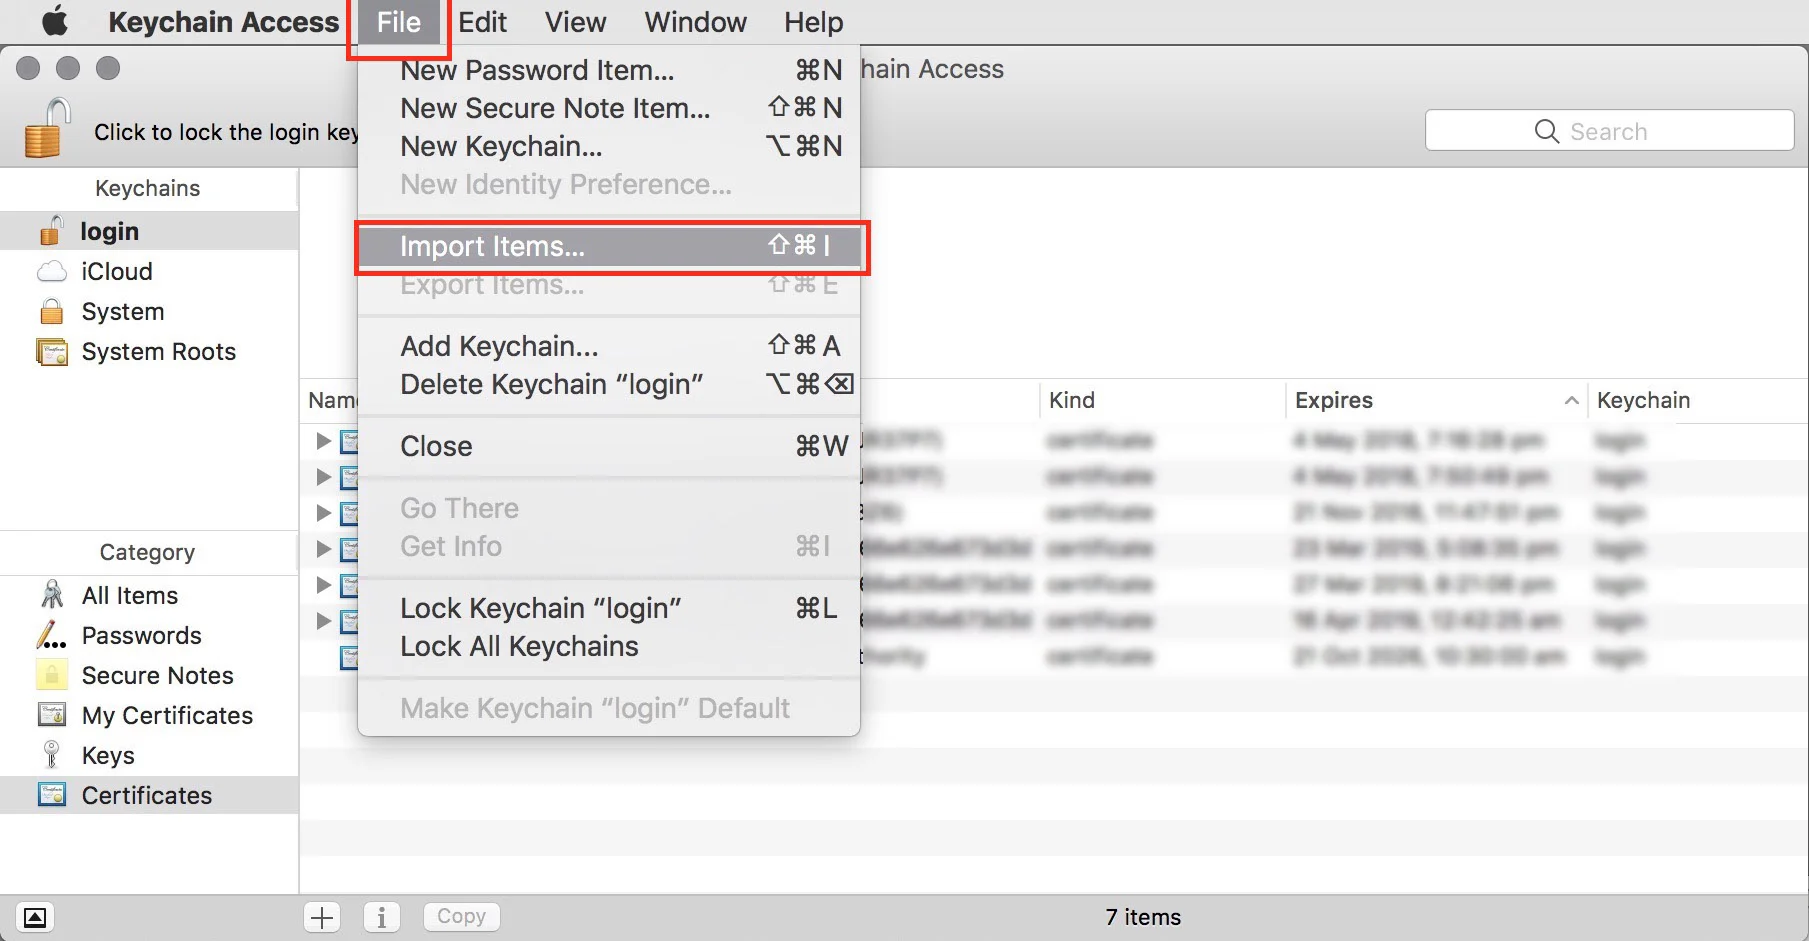
8. The next step is to import the ios.development.cer file into Keychain Access. If it's not already open, open Keychain Access. In Keychain Access, select Menu/File/Import Items (figure #22)
figure #22: Import cert to Keychain Access
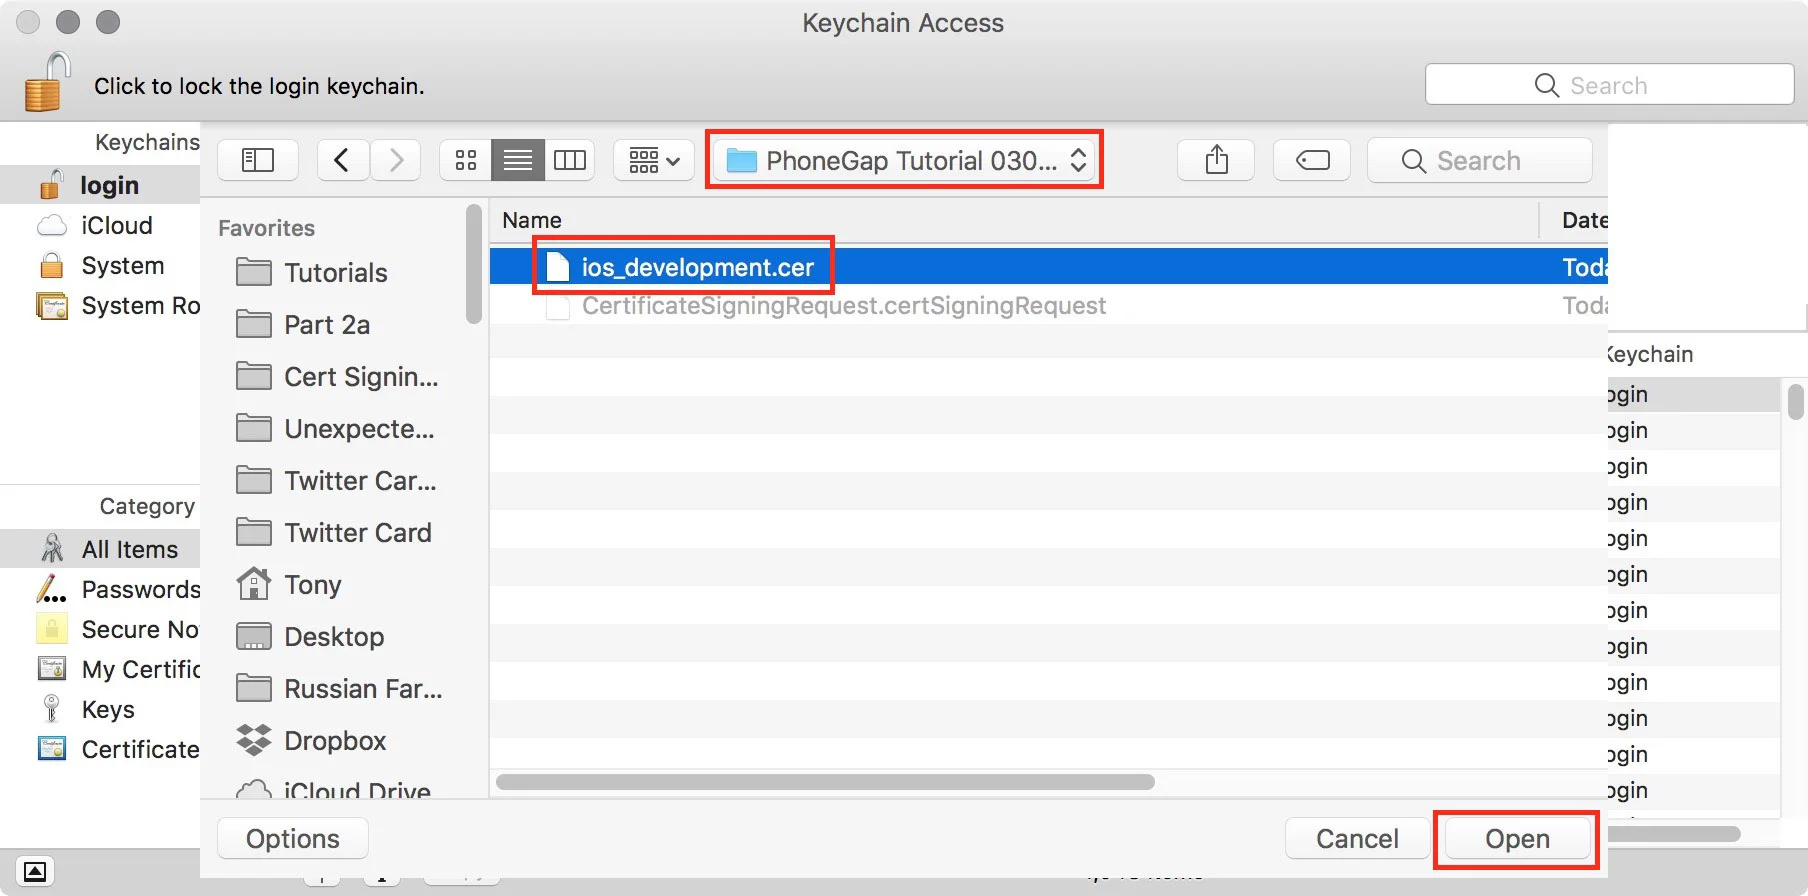
9. Browse to the PhoneGap Tutorial 0301 Assets folder. Select the ios_development.cer file and click on 'Open' to import it to Keychain Access (figure #23)
figure #23: Select the certificate and click on 'Open'
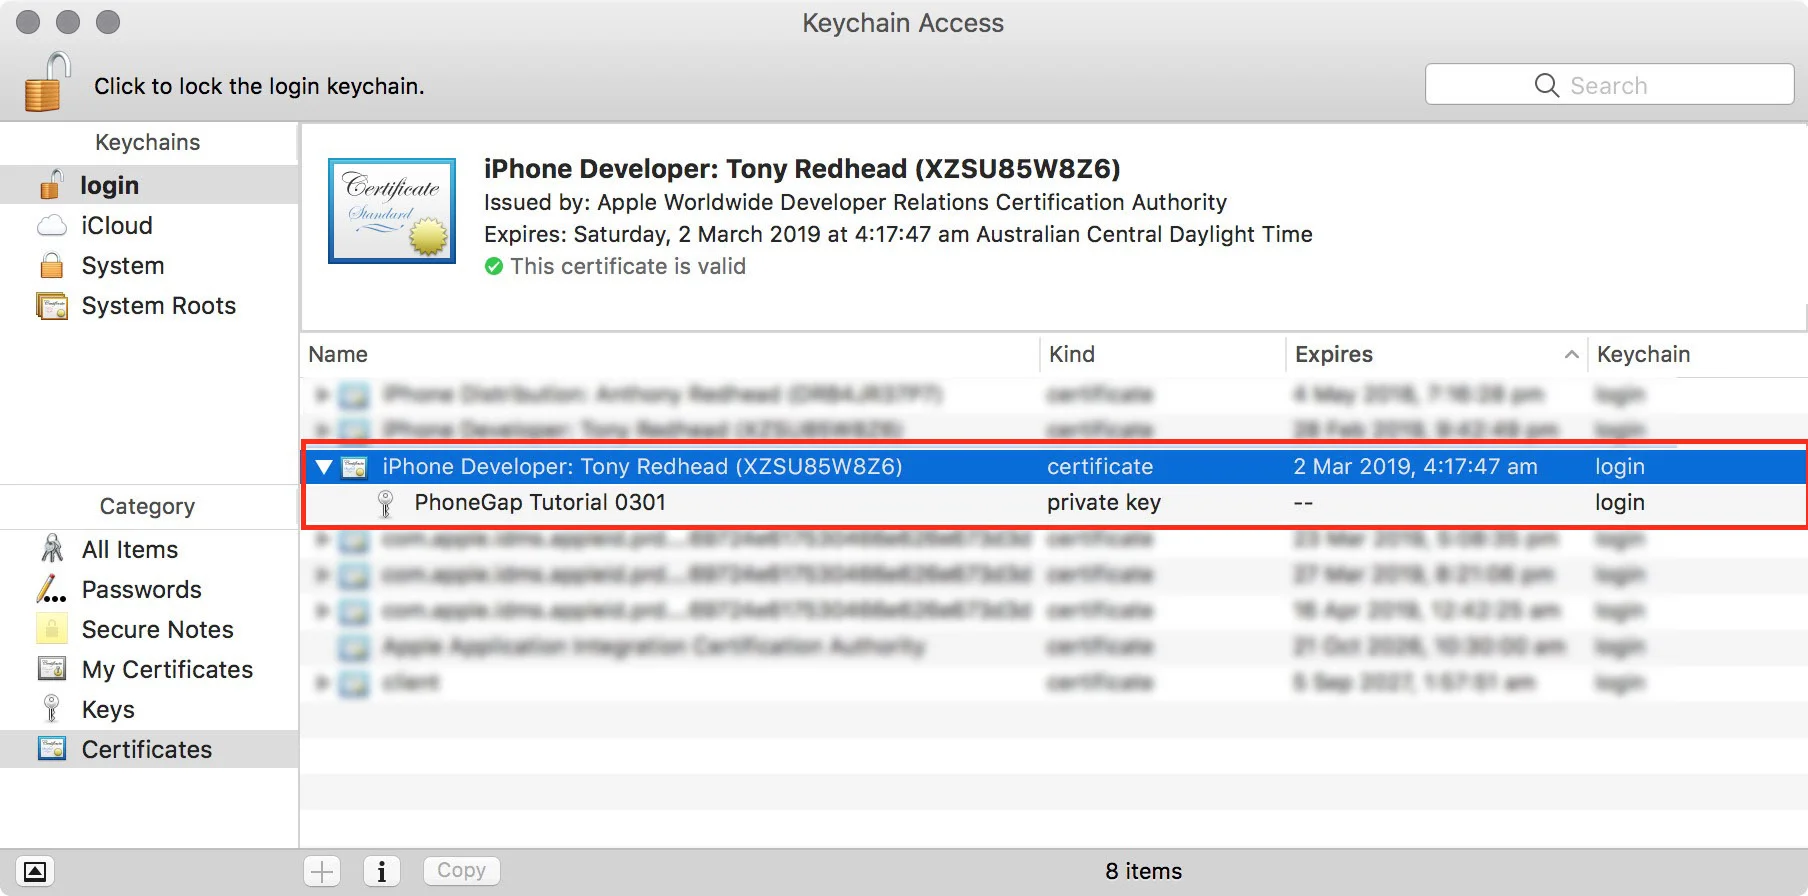
10. The certificate has been imported into Keychain Access and when you select it, information about the certificate is shown in the Upper pane (figure #24)
figure #24: Cert information
Tip: If you are having trouble locating the correct certificate check the expiry date, it will be the one year from the date it was generated.
Please proceed to Part 2b and continue the process of creating your original set of certificates
